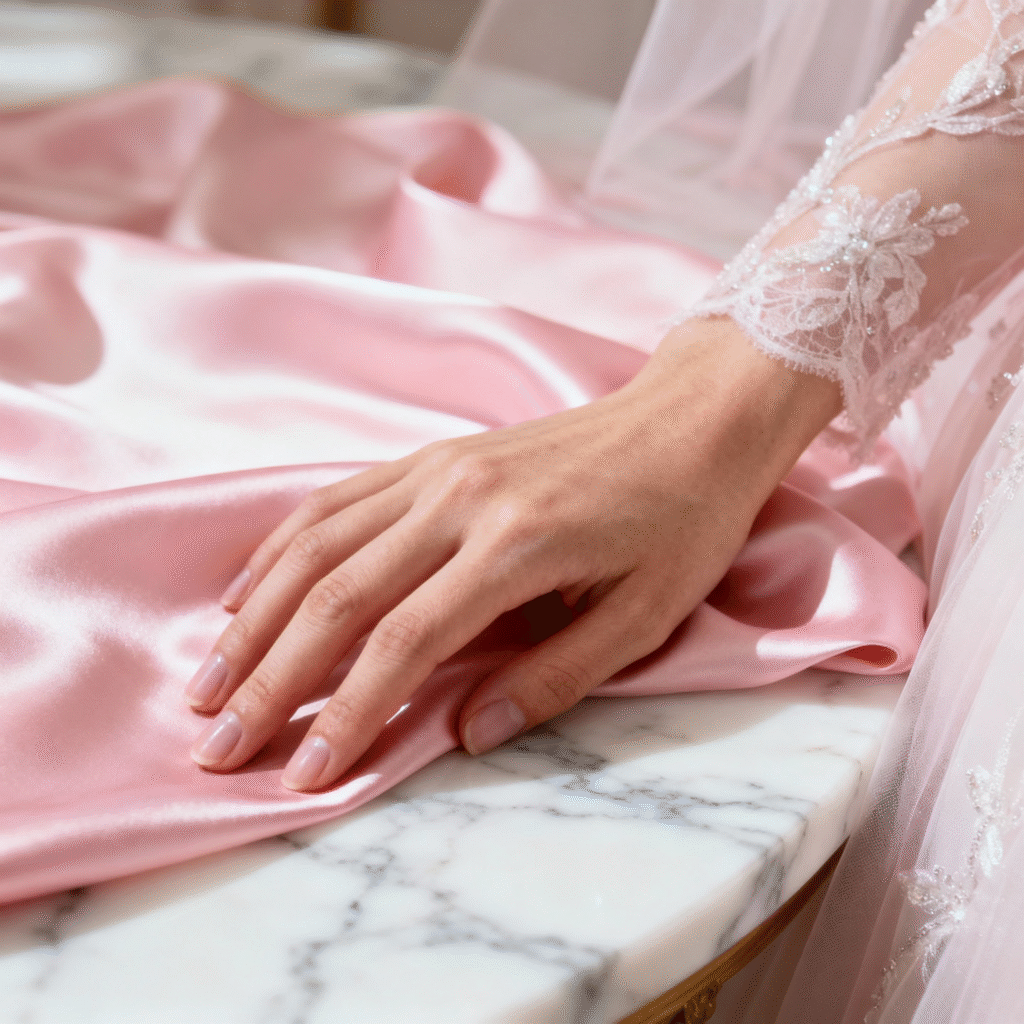
Wedding Nails – 35 Elegant Designs for the Perfect Bridal Look
Wedding nails have become an essential part of bridal beauty trends, offering a perfect finishing touch to your big day. From soft nudes to intricate crystal accents, wedding nail designs are now a statement of elegance and personal style. Discover 35 stunning wedding nail ideas to inspire your unforgettable bridal look.
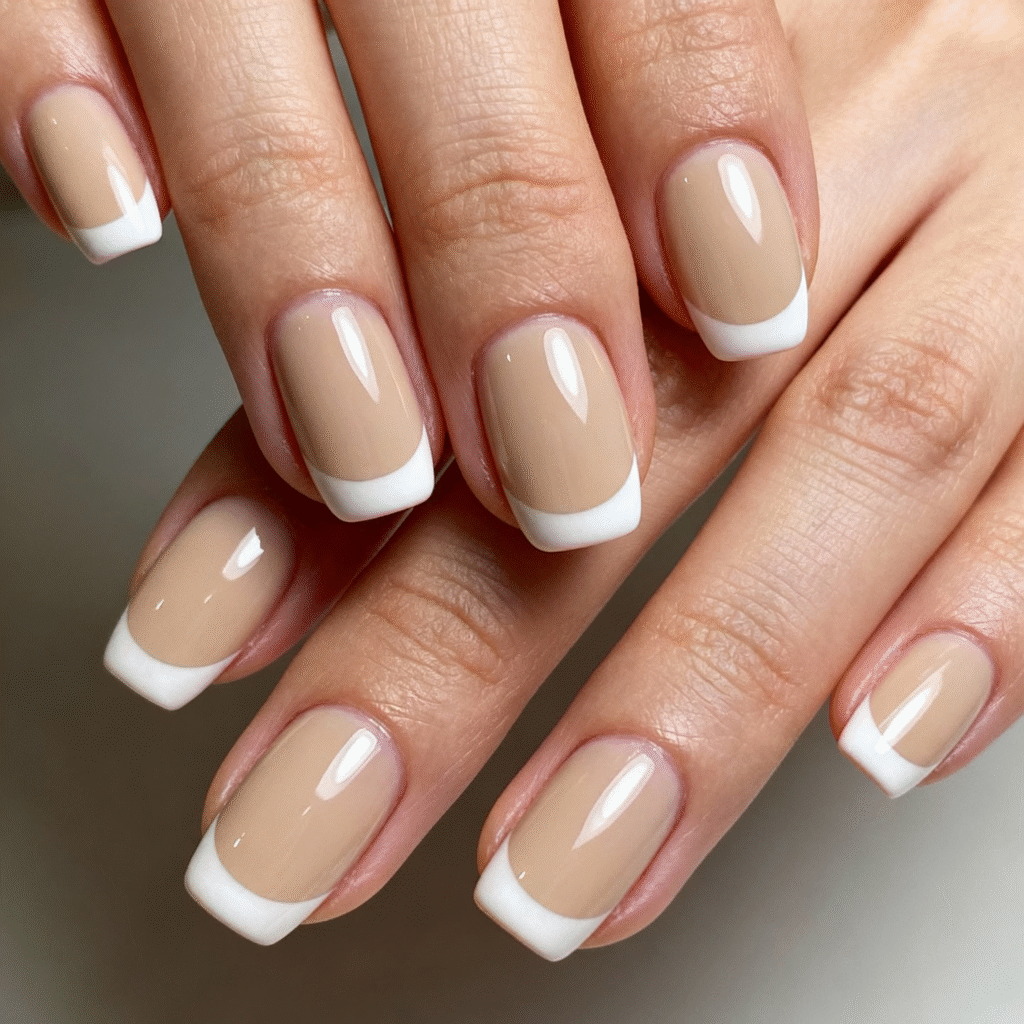
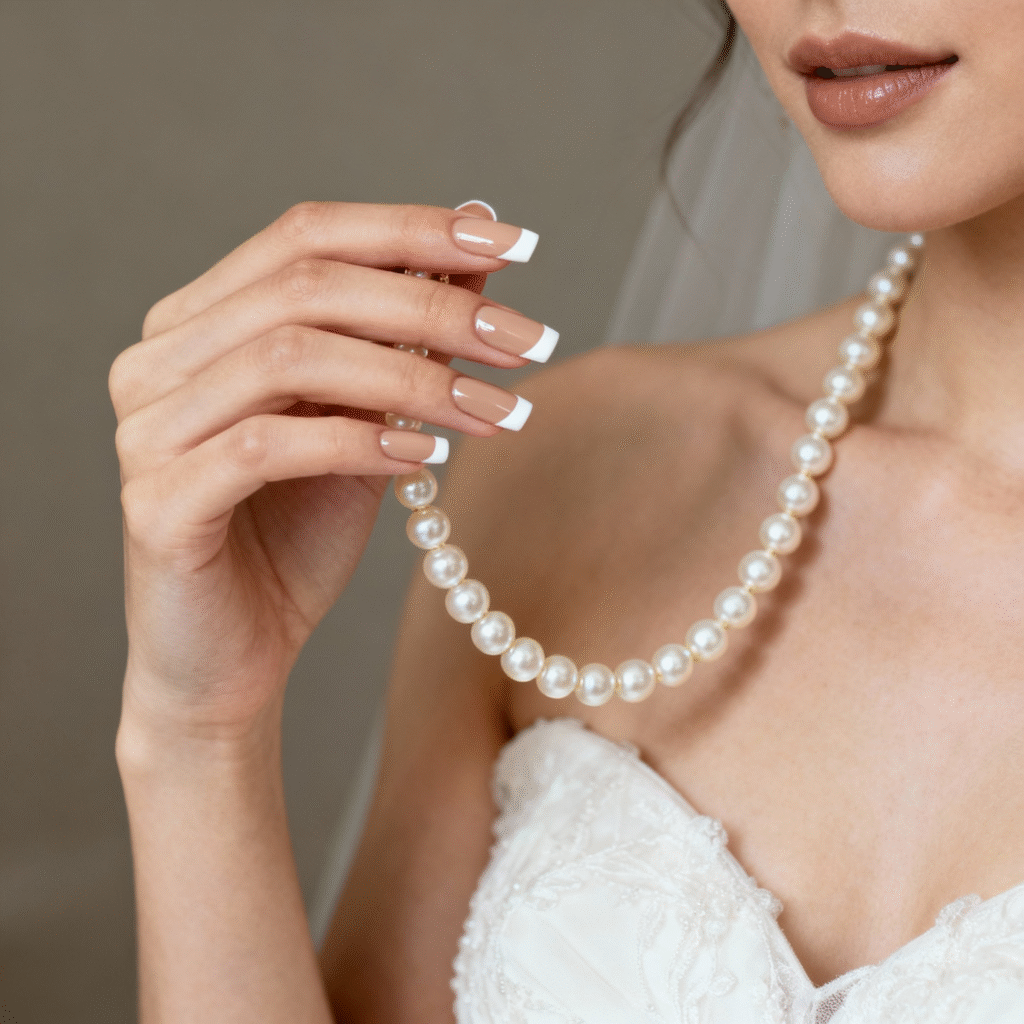
1. Classic French Tip Elegance
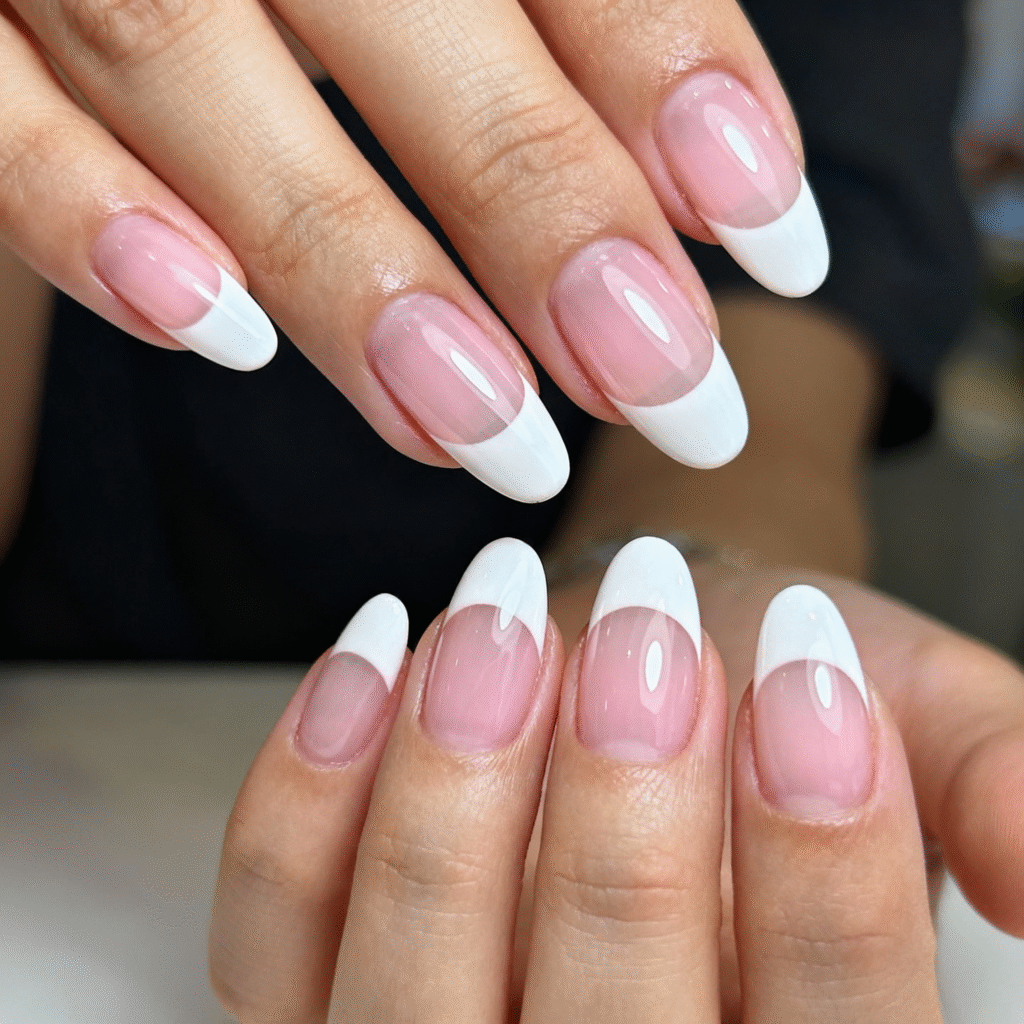
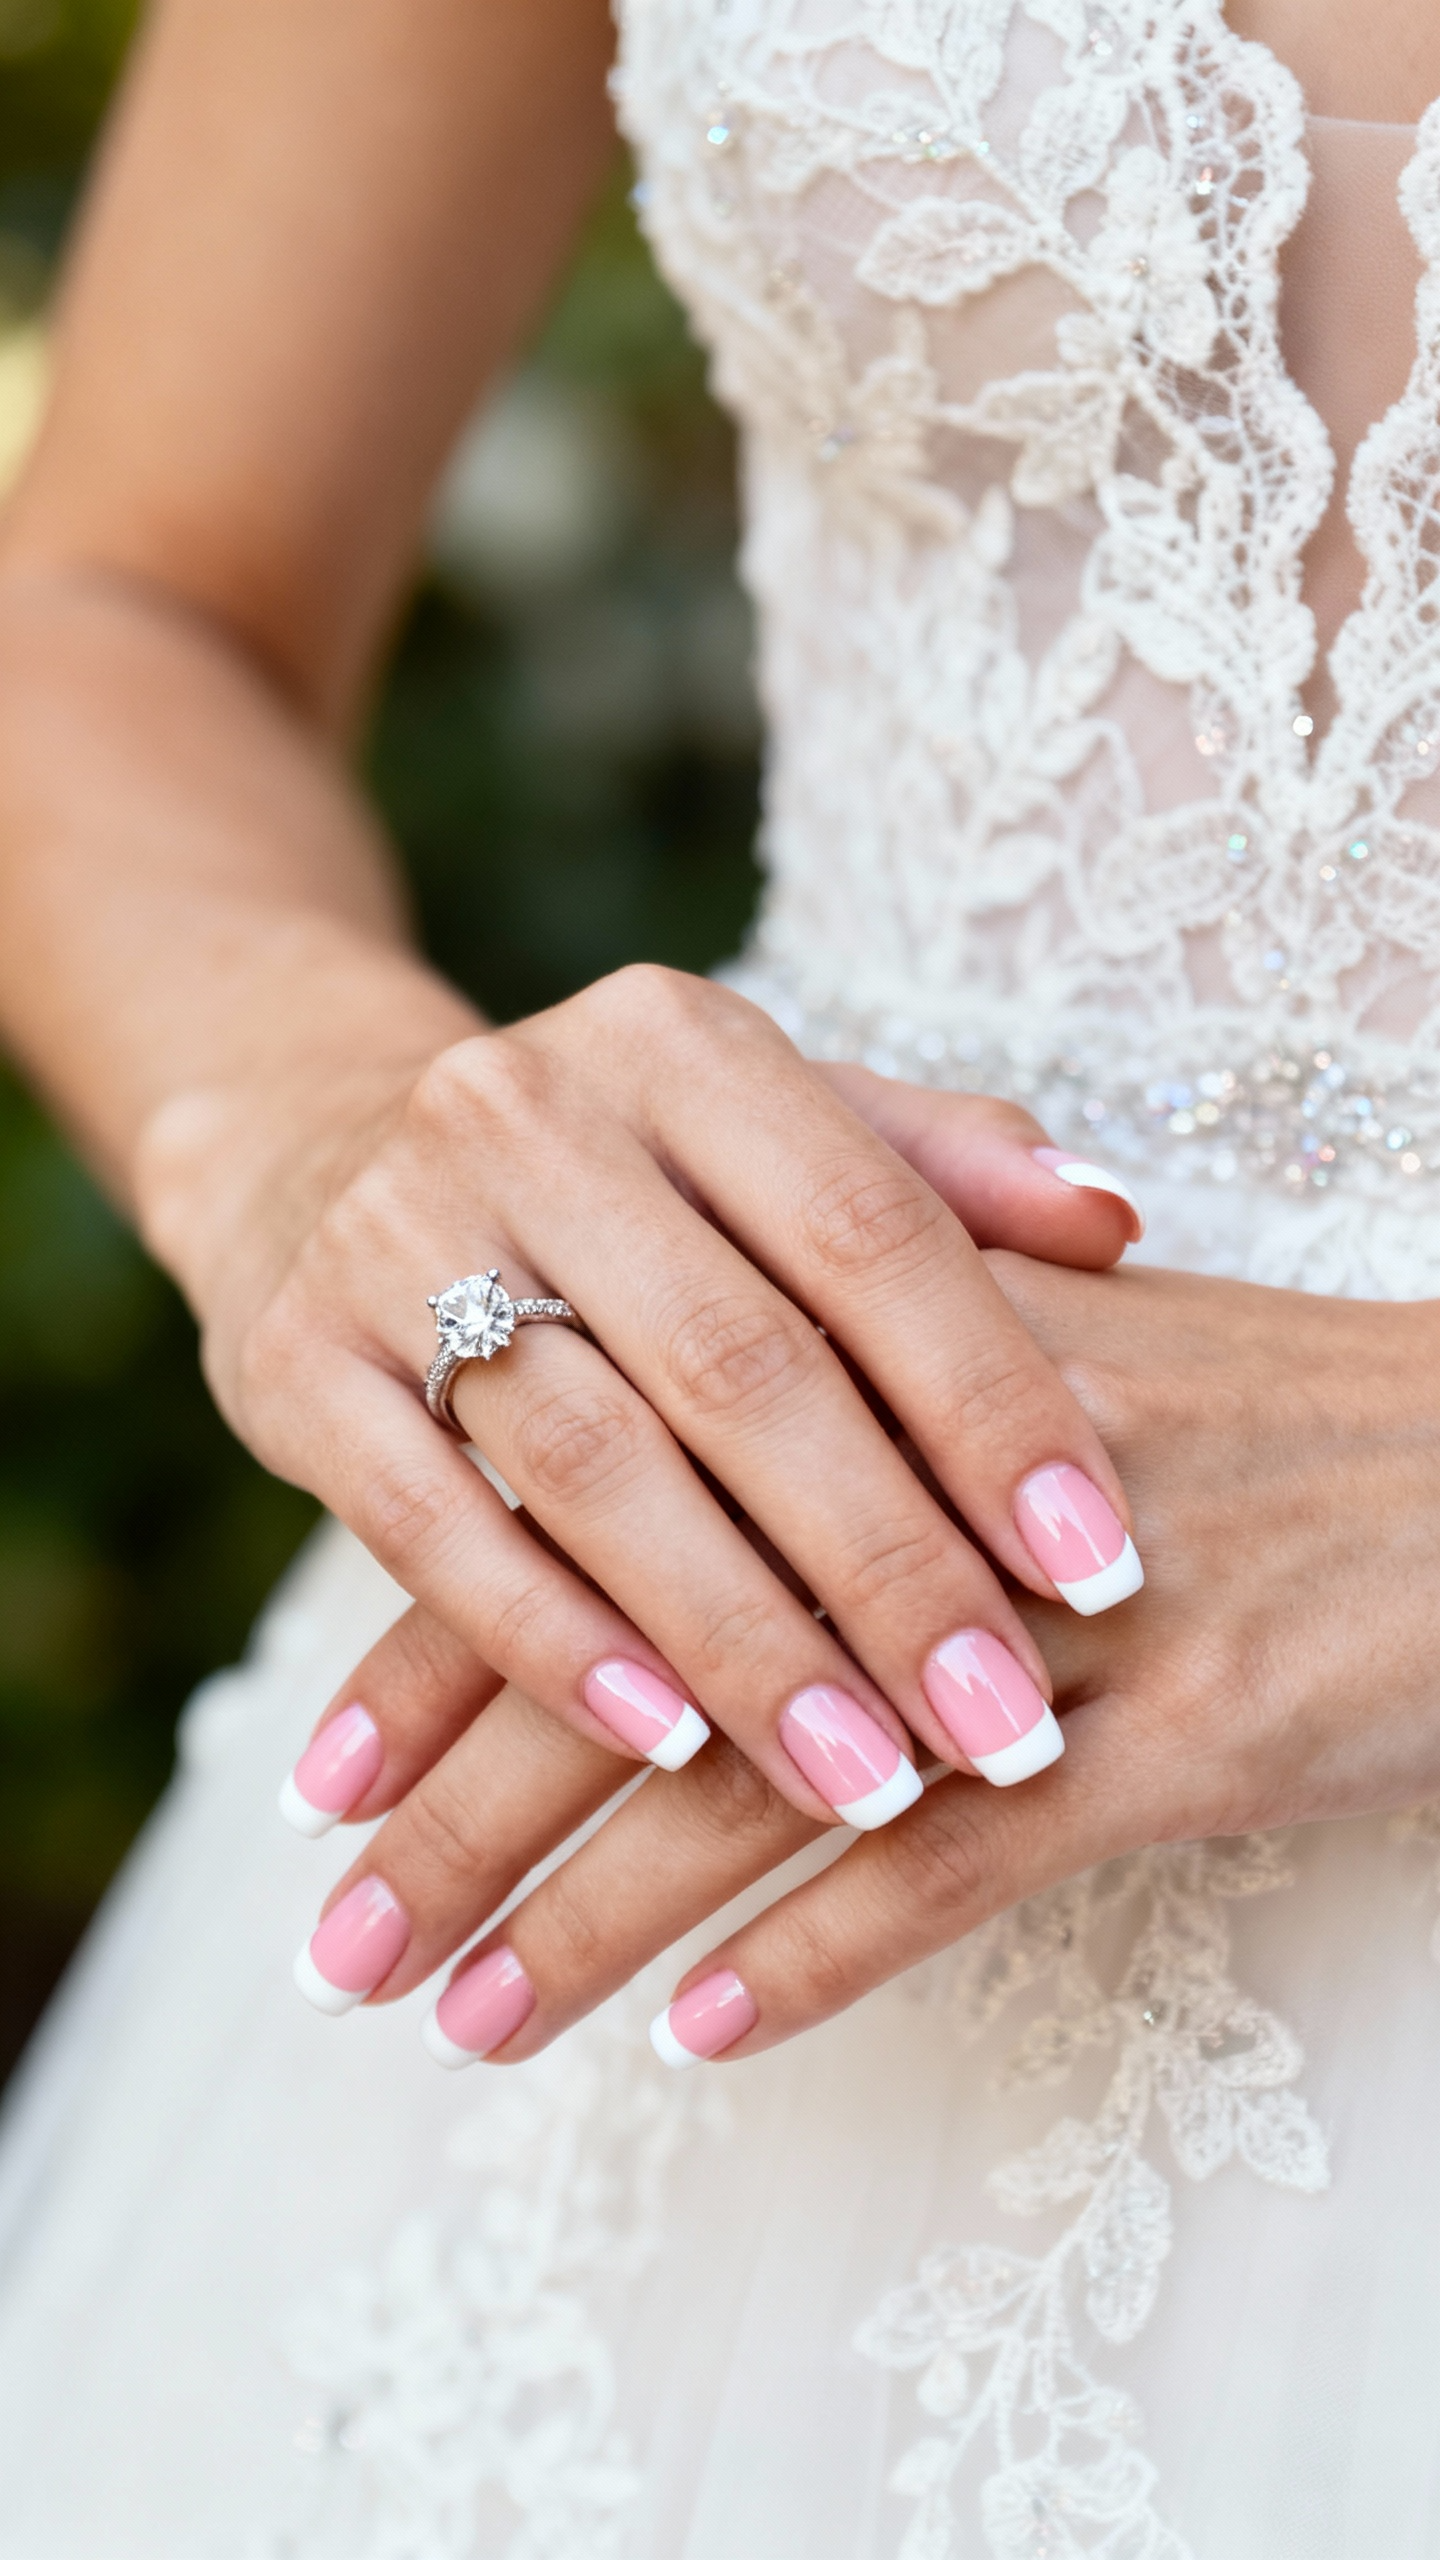
About the Design:
The timeless French manicure remains a top choice for brides who love understated elegance. Featuring soft pink or nude bases with crisp white tips, this design complements any wedding dress and adds a touch of sophistication without overpowering the look. Perfect for brides seeking a clean, graceful appearance.
What Makes This Design Unique:
The charm of this design lies in its versatility. Whether paired with glossy or matte finishes, or adorned with a hint of shimmer near the cuticle, the French tip can be customized for both traditional and modern brides. Its simplicity allows your engagement ring to shine beautifully.
How to Do It (Step by Step):
- File your nails into a soft square or almond shape for a feminine finish.
- Apply a base coat to protect your nails and ensure smooth application.
- Use a white polish to carefully paint the tips of each nail with precision.
- Seal the look with a sheer pink top coat for a glossy and lasting finish.
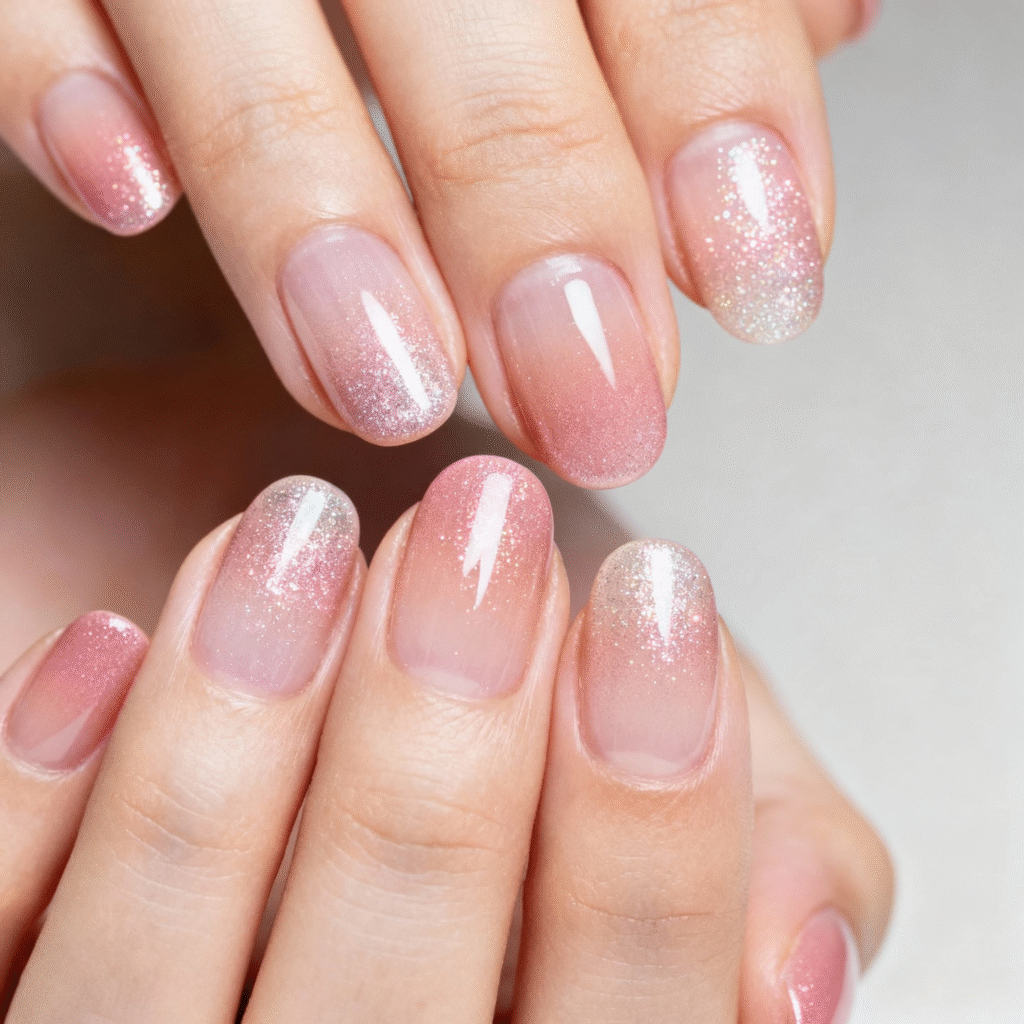
2. Blush Pink Glitter Fade
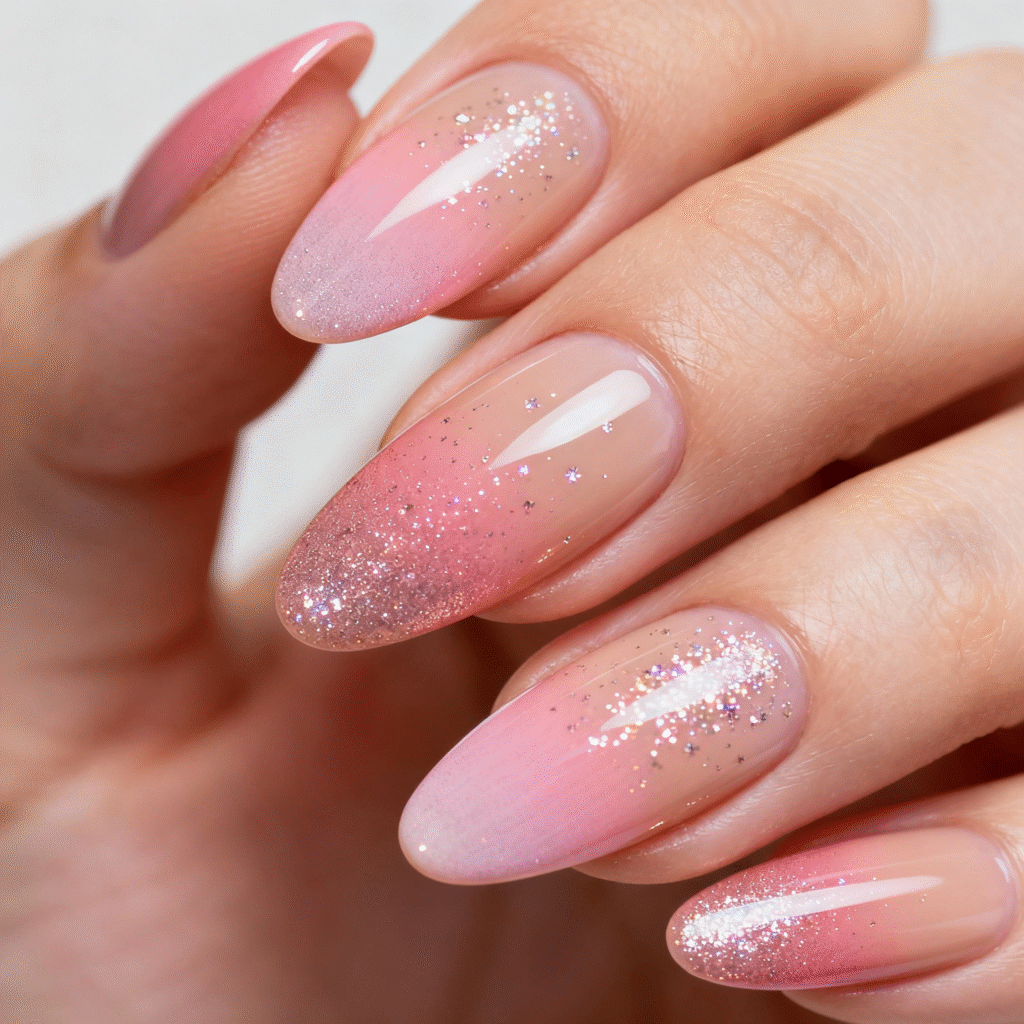
About the Design:
This soft, romantic design blends delicate blush tones with a subtle gradient of glitter. It’s ideal for brides who want a hint of sparkle without being too bold. The shimmer captures the light beautifully, adding a dreamy glow to your hands in every photo.
What Makes This Design Unique:
The fade effect creates a natural transition from solid color to sparkle, symbolizing elegance and joy. It’s a favorite for outdoor weddings or receptions where lighting enhances the subtle glimmer. The soft pink hue also complements a variety of skin tones effortlessly.
How to Do It (Step by Step):
- Apply a light pink polish as the base color and let it dry completely.
- Use a makeup sponge to dab glitter polish near the tips, blending upward.
- Repeat until the fade looks smooth and sparkly, without harsh lines.
- Finish with a clear top coat for a seamless, glossy, and long-lasting result.
3. Pearl Embellished Nails
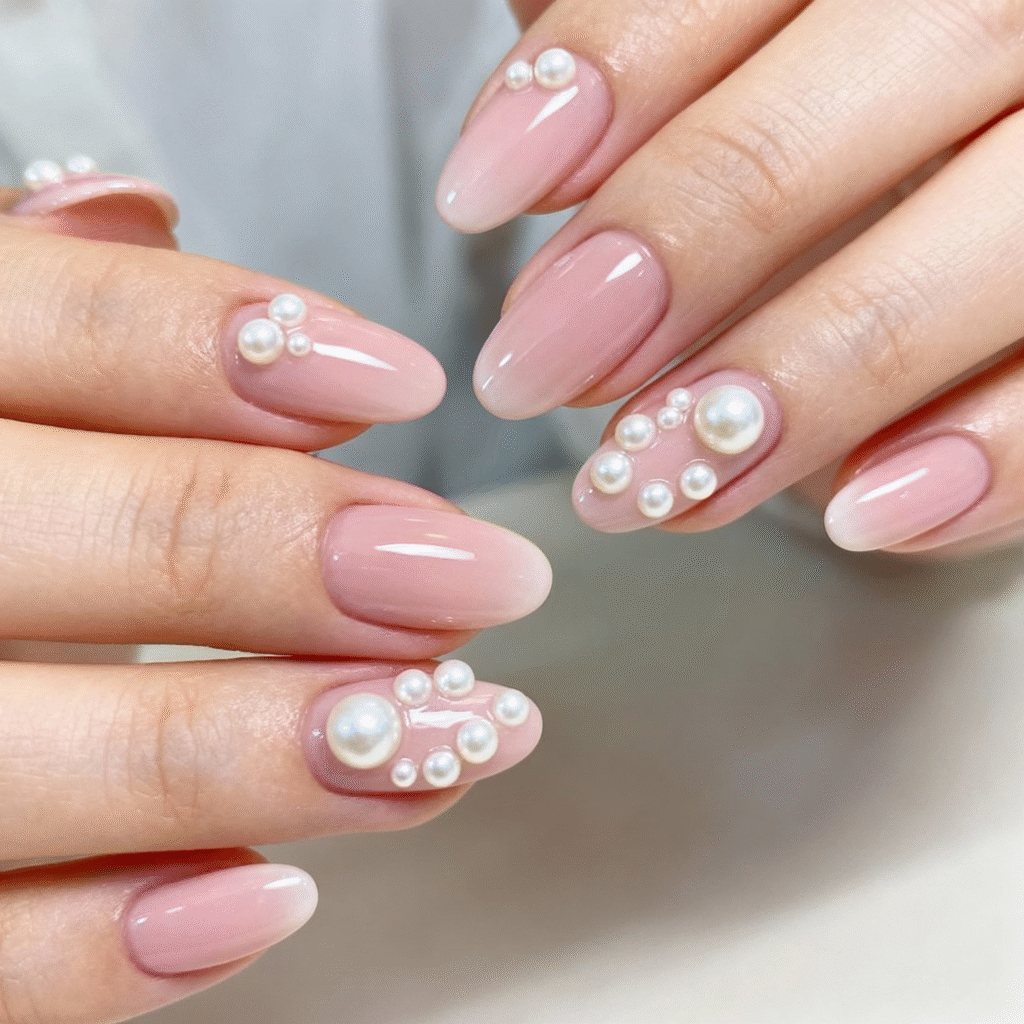
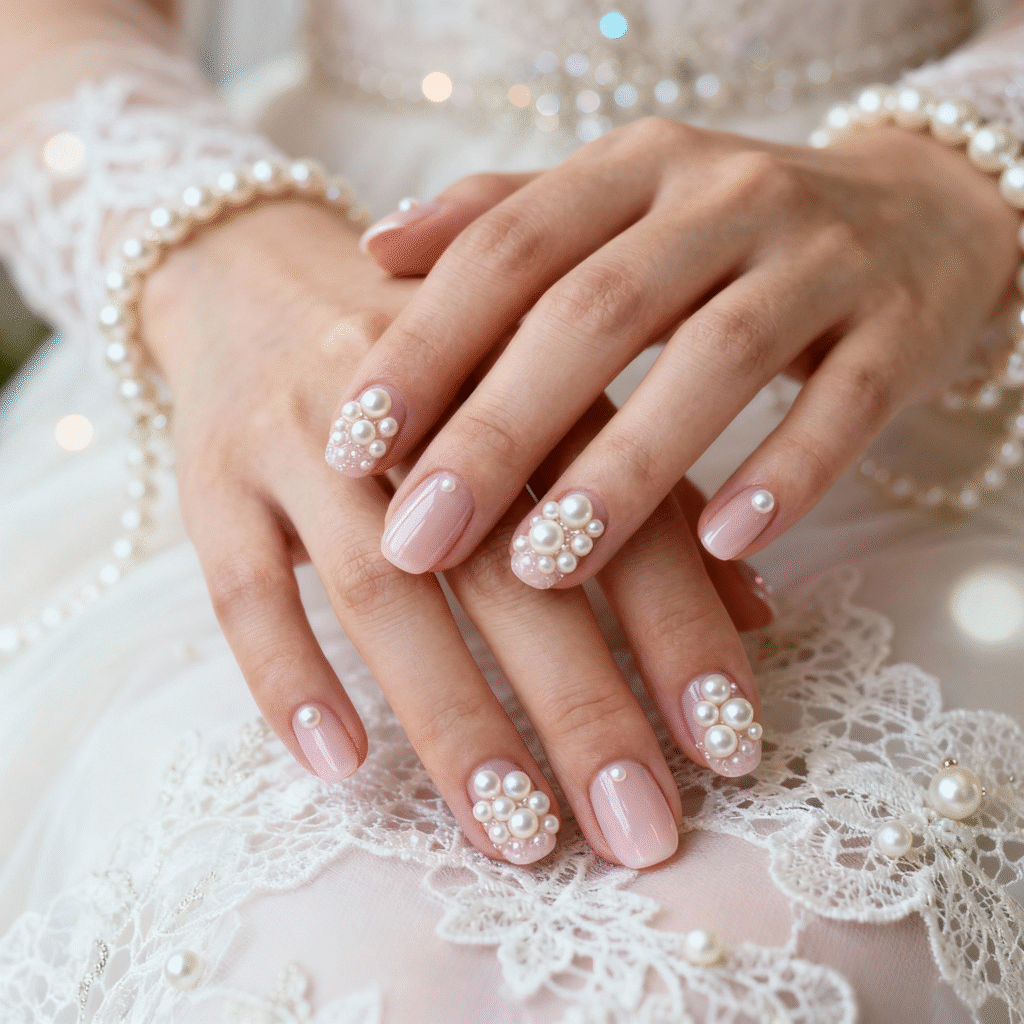
About the Design:
Pearl nails bring sophistication and a vintage bridal charm. Tiny pearls are delicately placed on a nude or pastel base, creating a soft, luminous effect. This design adds luxury and pairs beautifully with pearl jewelry or lace wedding gowns.
What Makes This Design Unique:
Each pearl placement reflects attention to detail and bridal refinement. The subtle 3D texture creates depth and dimension, making your nails look elegant and artistic. It’s a trend that merges classic beauty with modern nail art creativity.
How to Do It (Step by Step):
- Paint nails with a neutral base coat, like ivory or soft pink.
- While the polish is slightly tacky, place small pearls using tweezers or a dotting tool.
- Gently press each pearl to ensure it adheres securely to the nail surface.
- Seal with a thick layer of top coat to protect the embellishments and add shine.
4. White Lace Detail Nails
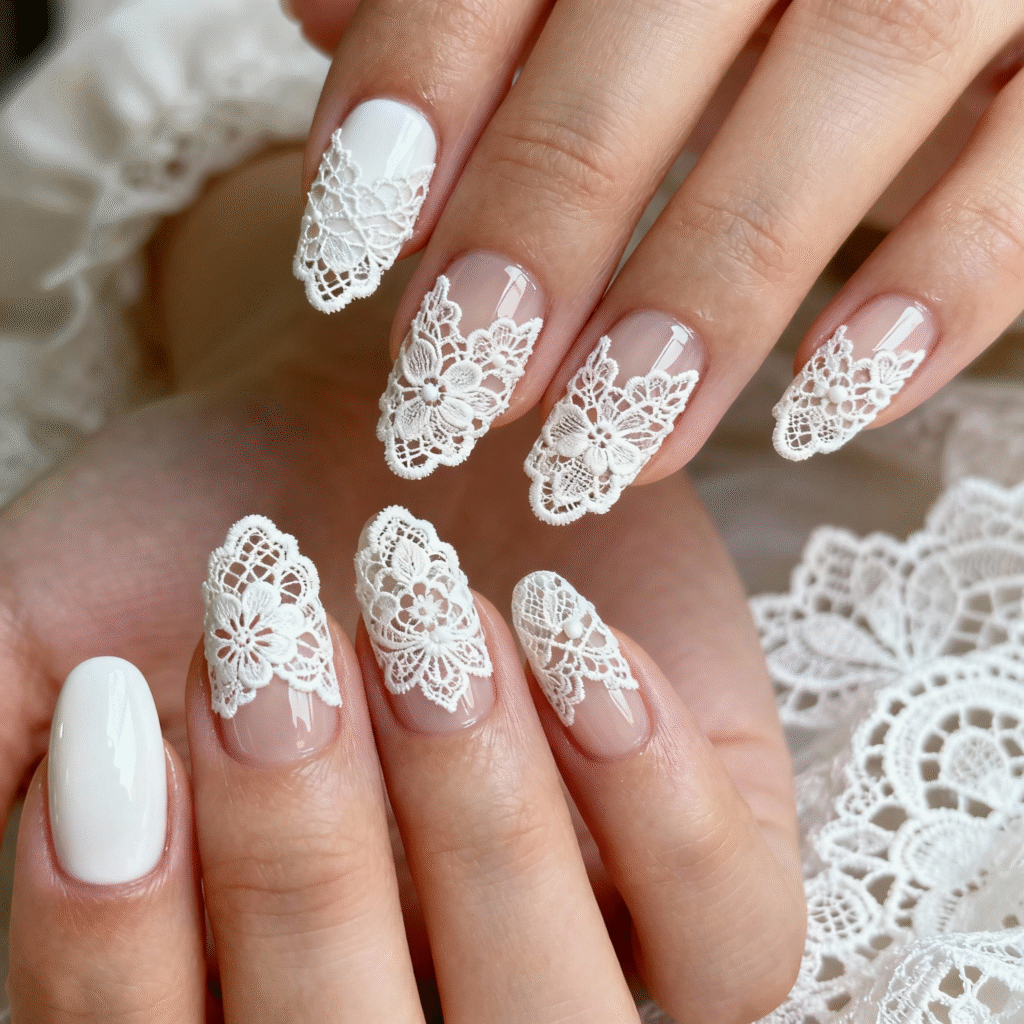
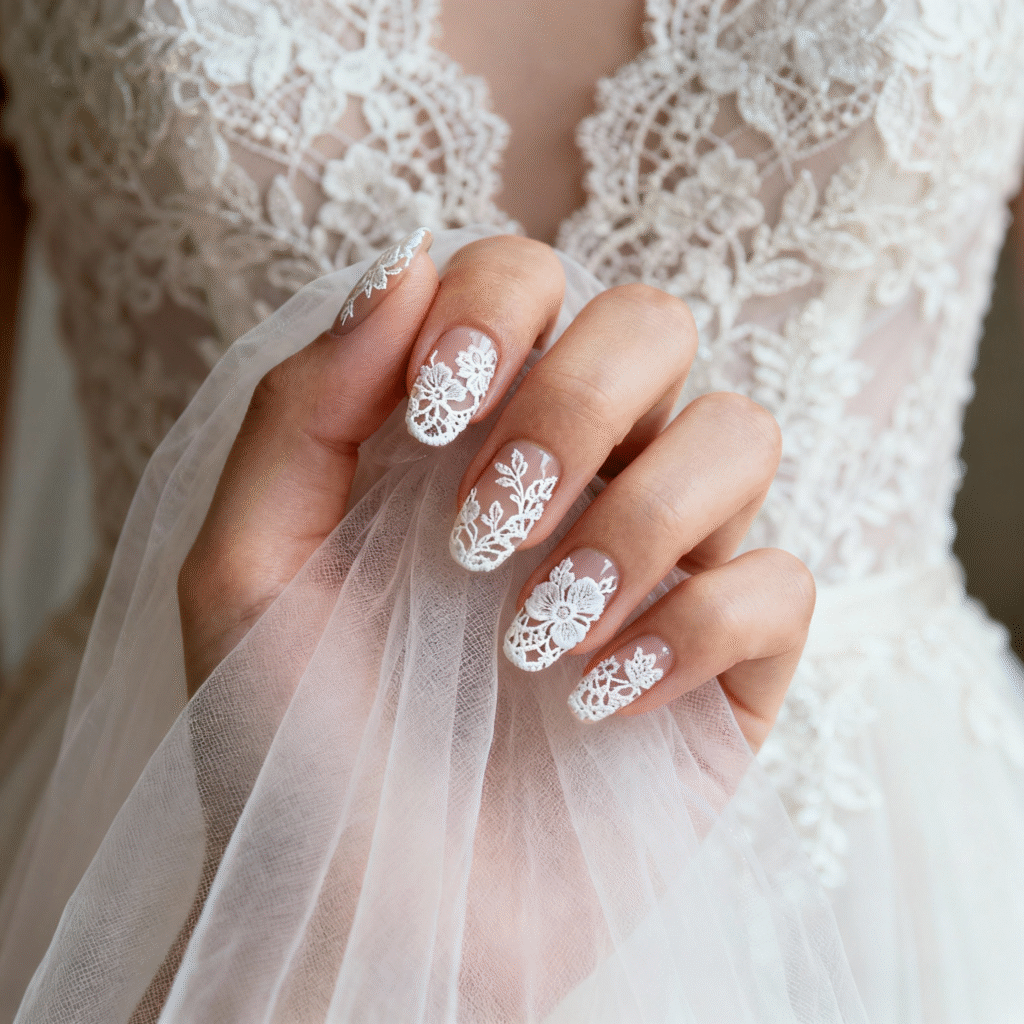
About the Design:
Inspired by wedding dresses, lace nails feature delicate white patterns on sheer or nude bases. The intricate design mimics fine bridal lace, adding an ultra-feminine touch to your look. Perfect for brides who love romantic and detailed art.
What Makes This Design Unique:
The hand-painted lace or stamped patterns make every nail a tiny piece of art. The translucent effect gives it a soft, ethereal vibe that complements both bohemian and traditional wedding themes beautifully.
How to Do It (Step by Step):
- Apply a nude or milky base coat and allow it to dry.
- Use a fine brush or lace stamping plate to create detailed white lace patterns.
- Add a hint of shimmer or silver dots for extra elegance if desired.
- Lock in the design with a glossy top coat for durability and sheen.
5. Champagne Chrome Nails
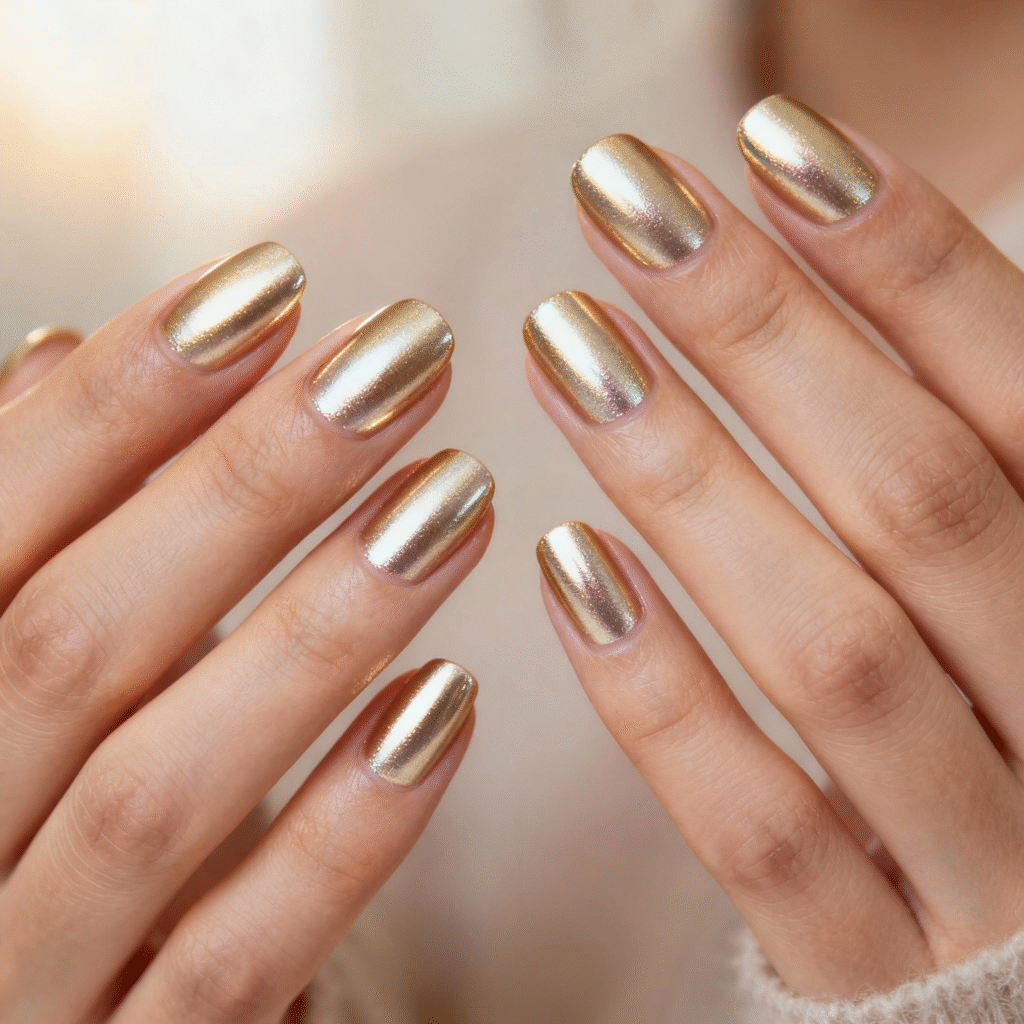
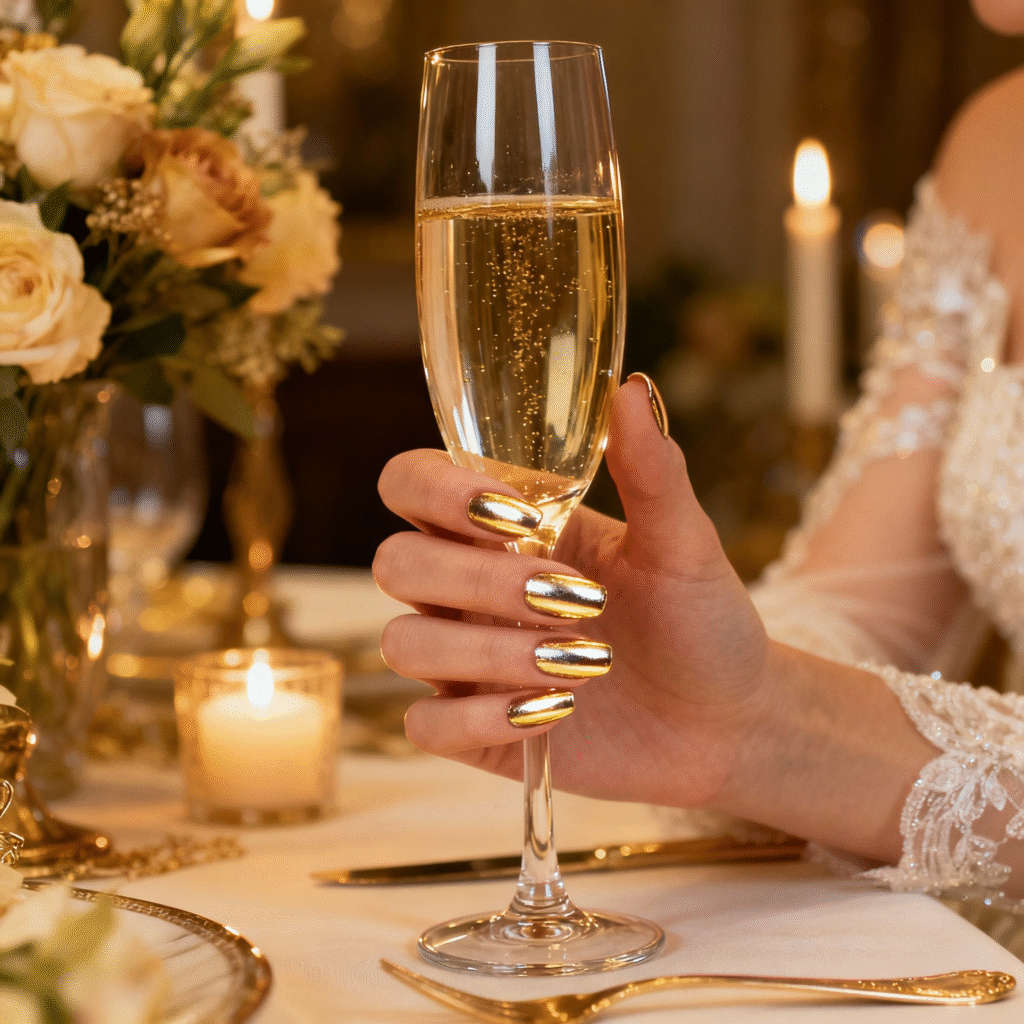
About the Design:
Champagne chrome nails bring a metallic yet sophisticated glow to your wedding day look. The smooth, mirror-like finish catches the light and adds a subtle golden radiance, perfect for evening receptions or glamorous venues.
What Makes This Design Unique:
Unlike traditional metallics, champagne chrome offers a softer, more refined tone. It pairs beautifully with ivory dresses and gold jewelry, creating a luxurious yet balanced aesthetic for modern brides.
How to Do It (Step by Step):
- Apply a base coat followed by a nude or pale gold polish.
- Rub chrome powder gently onto each nail using a soft sponge applicator.
- Buff the surface until the mirror-like finish appears evenly.
- Apply a no-wipe top coat to lock in shine and protect the metallic layer.
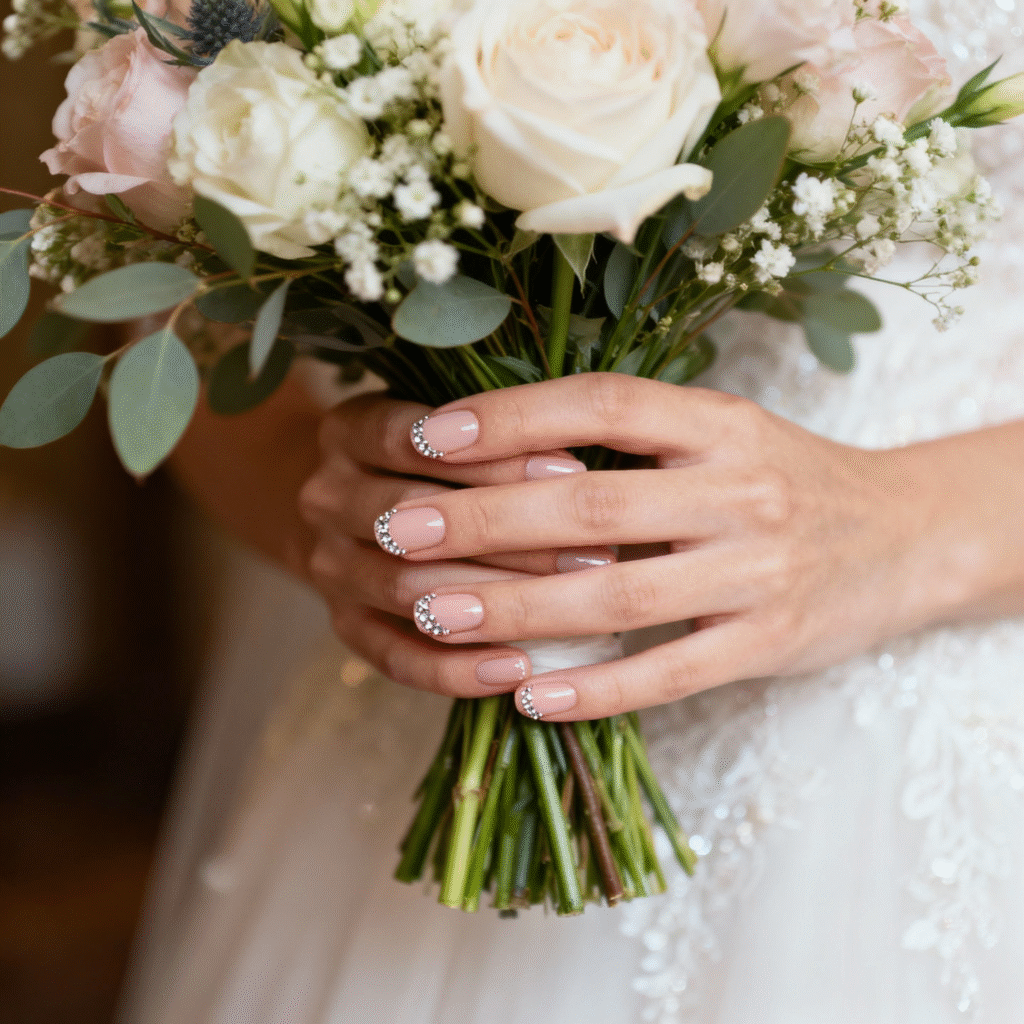
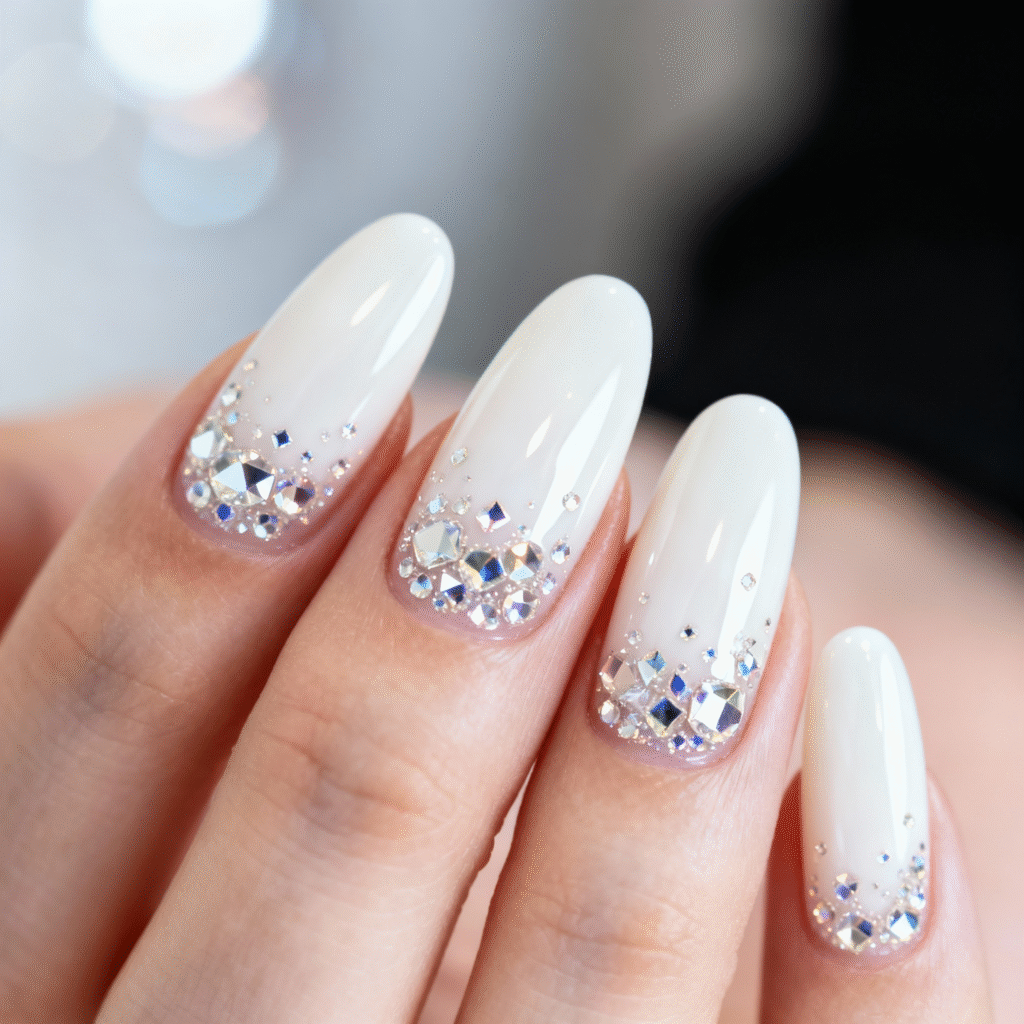
6. Crystal Accent Nails
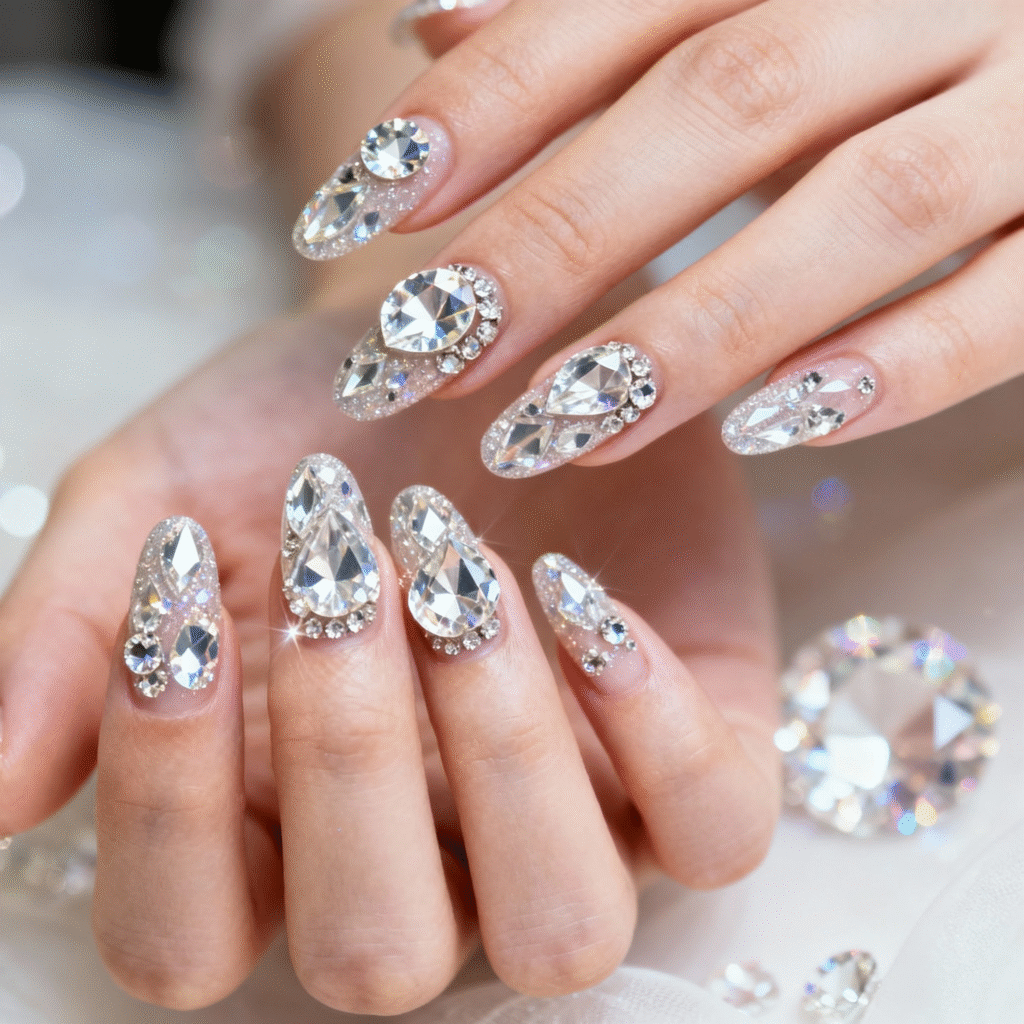

About the Design:
For brides who love a touch of sparkle, crystal accent nails add the perfect dose of glam. One or two feature nails are adorned with rhinestones or Swarovski crystals, while the rest stay in neutral tones for balance.
What Makes This Design Unique:
The combination of simplicity and sparkle makes this look stand out without being overwhelming. Each crystal catches light beautifully, creating a dazzling effect that elevates your bridal manicure instantly.
How to Do It (Step by Step):
- Apply a sheer or nude polish as your base and allow it to dry.
- Place crystals strategically near the cuticle or along the tips using nail glue.
- Press gently and ensure each crystal is securely fixed in place.
- Finish with a strong top coat to protect the stones and add long-lasting shine.
7. Soft Ombre Nude Nails
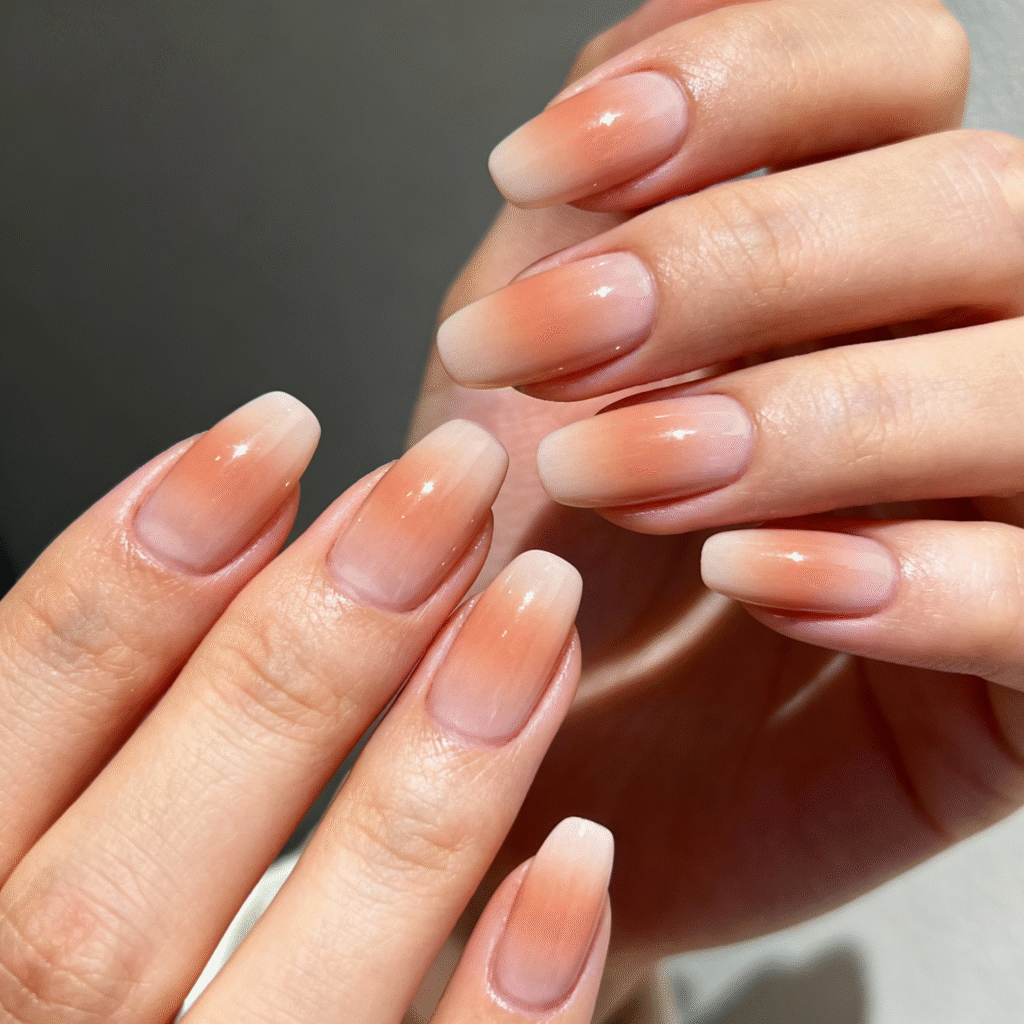

About the Design:
The ombre nude design blends two shades—usually white and nude—to create a graceful gradient effect. It’s perfect for brides seeking something minimal yet eye-catching. The smooth transition mimics natural tones, ideal for classic and contemporary weddings alike.
What Makes This Design Unique:
Its subtle fade offers timeless beauty and suits every skin tone. The design’s versatility allows you to personalize it with shimmer or delicate embellishments, keeping it elegant but not overpowering.
How to Do It (Step by Step):
- Paint nails with a nude base color and let it dry.
- Apply white polish to a sponge and gently dab from tips to mid-nail.
- Blend the two colors seamlessly to create a soft gradient.
- Finish with a glossy top coat to unify and enhance the ombre effect.
8. Gold Foil Glamour Nails
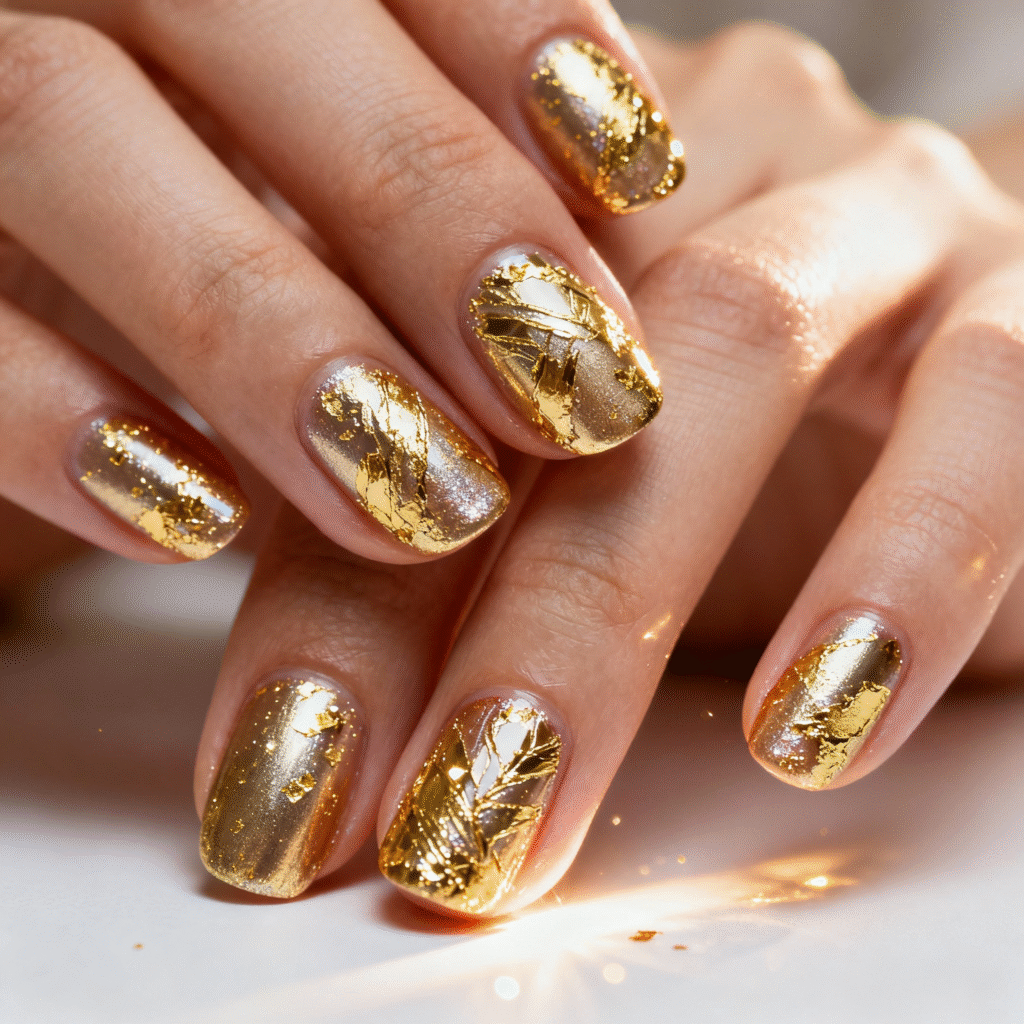
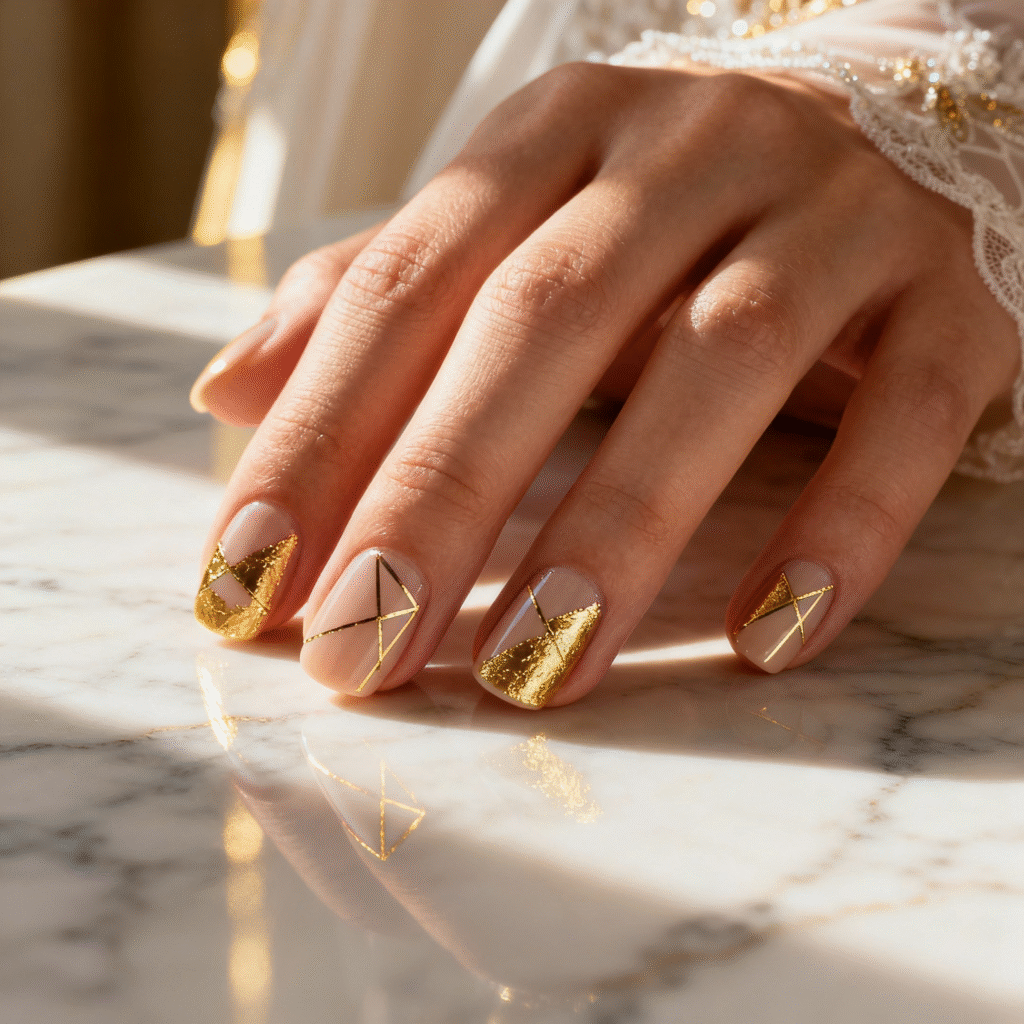
About the Design:
Gold foil nails add a regal, modern touch to wedding manicures. Small pieces of gold foil are applied over neutral or blush bases, creating an abstract yet sophisticated design that gleams under any lighting.
What Makes This Design Unique:
The irregular foil placement creates an artful and customized look. Each nail looks unique, resembling delicate gold leaf work—perfect for brides who appreciate a blend of luxury and creativity.
How to Do It (Step by Step):
- Apply a neutral or pink base coat and let it dry thoroughly.
- Gently place small gold foil pieces over slightly tacky polish.
- Press lightly to secure them in desired areas on each nail.
- Seal with a clear top coat to ensure the foil stays in place and gleams beautifully.
9. Milky White Nails with Silver Lines
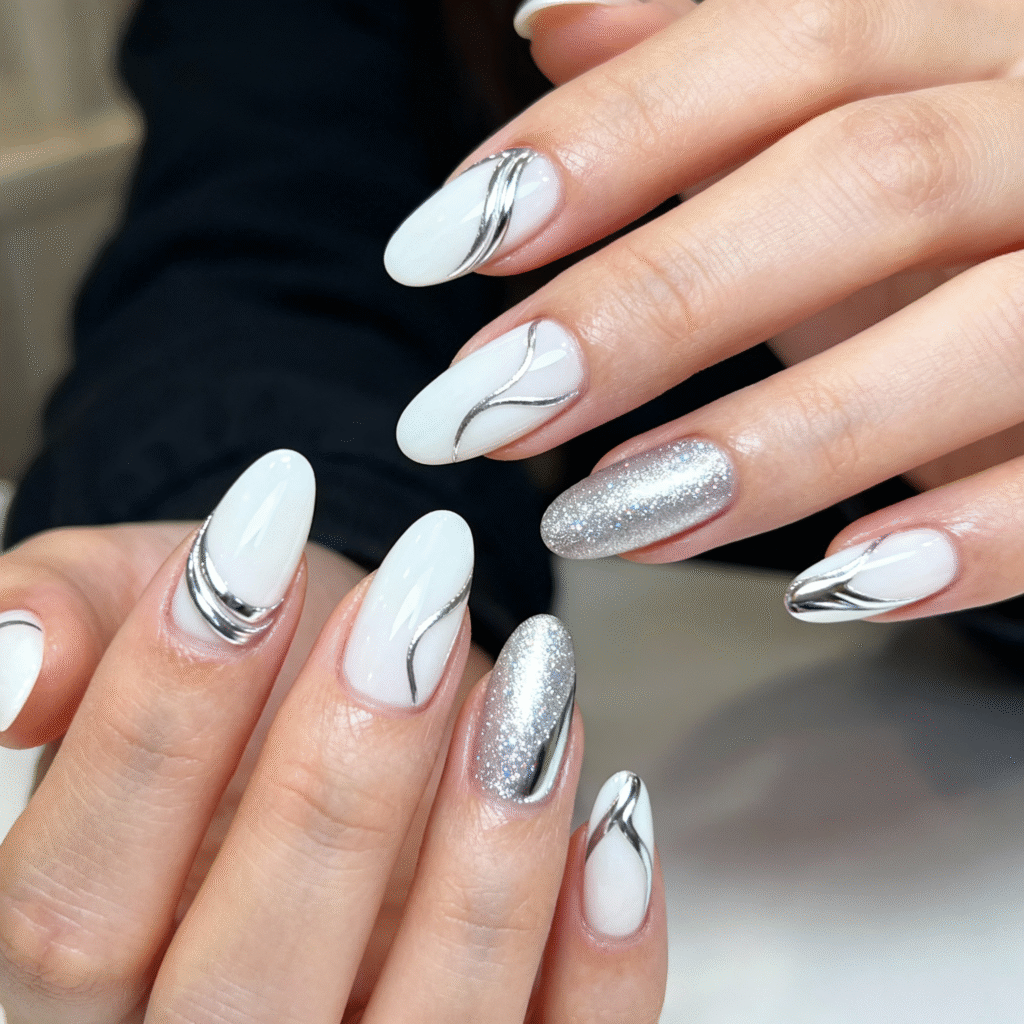
About the Design:
This chic bridal nail design uses milky white polish paired with thin silver lines for a modern, minimalist aesthetic. It’s perfect for brides who prefer sleek, refined beauty without excessive sparkle.
What Makes This Design Unique:
The combination of soft white and metallic silver creates a fresh, futuristic bridal vibe. The linear detailing adds structure and elegance, making your nails look professionally polished and contemporary.
How to Do It (Step by Step):
- Paint nails with a milky white base and allow them to dry completely.
- Use silver striping tape or a fine brush to create clean horizontal or vertical lines.
- Trim any excess tape and ensure lines appear even and straight.
- Apply a top coat carefully to prevent smudging and add a glossy finish.
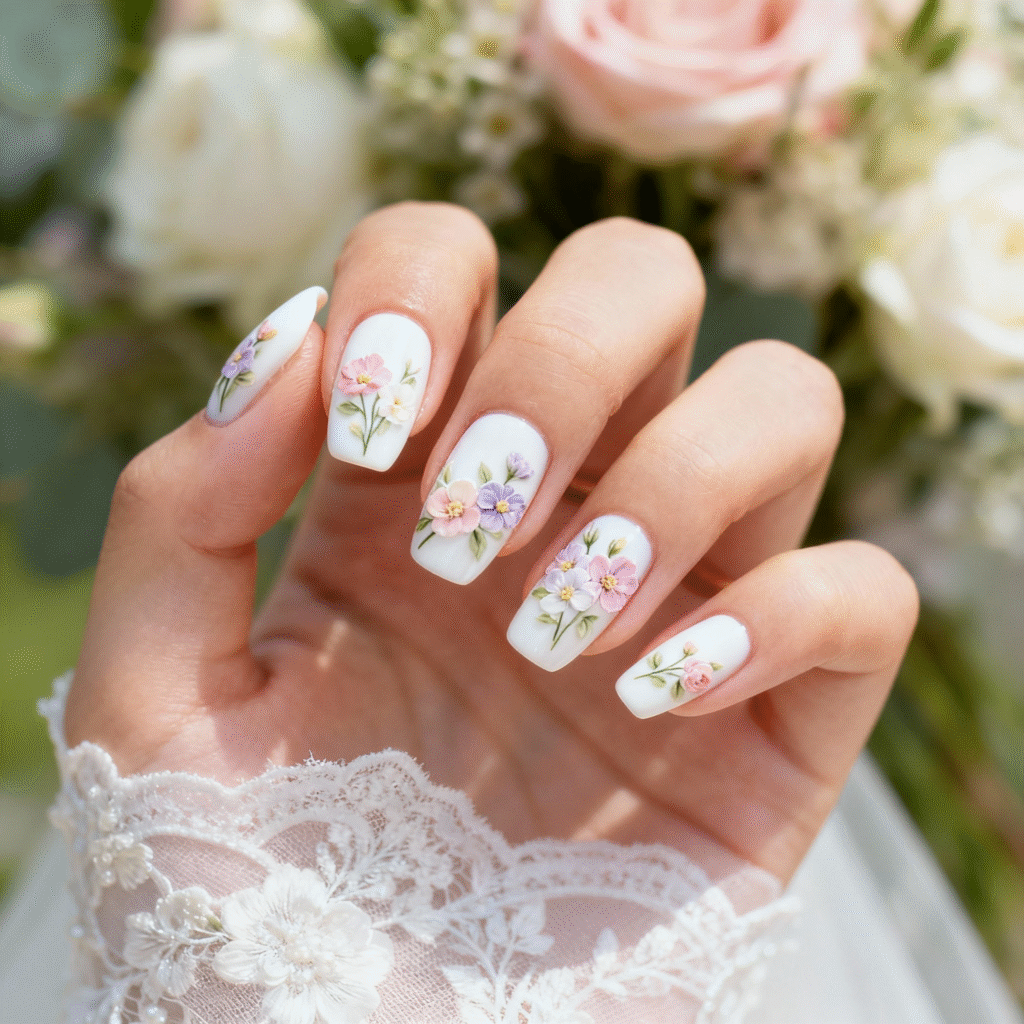
10. Floral Pressed Nails
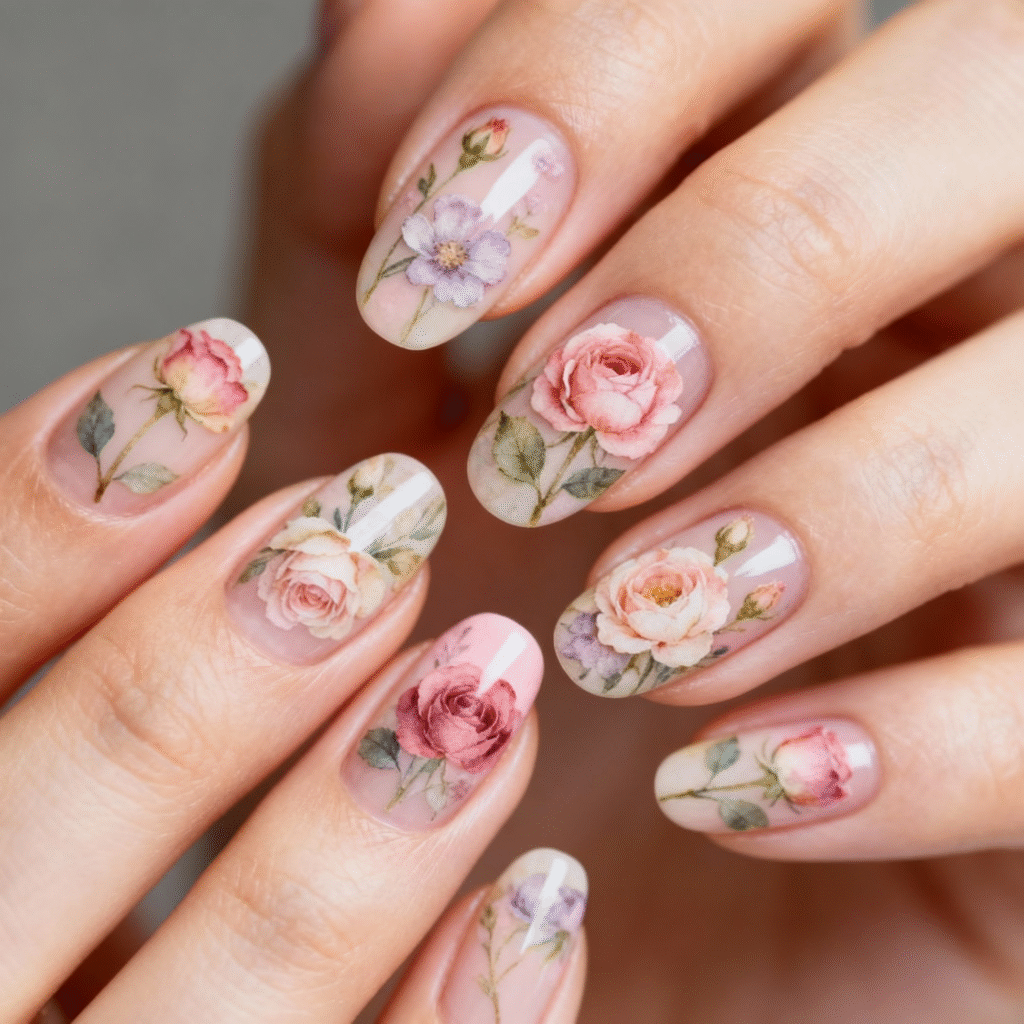
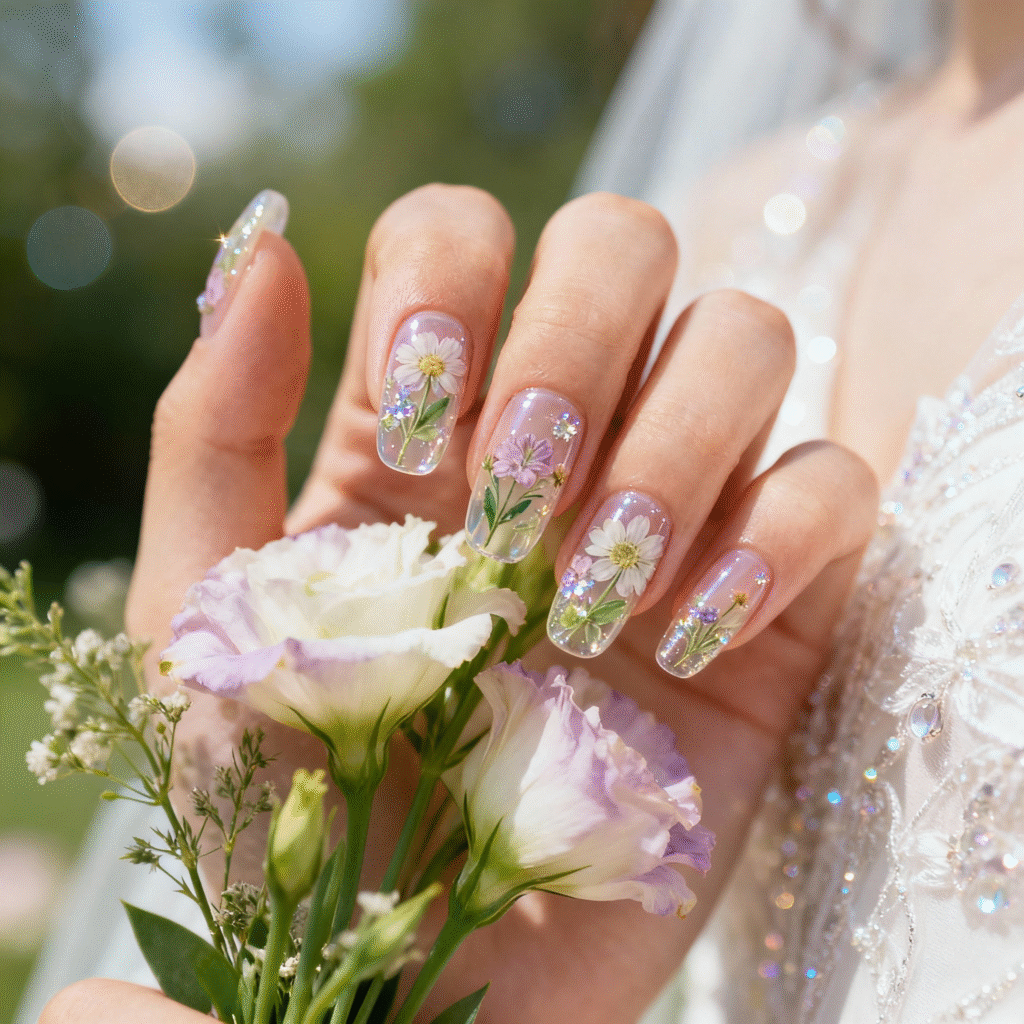
About the Design:
Floral pressed nails capture the beauty of real or painted flowers encased in clear polish. This design brings a touch of nature to your bridal aesthetic, evoking romance and softness perfect for spring or outdoor weddings.
What Makes This Design Unique:
Each flower placement creates a unique, one-of-a-kind design. The transparent layers give a 3D effect, making your nails look artistic and delicate, symbolizing new beginnings and love.
How to Do It (Step by Step):
- Apply a clear base coat and let it dry partially.
- Place small dried or hand-painted flowers gently onto each nail.
- Press lightly to embed them within the polish for a smooth finish.
- Add two layers of top coat to seal and preserve the floral detail.
11. Rose Gold Shimmer Nails
About the Design:
Rose gold shimmer nails combine the romance of pink with the sophistication of metallic gold. The soft gleam enhances the bride’s natural glow, giving hands a radiant, polished look. Ideal for brides who love warmth and subtle glamour, this design pairs beautifully with champagne or blush wedding gowns.
What Makes This Design Unique:
Unlike standard metallics, rose gold offers a romantic undertone that feels soft and feminine. The mix of shimmer and color depth creates a luminous effect that flatters every skin tone and catches light beautifully throughout the wedding day.
How to Do It (Step by Step):
- Apply a sheer nude or pale pink base coat and let it dry fully.
- Brush on a layer of rose gold shimmer polish evenly across each nail.
- Add a second coat to intensify the metallic glow if desired.
- Seal with a glossy top coat for long-lasting shine and brilliance.
12. Baby Blue Bridal Nails
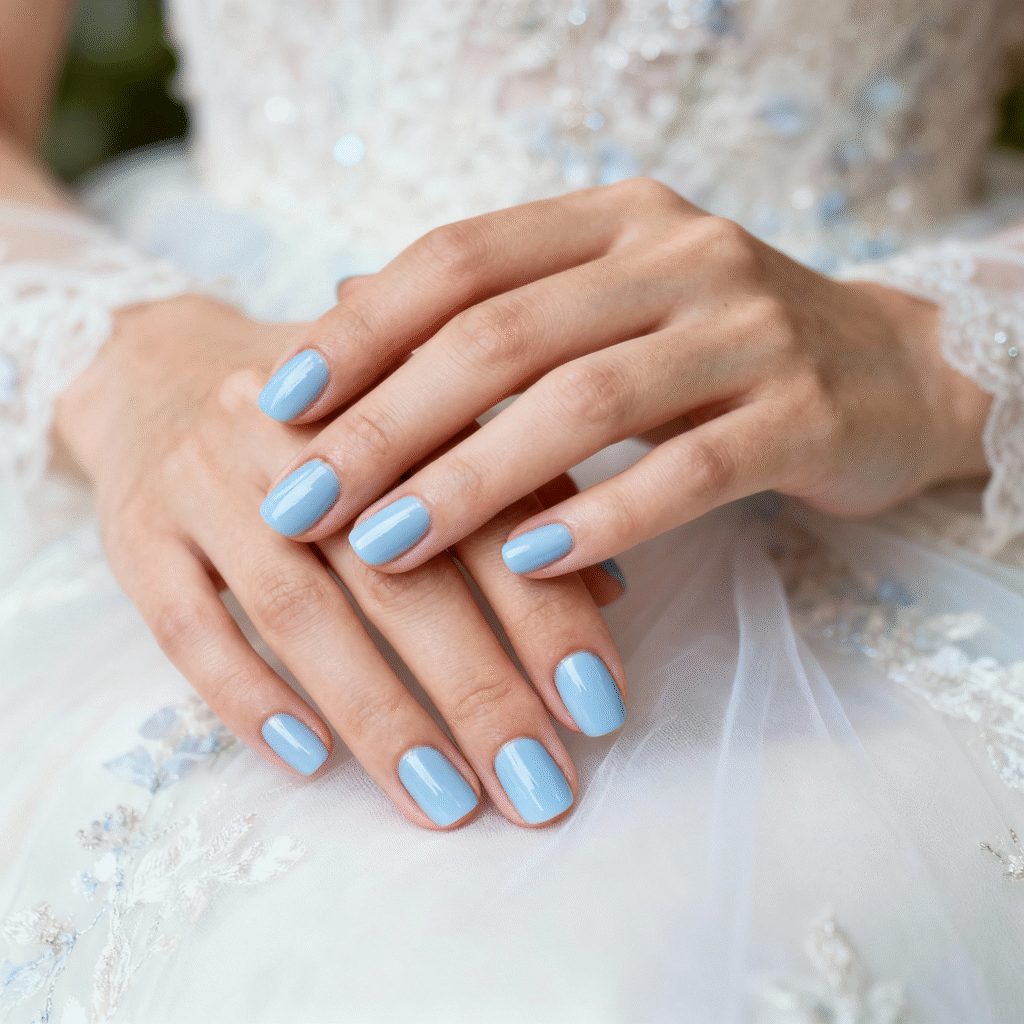
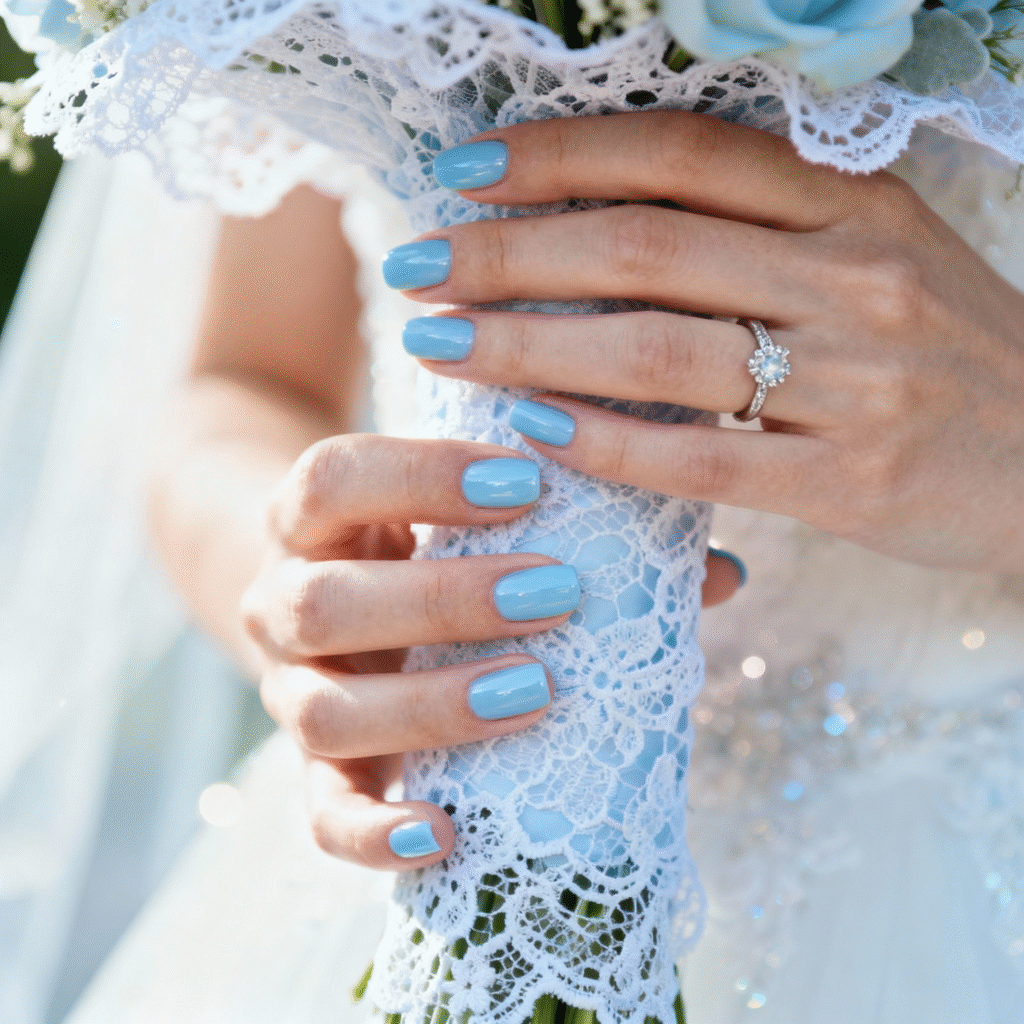
About the Design:
Baby blue nails bring a soft, “something blue” touch to your bridal look. The pastel tone feels light, dreamy, and refreshing — perfect for beach, spring, or garden weddings. It adds a delicate pop of color without overpowering the rest of your bridal styling.
What Makes This Design Unique:
This design blends tradition and modernity beautifully. The “something blue” element is reimagined with a chic pastel polish, making it a stylish yet meaningful detail that completes your wedding day symbolism.
How to Do It (Step by Step):
- Apply a clear base coat to strengthen nails and ensure smooth polish application.
- Paint two thin layers of baby blue nail polish for even coverage.
- Allow each coat to dry before adding a third if needed for opacity.
- Finish with a clear glossy top coat to enhance color and shine.
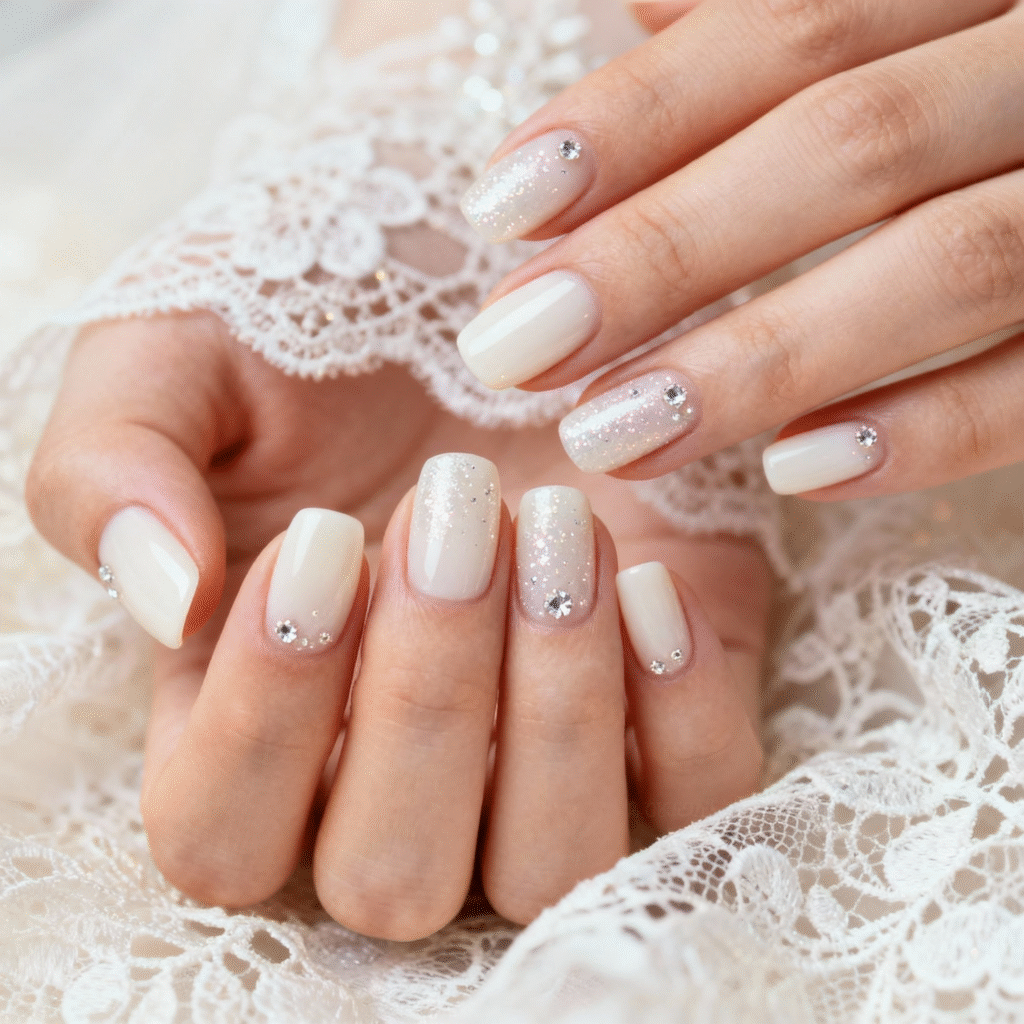
13. Nude Nails with Rhinestone Cuticles
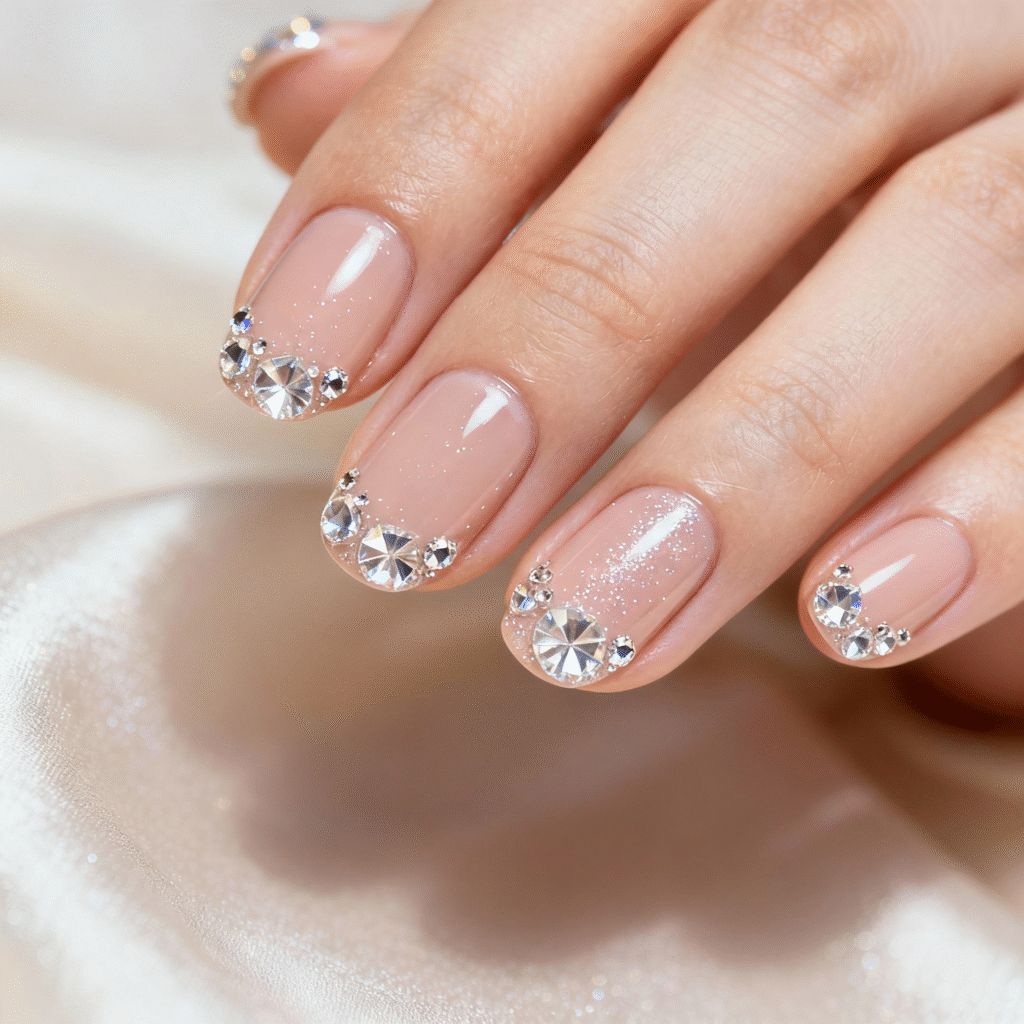
About the Design:
This sophisticated design keeps the nails natural with a nude tone while adding rhinestones along the cuticle line. It’s minimal yet luxurious, perfect for brides who want elegance with a touch of sparkle.
What Makes This Design Unique:
Instead of covering the whole nail with gems, this design focuses detail near the base, creating a refined, jewelry-like accent. It’s subtle enough for daytime yet dazzling under wedding lights.
How to Do It (Step by Step):
- Paint your nails with a nude polish and let them dry.
- Use tweezers to place tiny rhinestones carefully around each cuticle.
- Secure the stones using a thin layer of nail glue or gel adhesive.
- Finish with a protective top coat to lock everything in place.
14. Matte White with Gold Details
About the Design:
Matte white nails paired with thin gold details create a clean yet regal bridal look. The contrast between soft matte and metallic lines adds sophistication and a modern touch to a classic color palette.
What Makes This Design Unique:
The combination of textures—matte and metallic—feels both luxurious and contemporary. The gold accents can be customized into stripes, borders, or tiny dots, allowing the bride to personalize the look elegantly.
How to Do It (Step by Step):
- Apply two coats of matte white polish and allow to dry completely.
- Use thin striping tape or a fine brush to create gold lines or borders.
- Carefully clean the edges for precise, symmetrical designs.
- Add a matte-safe top coat to preserve the soft finish and metallic detail.
15. Pink Marble Nails
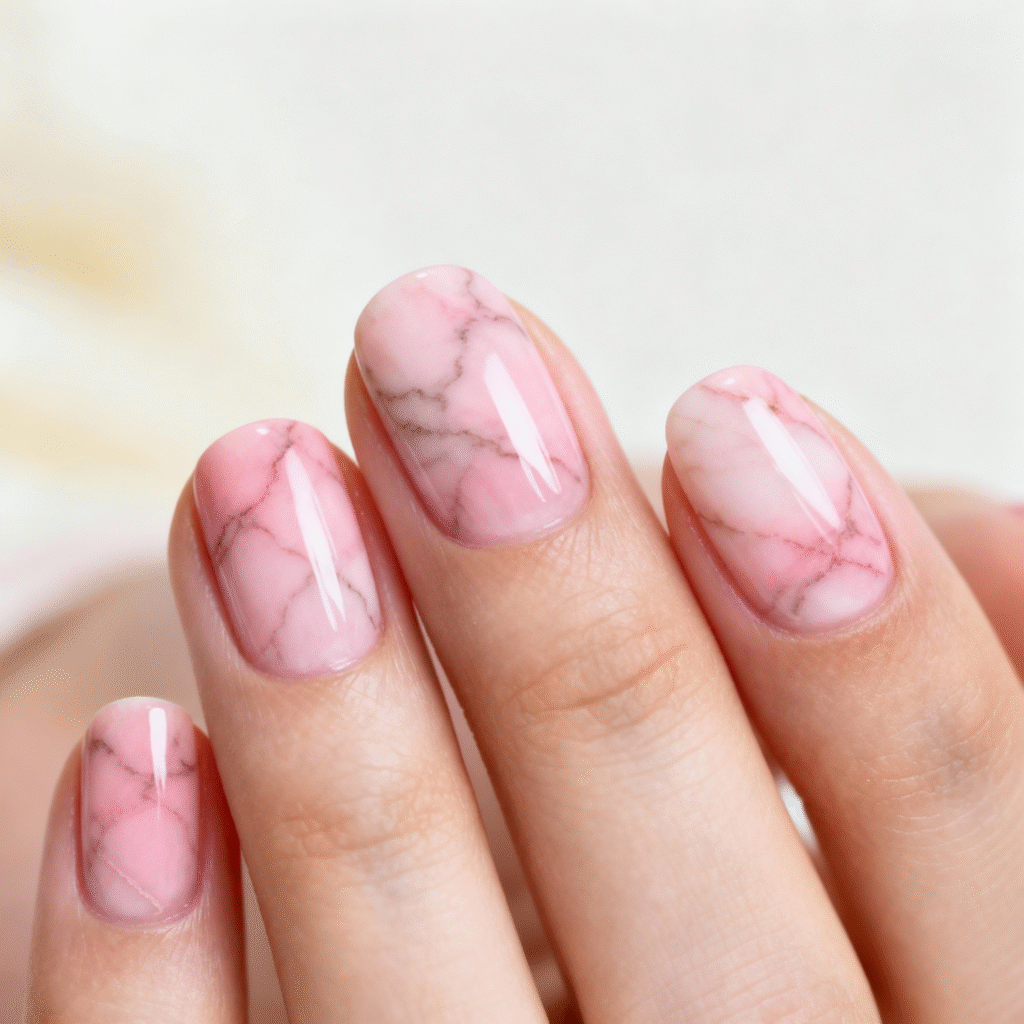
About the Design:
Pink marble nails mimic the natural swirl of marble stone using soft pink and white tones. The result is elegant, artistic, and perfect for brides who appreciate delicate yet trendy nail art.
What Makes This Design Unique:
Each nail looks like a unique marble pattern—no two are the same. The design blends femininity with a modern artistic twist, offering a bespoke look for the bride’s special day.
How to Do It (Step by Step):
- Apply a light pink base and allow it to dry.
- Mix white and darker pink polish drops on a palette for the marbling effect.
- Use a thin brush or toothpick to swirl and apply the mixture on nails.
- Seal with a glossy top coat to enhance the marble texture.
16. Iridescent Aurora Nails
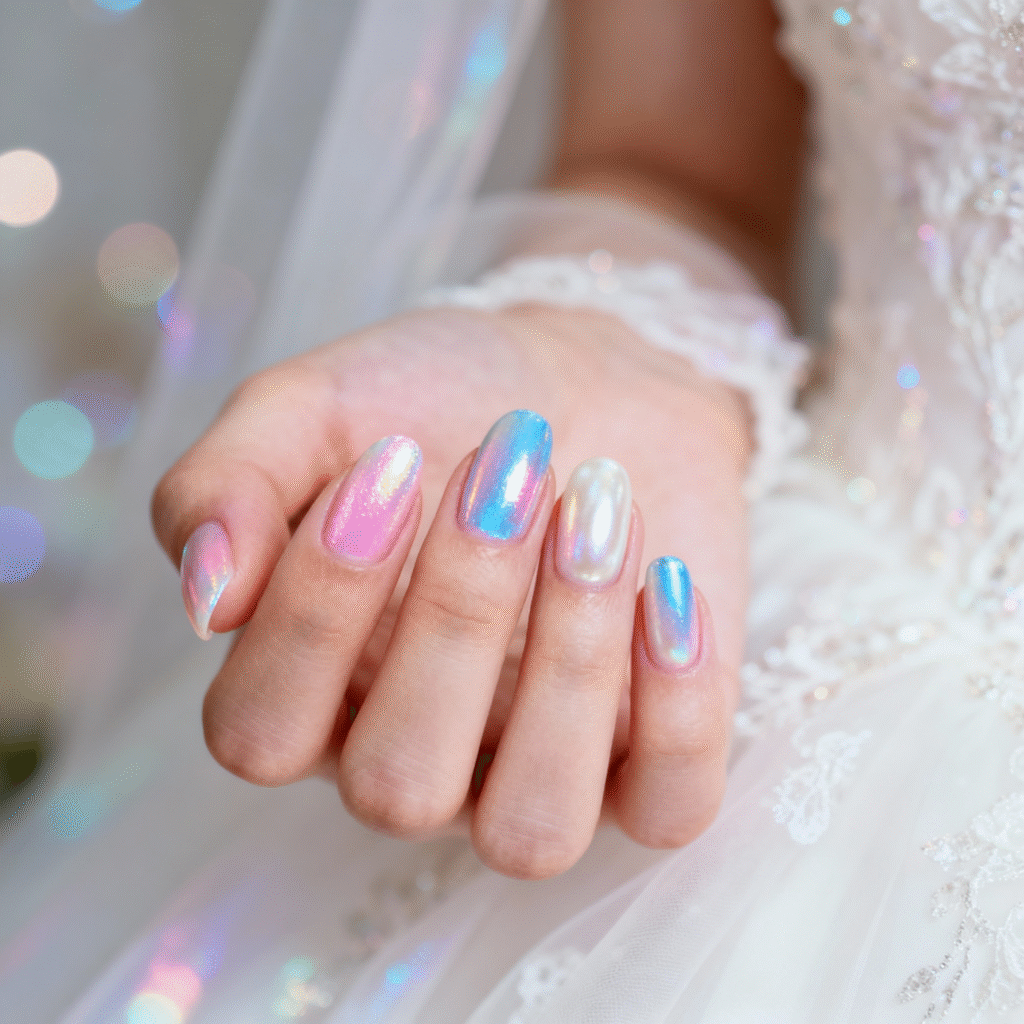
About the Design:
Inspired by the Northern Lights, aurora nails feature a magical, color-shifting shimmer that glows differently under various lights. The pearly finish makes hands look radiant and ethereal, ideal for brides who want a dreamy effect.
What Makes This Design Unique:
The iridescent pigments create an enchanting multi-dimensional glow. This design appears different in every photo, making it perfect for brides who want something captivating and photogenic.
How to Do It (Step by Step):
- Apply a pale lavender or white base color for best light reflection.
- Rub iridescent pigment powder over the dry polish using a sponge.
- Buff lightly to bring out a luminous rainbow shine.
- Seal with a no-wipe top coat for a glass-like finish.
17. White Nails with Tiny Floral Art
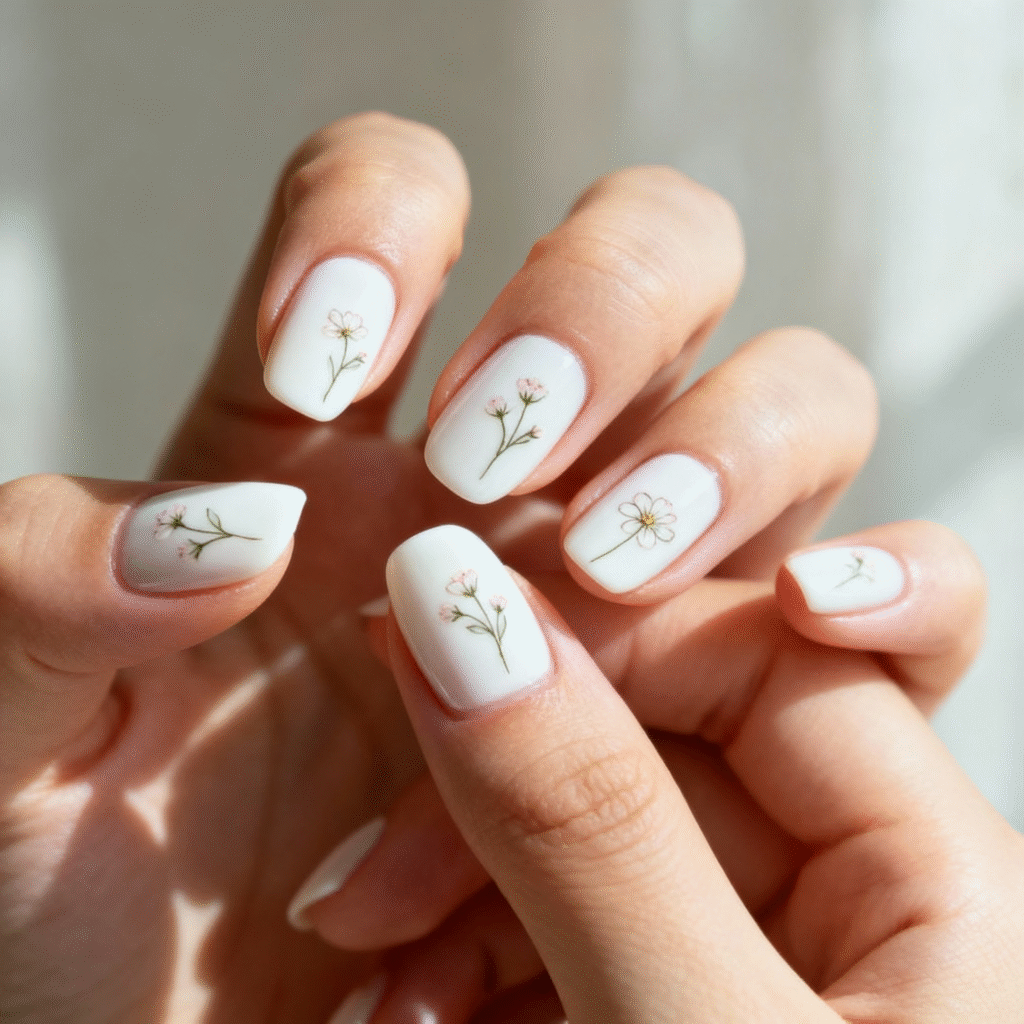
About the Design:
This delicate design combines white nails with hand-painted miniature flowers. It’s a soft, feminine choice that adds a romantic touch to your bridal beauty look, ideal for spring or garden weddings.
What Makes This Design Unique:
The small, painted flowers create an elegant contrast against the white background. Each nail becomes a miniature canvas, blending art and romance into one timeless bridal statement.
How to Do It (Step by Step):
- Paint nails with a pure white polish and let them dry.
- Use a detail brush to paint tiny flowers in pastel shades.
- Add fine green stems or gold dots for extra definition.
- Finish with a top coat to protect and smooth the painted surface.
18. Glitter French Tips
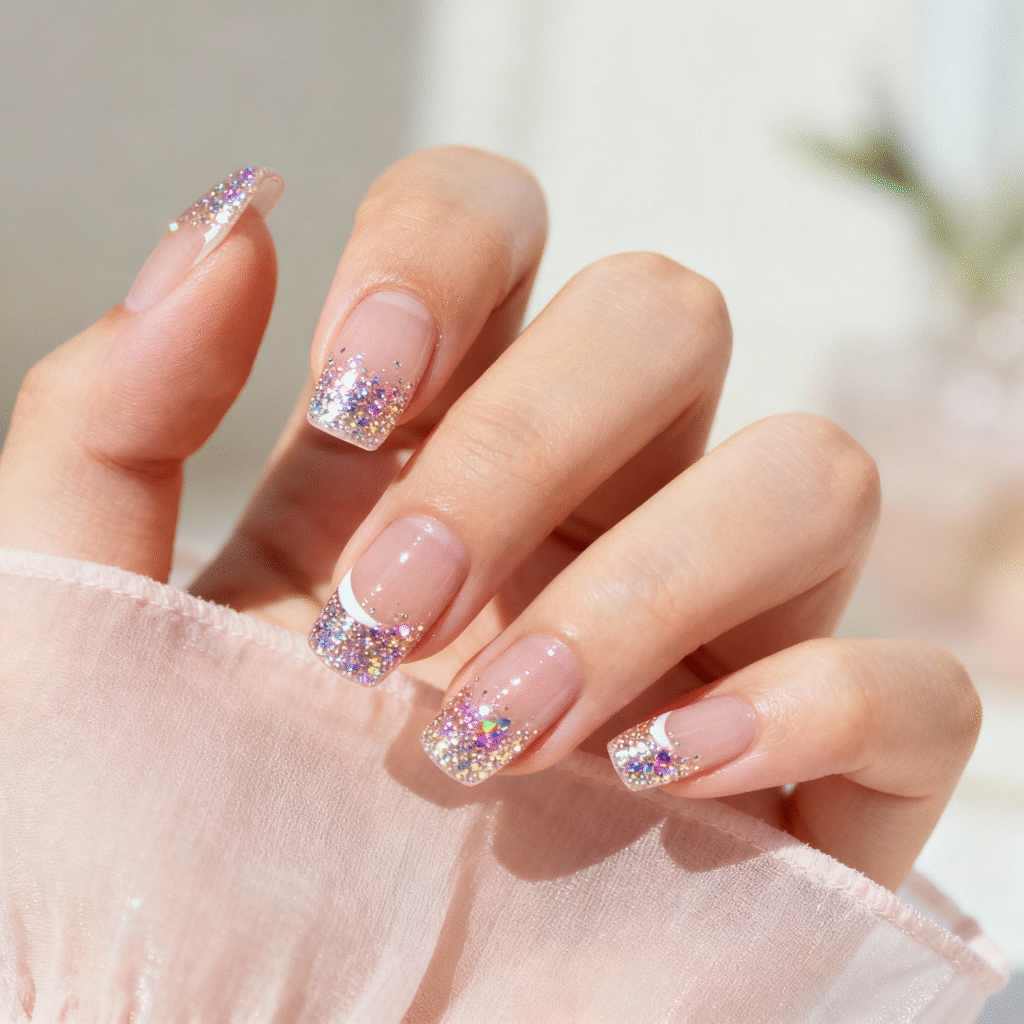
About the Design:
A twist on the classic French manicure, this version replaces white tips with fine glitter for added glamour. It’s a subtle yet sparkling option that catches the light beautifully.
What Makes This Design Unique:
The glitter tips elevate the traditional look into something modern and festive. It’s perfect for brides who want an elegant manicure that still feels celebratory.
How to Do It (Step by Step):
- Apply a nude or pale pink base and let it dry completely.
- Use tape or a guide to define the tip area of each nail.
- Paint the tips with fine silver or champagne glitter polish.
- Add a top coat for shine and durability.
19. Sheer Nude Nails with White Swirls
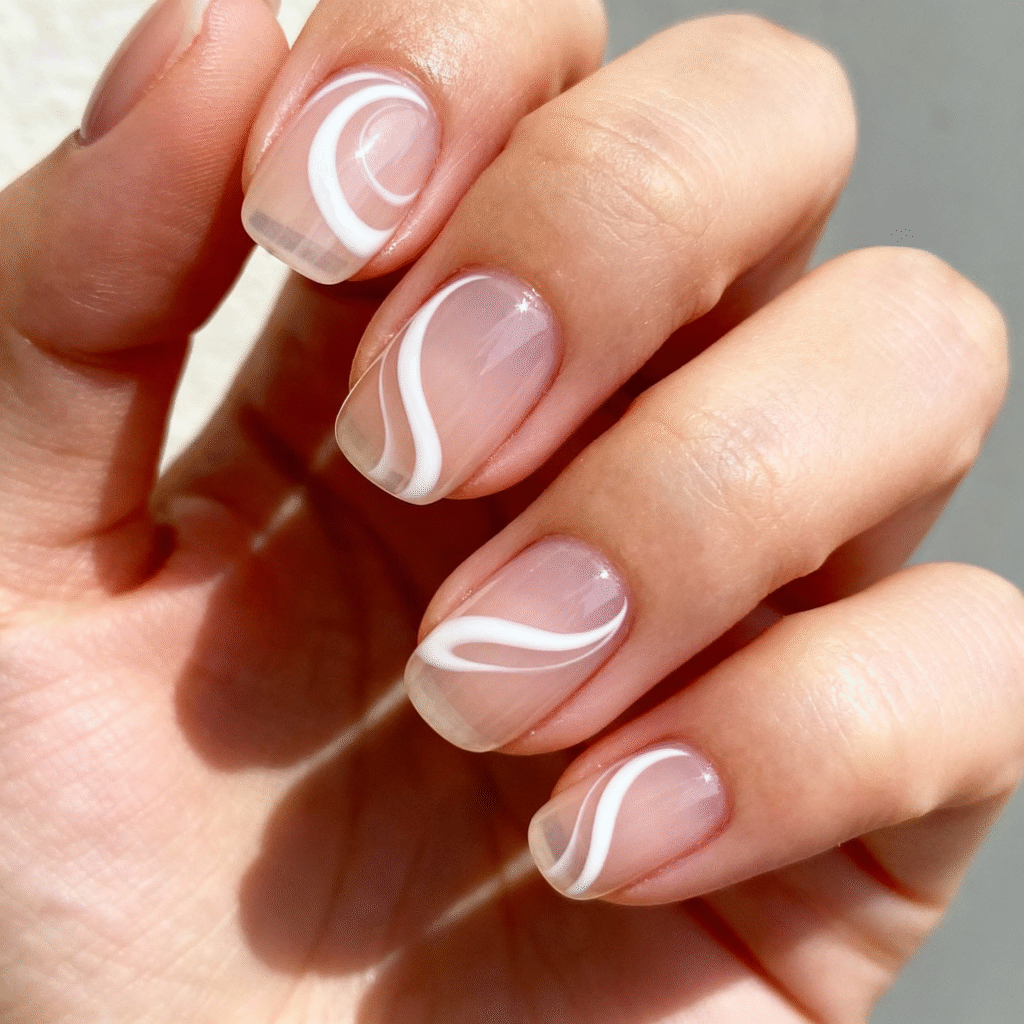
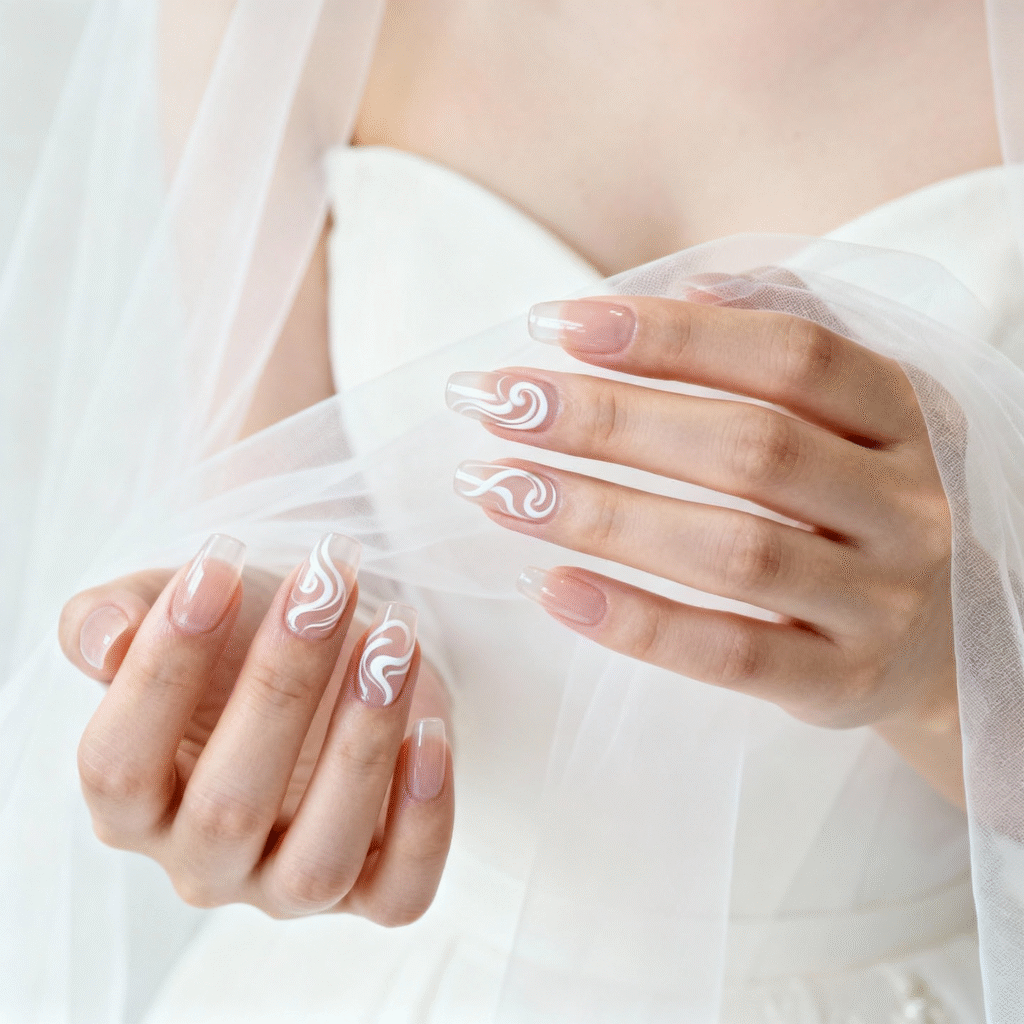
About the Design:
This modern bridal nail design combines a sheer nude base with flowing white swirl patterns. It’s minimal yet captivating—perfect for brides who want artistic nails without overwhelming detail.
What Makes This Design Unique:
The swirls add fluidity and motion to the nails, symbolizing harmony and elegance. The semi-transparent background enhances the natural look, ideal for minimalist brides.
How to Do It (Step by Step):
- Apply a sheer nude polish and let it dry.
- Use a thin brush to create gentle white swirl designs across each nail.
- Allow the patterns to vary slightly for an organic appearance.
- Seal with a glossy top coat for a polished, smooth finish.
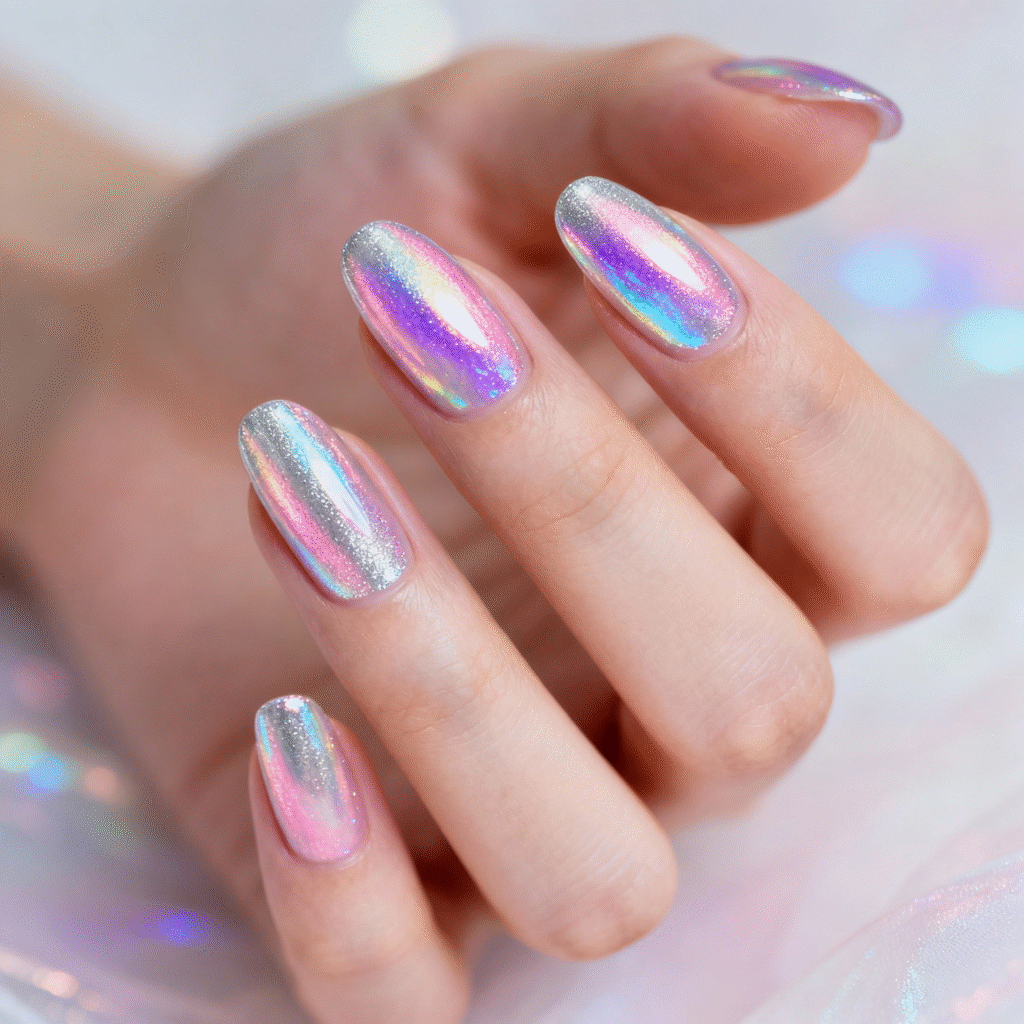
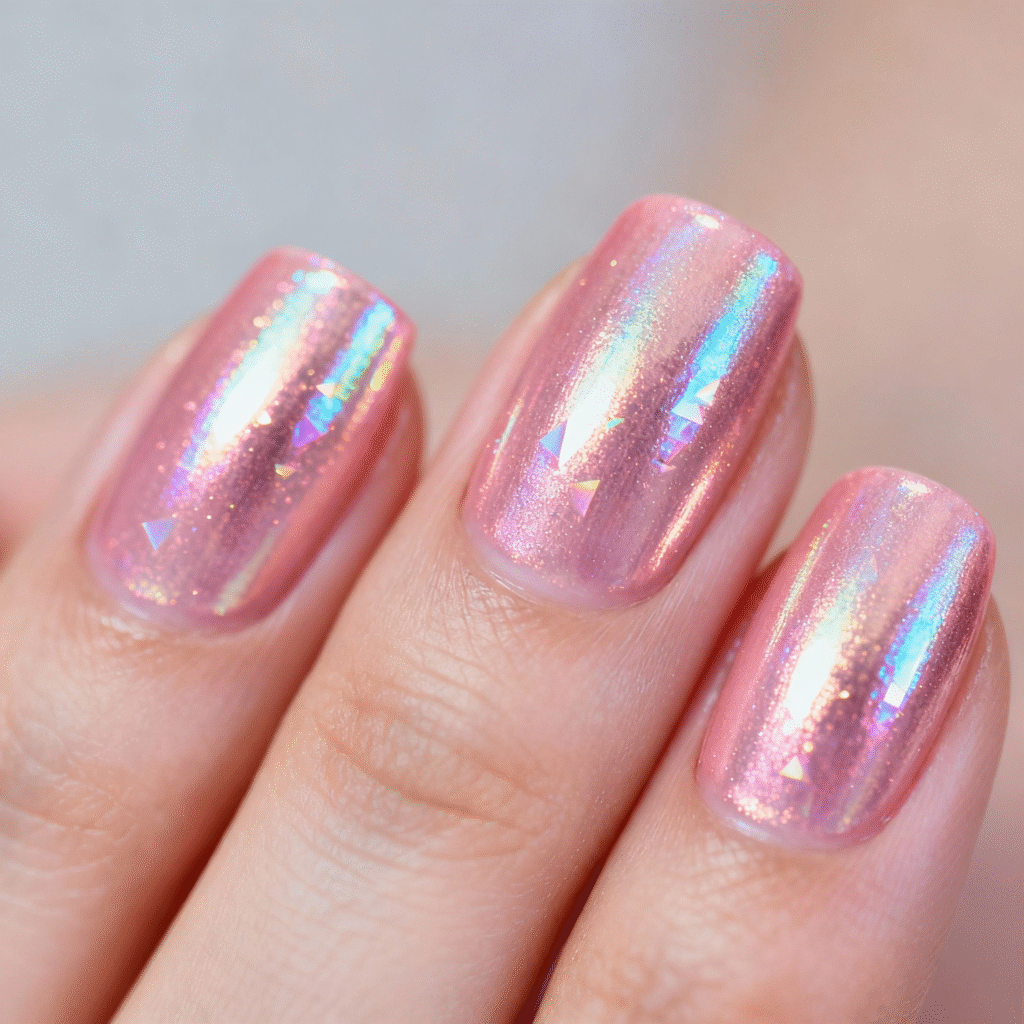
20. Diamond Dust Nails
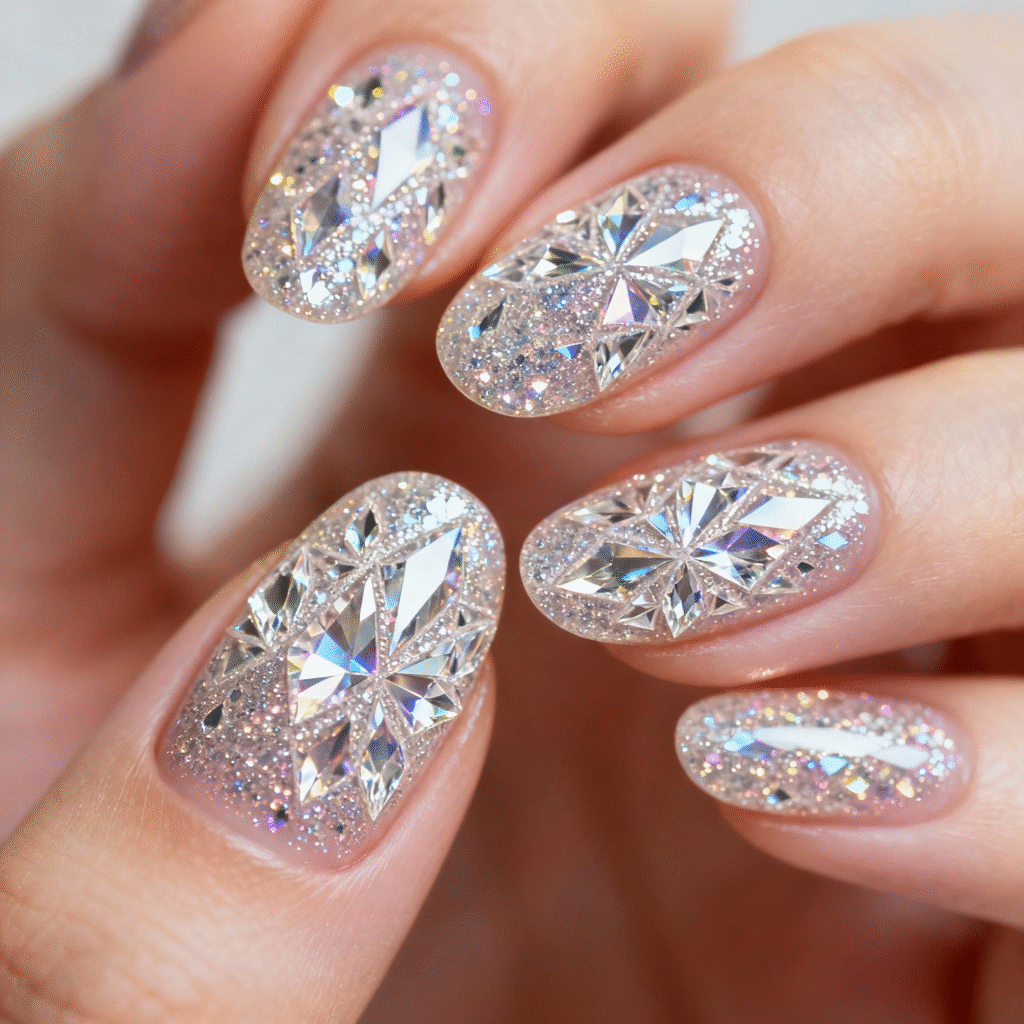
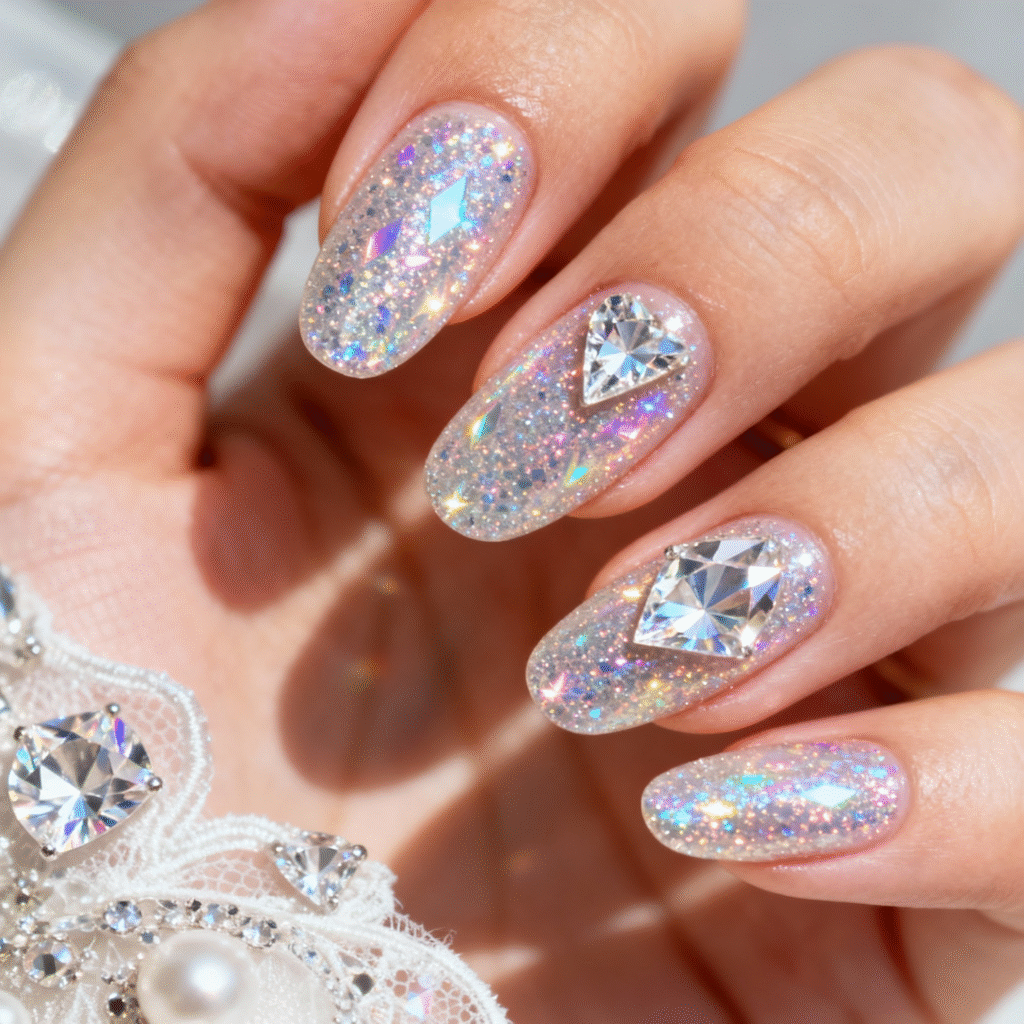
About the Design:
Diamond dust nails sparkle with a fine, crushed-diamond effect achieved through holographic micro-glitter. This look is made for brides who love a bold, luxurious statement.
What Makes This Design Unique:
The multidimensional shimmer mimics the brilliance of real diamonds, reflecting light at every angle. It’s both regal and eye-catching, ensuring your nails stand out in every wedding photo.
How to Do It (Step by Step):
- Apply a silver or nude base coat and let it dry fully.
- Dust holographic glitter evenly over each nail using a small sponge.
- Press gently to embed the sparkle into the polish for full coverage.
- Add a thick, glossy top coat to seal in the shine and protect the finish.
21. Soft Lavender Nails
About the Design:
Soft lavender nails bring a gentle pastel hue to the bridal look, radiating calmness and grace. The subtle purple undertone pairs perfectly with silver or white accessories, offering a hint of color that’s both sophisticated and romantic.
What Makes This Design Unique:
Unlike brighter purples, soft lavender feels airy and refined. The pastel tone reflects femininity and elegance, perfect for spring or vintage-themed weddings. It adds a graceful touch while maintaining a timeless bridal charm.
How to Do It (Step by Step):
- Start with a strengthening base coat to protect natural nails.
- Apply two thin coats of lavender polish for smooth, even color.
- Allow each layer to dry before adding a final coat for depth.
- Finish with a high-shine top coat to enhance the soft pastel glow.
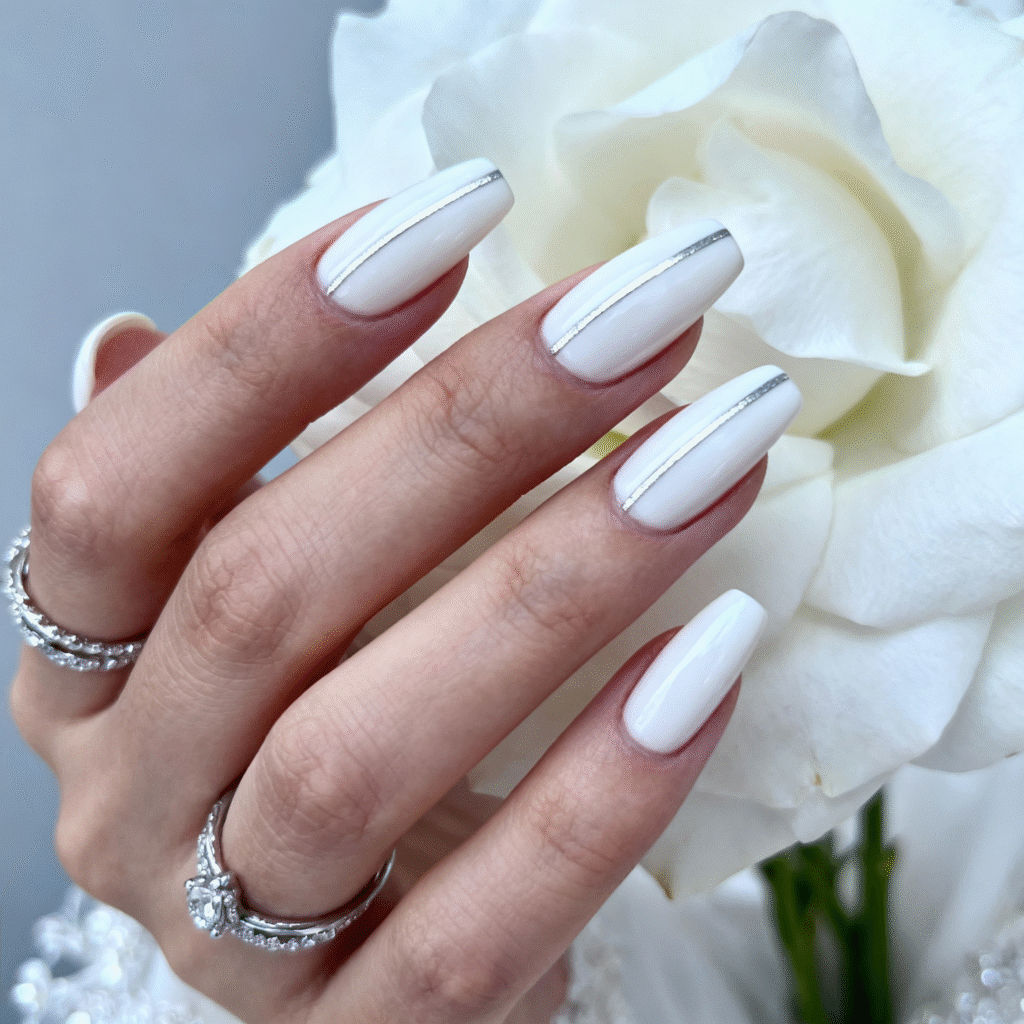
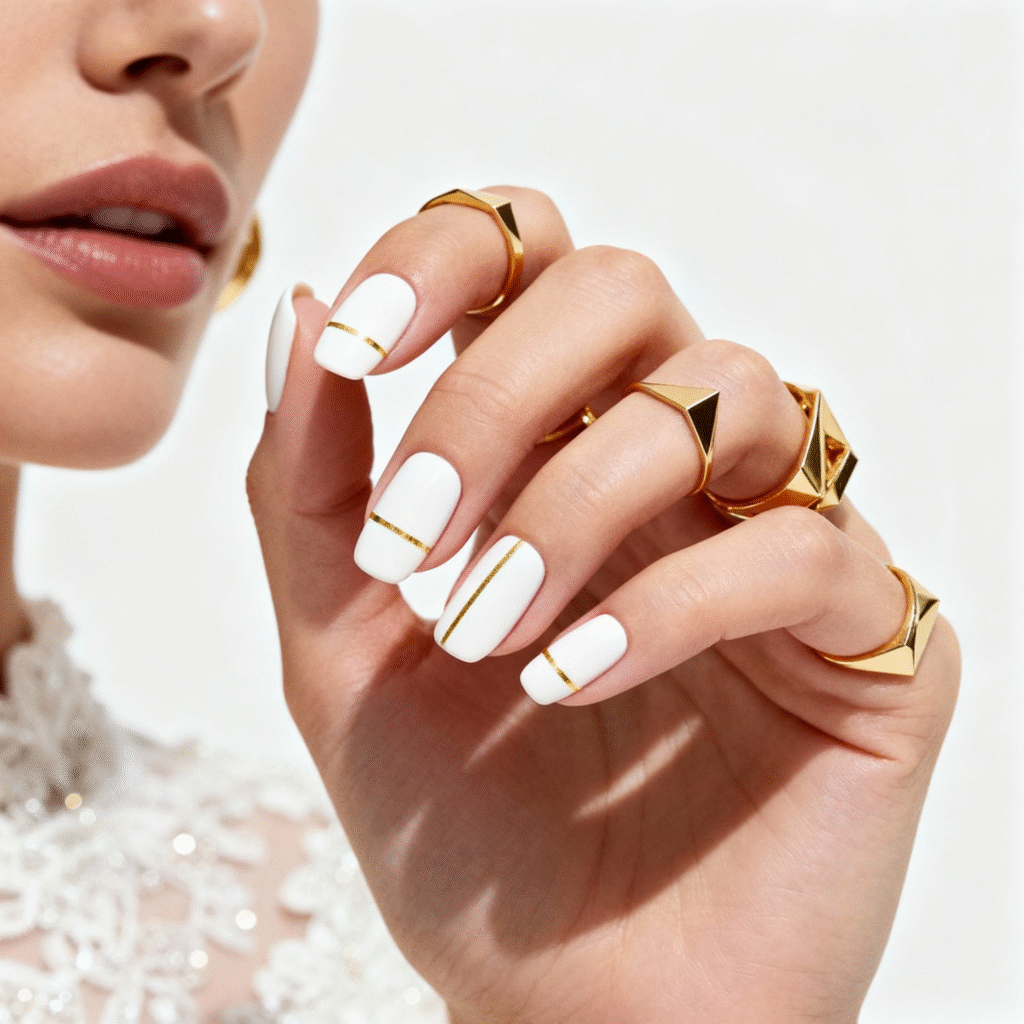
22. Minimalist Gold Line Nails
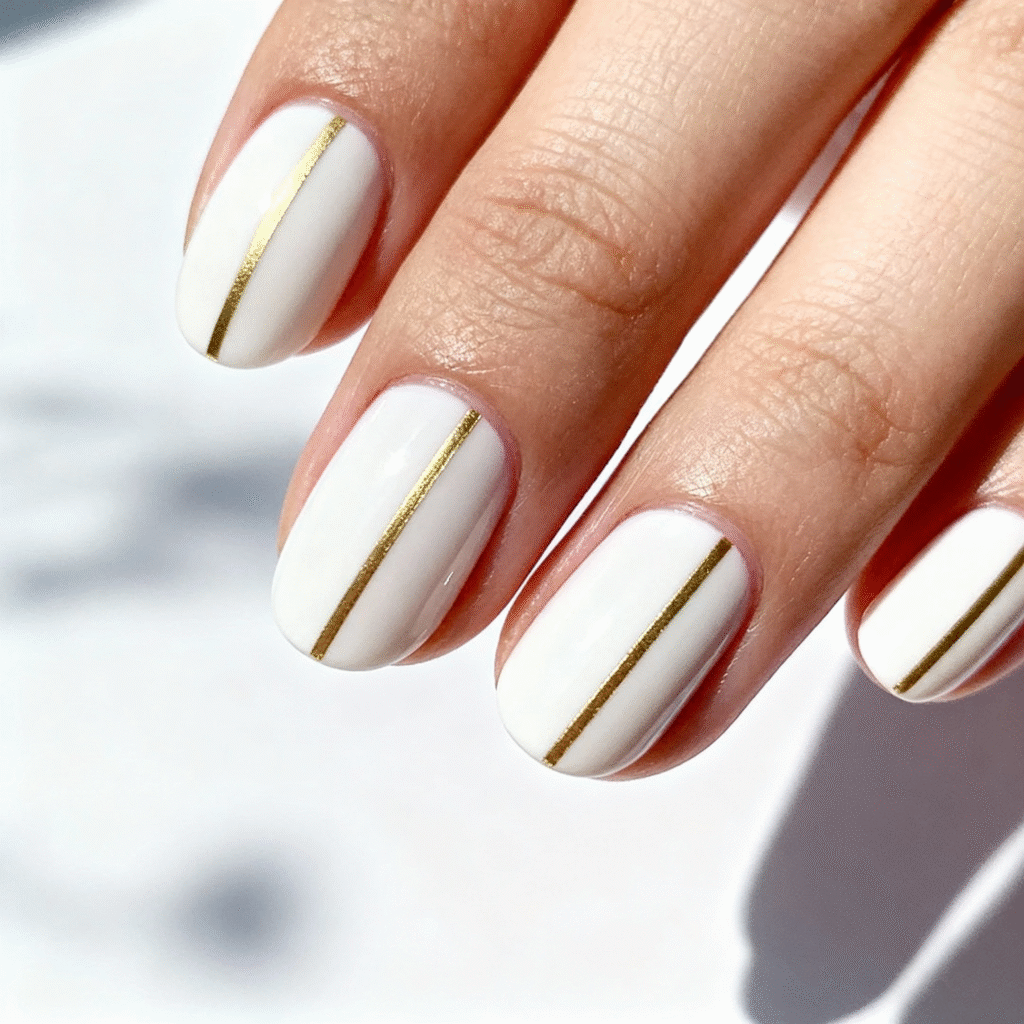

About the Design:
Minimalist gold line nails feature a nude or white base accented by a single thin gold stripe. This chic design suits brides who adore simplicity with a modern luxury twist.
What Makes This Design Unique:
The clean geometric line adds sophistication without distraction. It’s perfect for minimalist brides who prefer elegance through subtle detail rather than ornate decoration.
How to Do It (Step by Step):
- Apply a sheer nude or ivory polish as your base and let it dry.
- Use gold striping tape or a fine brush to draw a clean line down the nail’s center.
- Press the line gently to secure it evenly on each nail.
- Apply a top coat to lock the design and maintain its sleek finish.
23. Transparent Nails with Silver Glitter Veins
About the Design:
Transparent nails with silver glitter veins give the illusion of crystal quartz. This ethereal design brings a unique, magical glow to bridal manicures.
What Makes This Design Unique:
The translucent base enhances the glitter’s movement and depth, giving nails a gemstone-like appearance. It’s perfect for brides seeking a fresh, artistic, and celestial-inspired touch.
How to Do It (Step by Step):
- Apply a clear or milky polish as your base layer.
- Use a fine brush to draw irregular silver glitter lines like natural stone veins.
- Add subtle shimmer around the lines for extra sparkle.
- Seal with a clear top coat for a glossy, glass-like finish.
24. Beige Nails with White Tips
About the Design:
A modern variation of the French manicure, beige nails with crisp white tips create a soft, neutral look that enhances the natural beauty of the hands.
What Makes This Design Unique:
The beige base adds warmth compared to traditional pink tones, complementing all skin shades beautifully. It’s understated yet refined, ideal for brides who appreciate clean, timeless elegance.
How to Do It (Step by Step):
- Paint nails with a beige polish and let them dry completely.
- Use a fine brush to paint thin white tips for precision.
- Allow the tips to dry and fix any uneven edges carefully.
- Apply a glossy top coat for a professional salon-like finish.
25. Iridescent Pink Chrome Nails
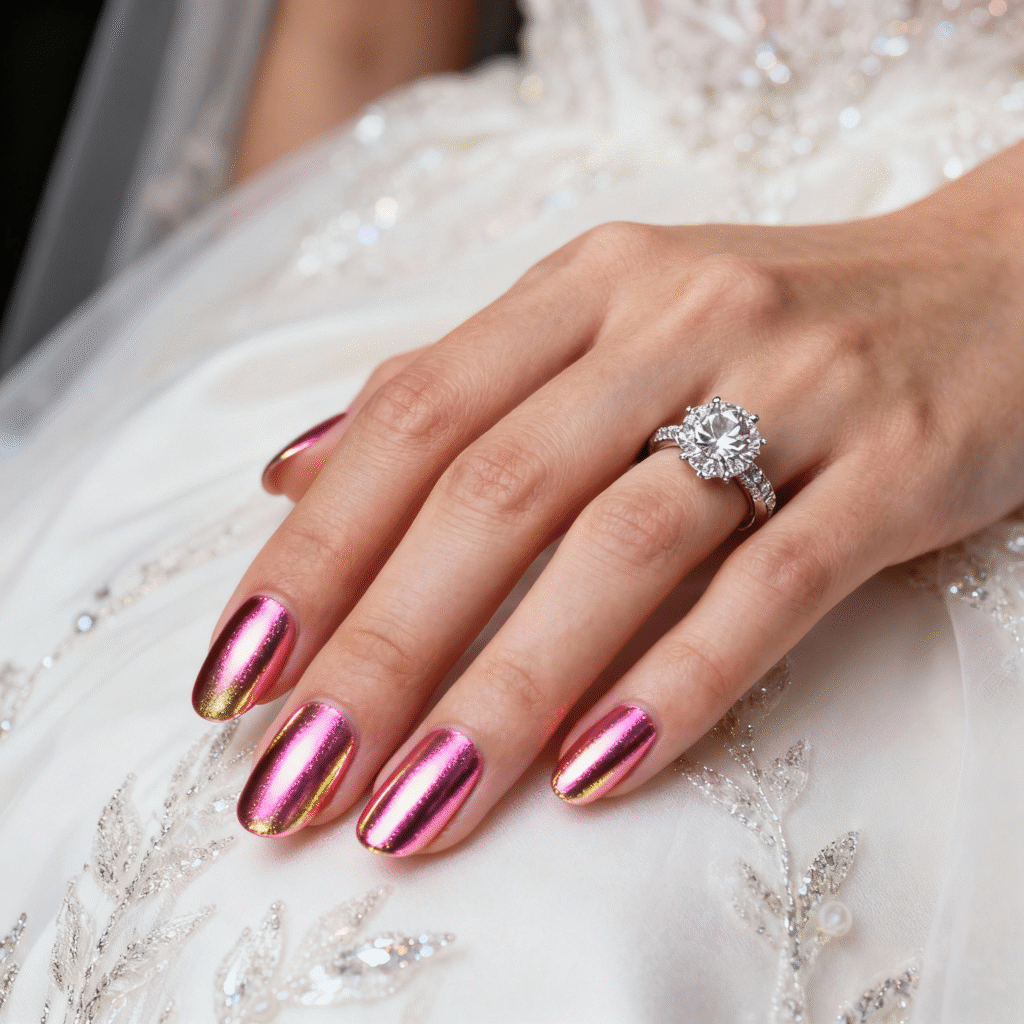
About the Design:
Iridescent pink chrome nails reflect light in shimmering tones of rose, pearl, and gold. This radiant look enhances the bride’s glow and feels effortlessly luxurious.
What Makes This Design Unique:
The chrome finish provides a futuristic yet delicate aesthetic. Its soft color-shifting reflection captures the dreamy essence of bridal beauty, making every photo sparkle.
How to Do It (Step by Step):
- Start with a pale pink base and cure if using gel polish.
- Rub iridescent chrome powder using a sponge for the mirror effect.
- Buff lightly to reveal a smooth, glowing finish.
- Apply a no-wipe top coat for brilliance and durability.
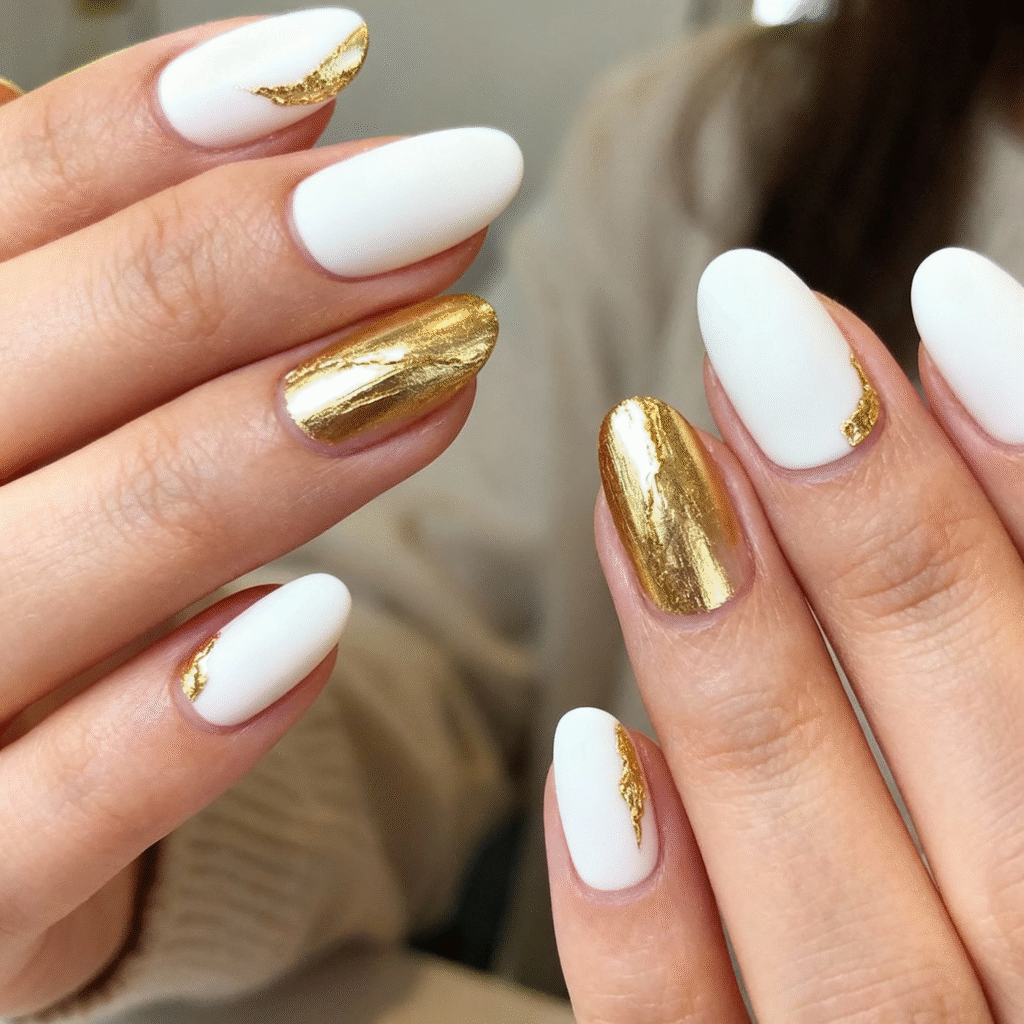
26. White Nails with Gold Leaf Accent
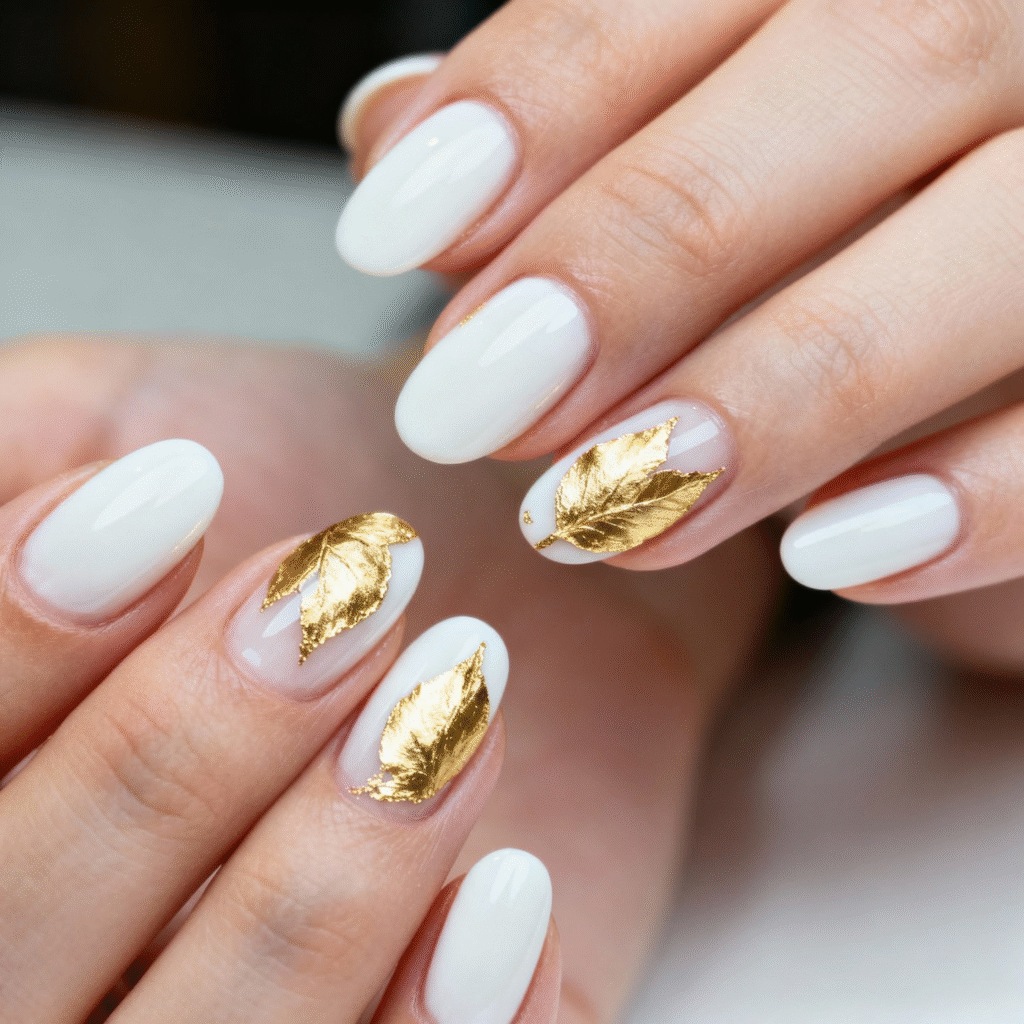
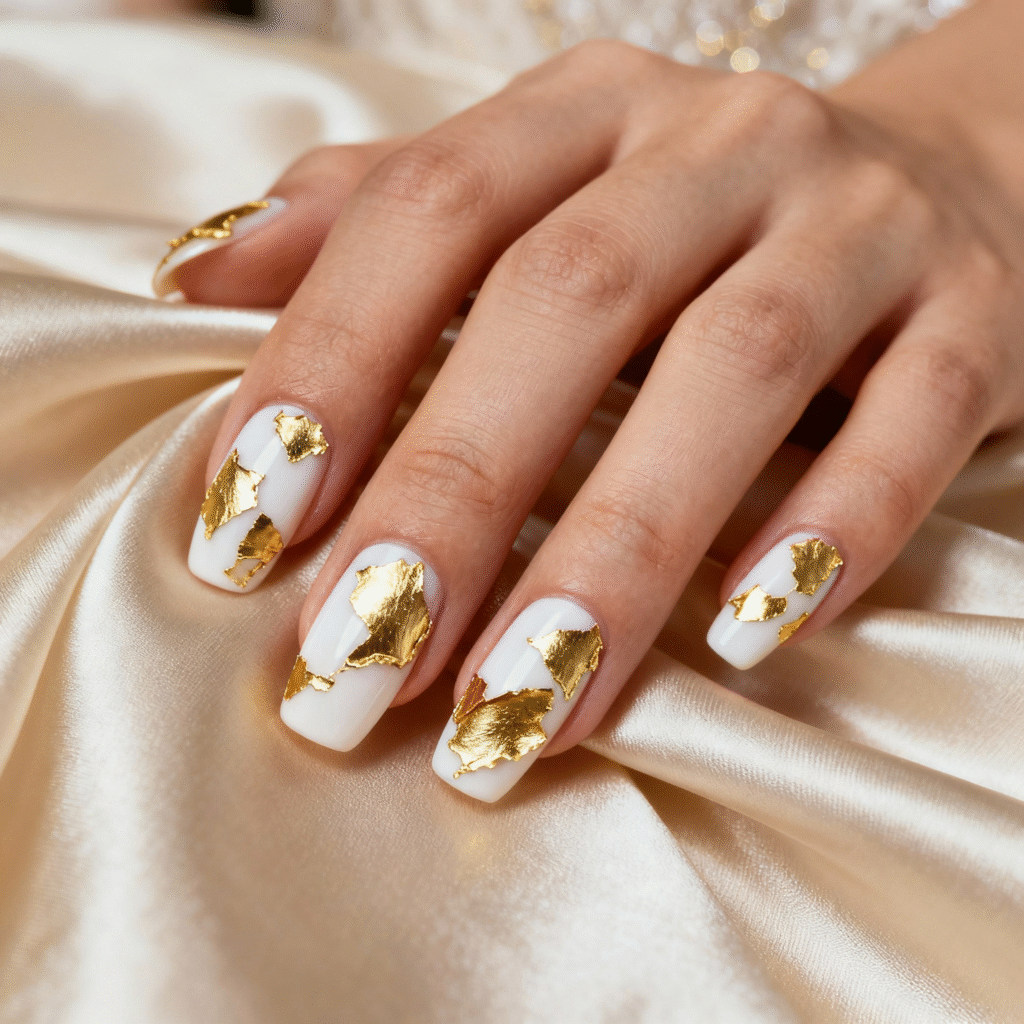
About the Design:
This design merges the purity of white polish with the glamour of gold leaf accents. The artistic gold flakes stand out against the clean background, creating a balance of modern and regal.
What Makes This Design Unique:
Each nail becomes a piece of abstract art. The random gold leaf placement ensures that every nail looks one-of-a-kind, making it ideal for brides who love luxury with individuality.
How to Do It (Step by Step):
- Paint nails with two coats of white polish and let dry.
- Use tweezers to gently place small gold leaf pieces on chosen areas.
- Press the foil lightly to adhere smoothly to the surface.
- Add a thick top coat to seal and enhance the luminous contrast.
27. Nude Nails with White Polka Dots
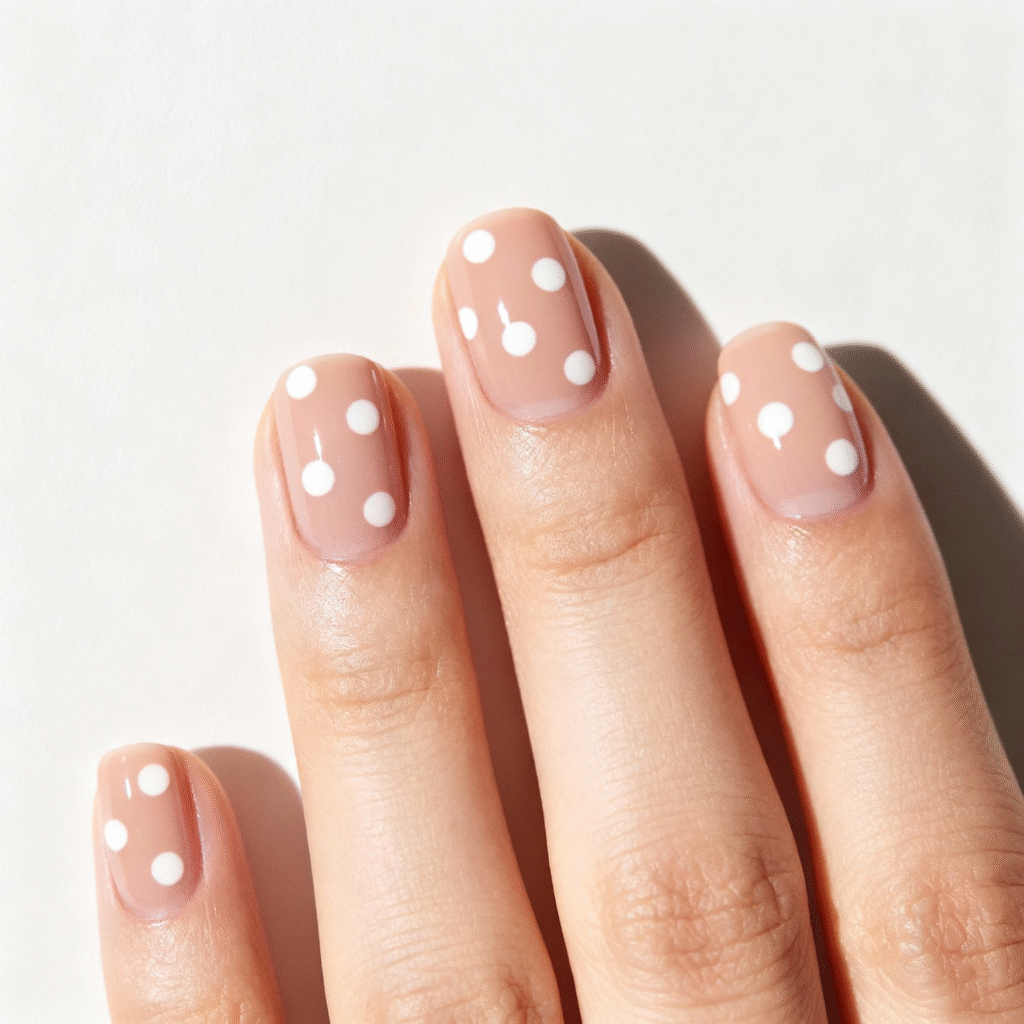
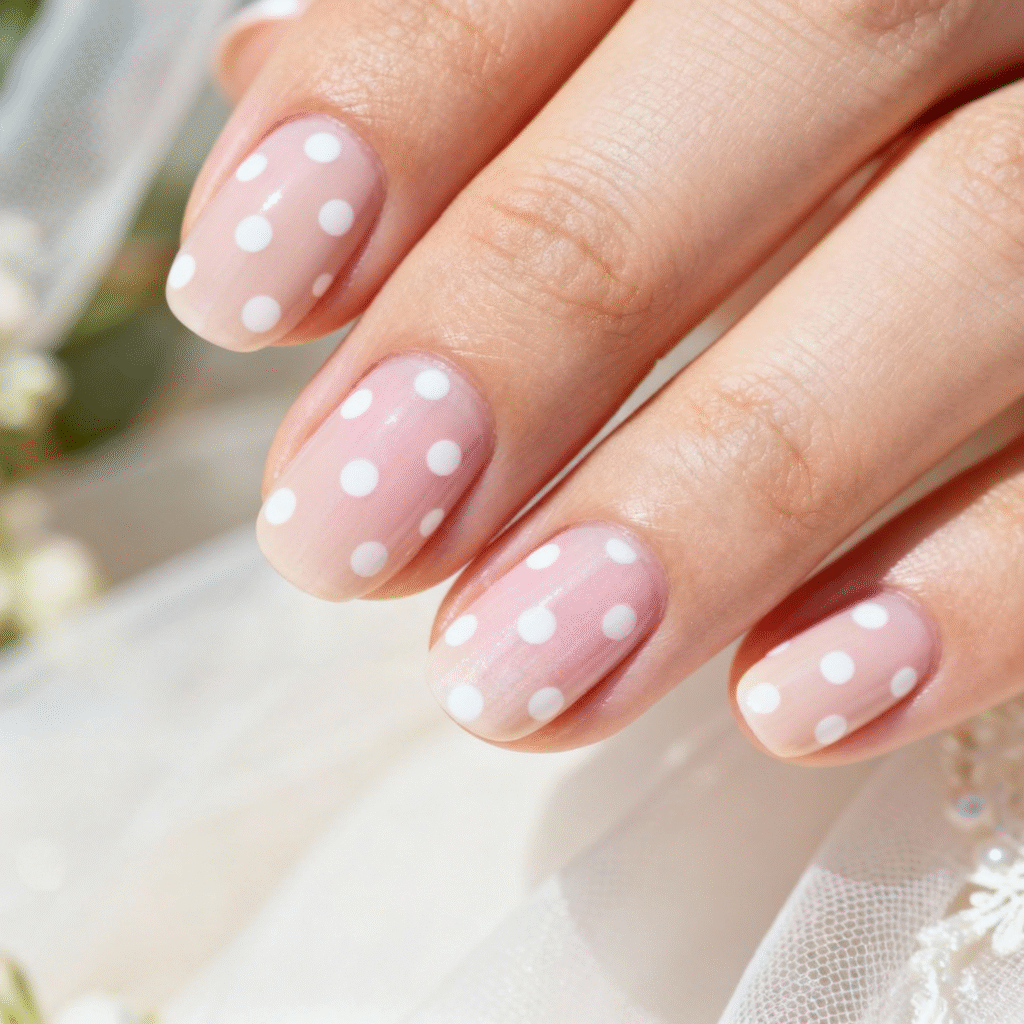
About the Design:
Cute yet elegant, nude nails with white polka dots bring playful charm to the bridal aesthetic. The soft design feels fresh, minimal, and easy to match with any gown.
What Makes This Design Unique:
The dotted pattern adds texture and fun without being overpowering. It’s the perfect balance between modern simplicity and youthful energy.
How to Do It (Step by Step):
- Apply a nude or blush polish as your base and let it dry.
- Use a dotting tool to create small white dots evenly across each nail.
- Keep the dots consistent for a clean, minimal pattern.
- Finish with a glossy top coat for a polished result.
28. Pink Nails with Silver Foil Tips
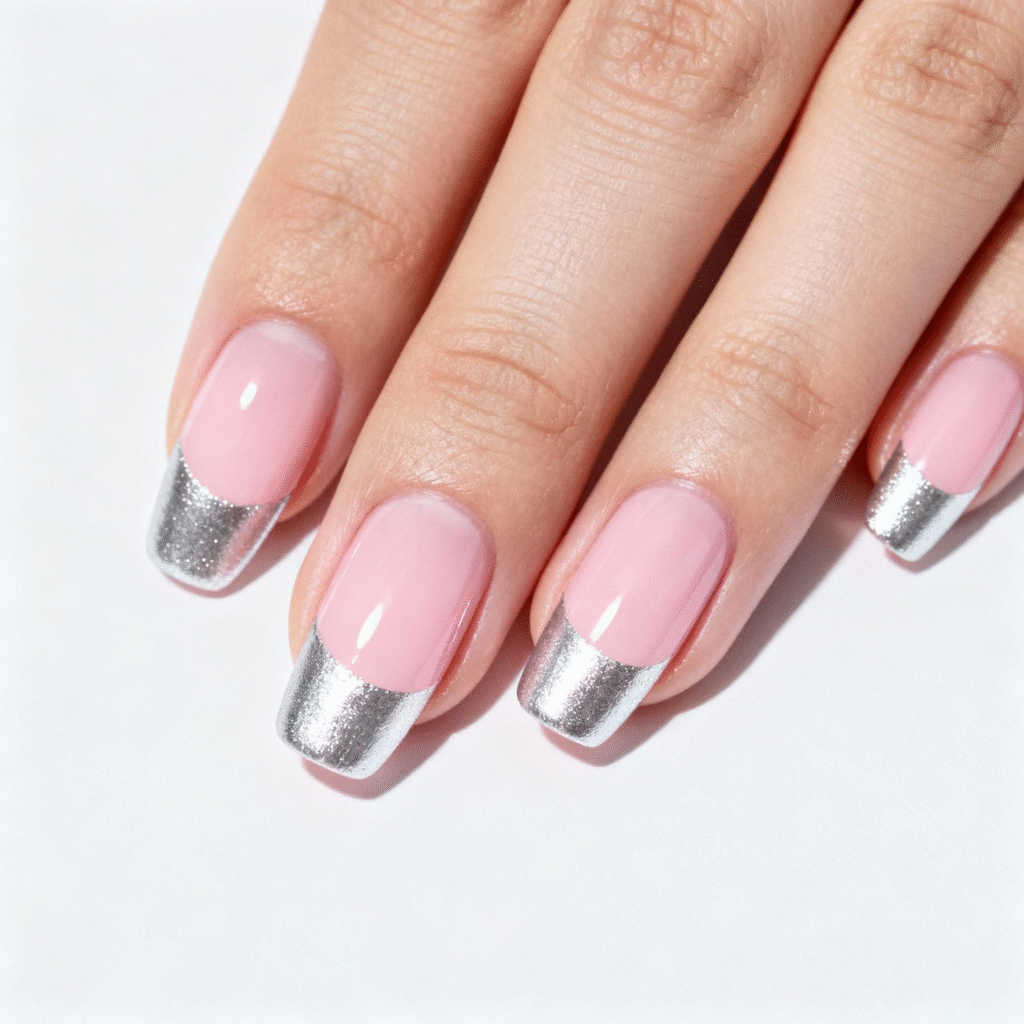
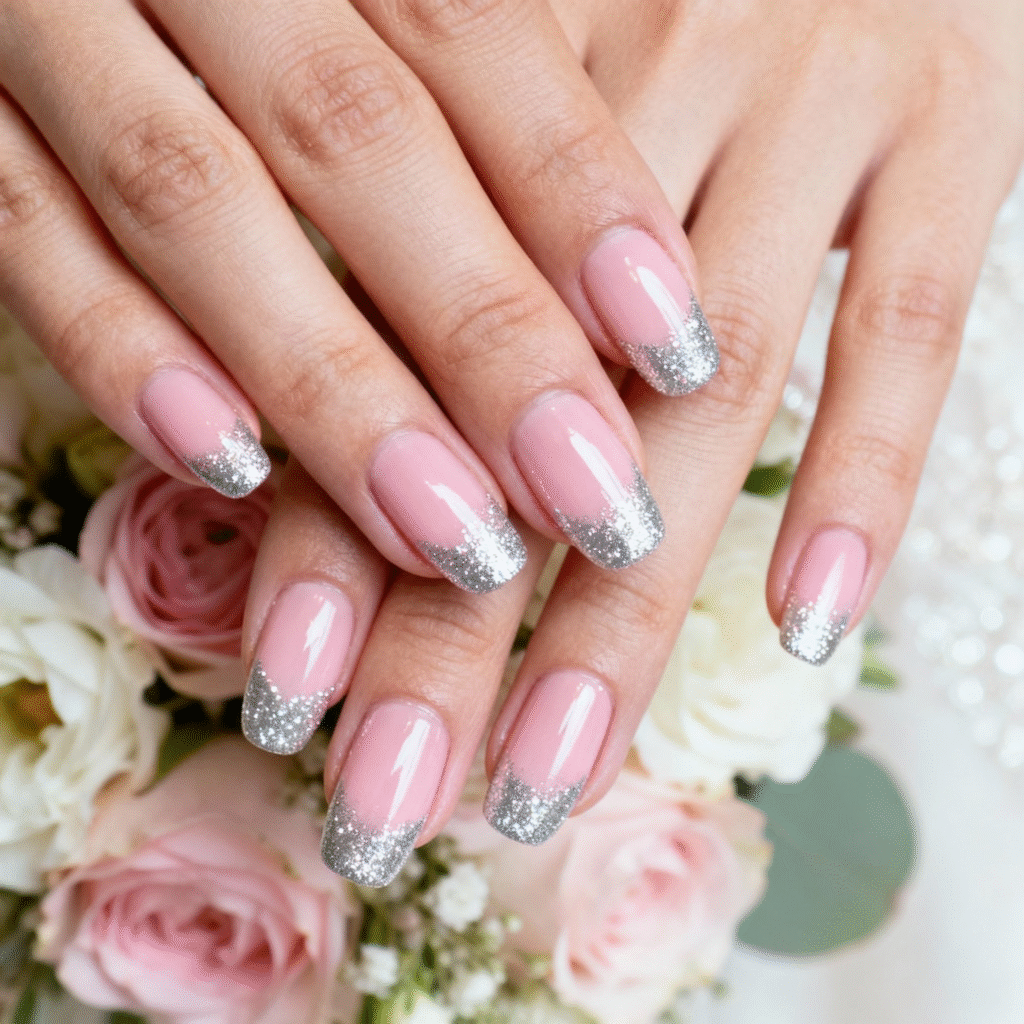
About the Design:
This glamorous bridal nail design blends romantic pink polish with dazzling silver foil tips. It’s a contemporary take on classic bridal elegance, offering subtle shine and depth.
What Makes This Design Unique:
The silver foil adds sparkle precisely where it’s needed—the tips. It elevates the pink tone beautifully, balancing softness with brilliance for a picture-perfect bridal finish.
How to Do It (Step by Step):
- Paint nails with a blush pink polish and allow them to dry.
- Gently press small silver foil pieces along the tips.
- Adjust placement for even coverage and balance.
- Seal with a glossy top coat to protect and smooth the design.
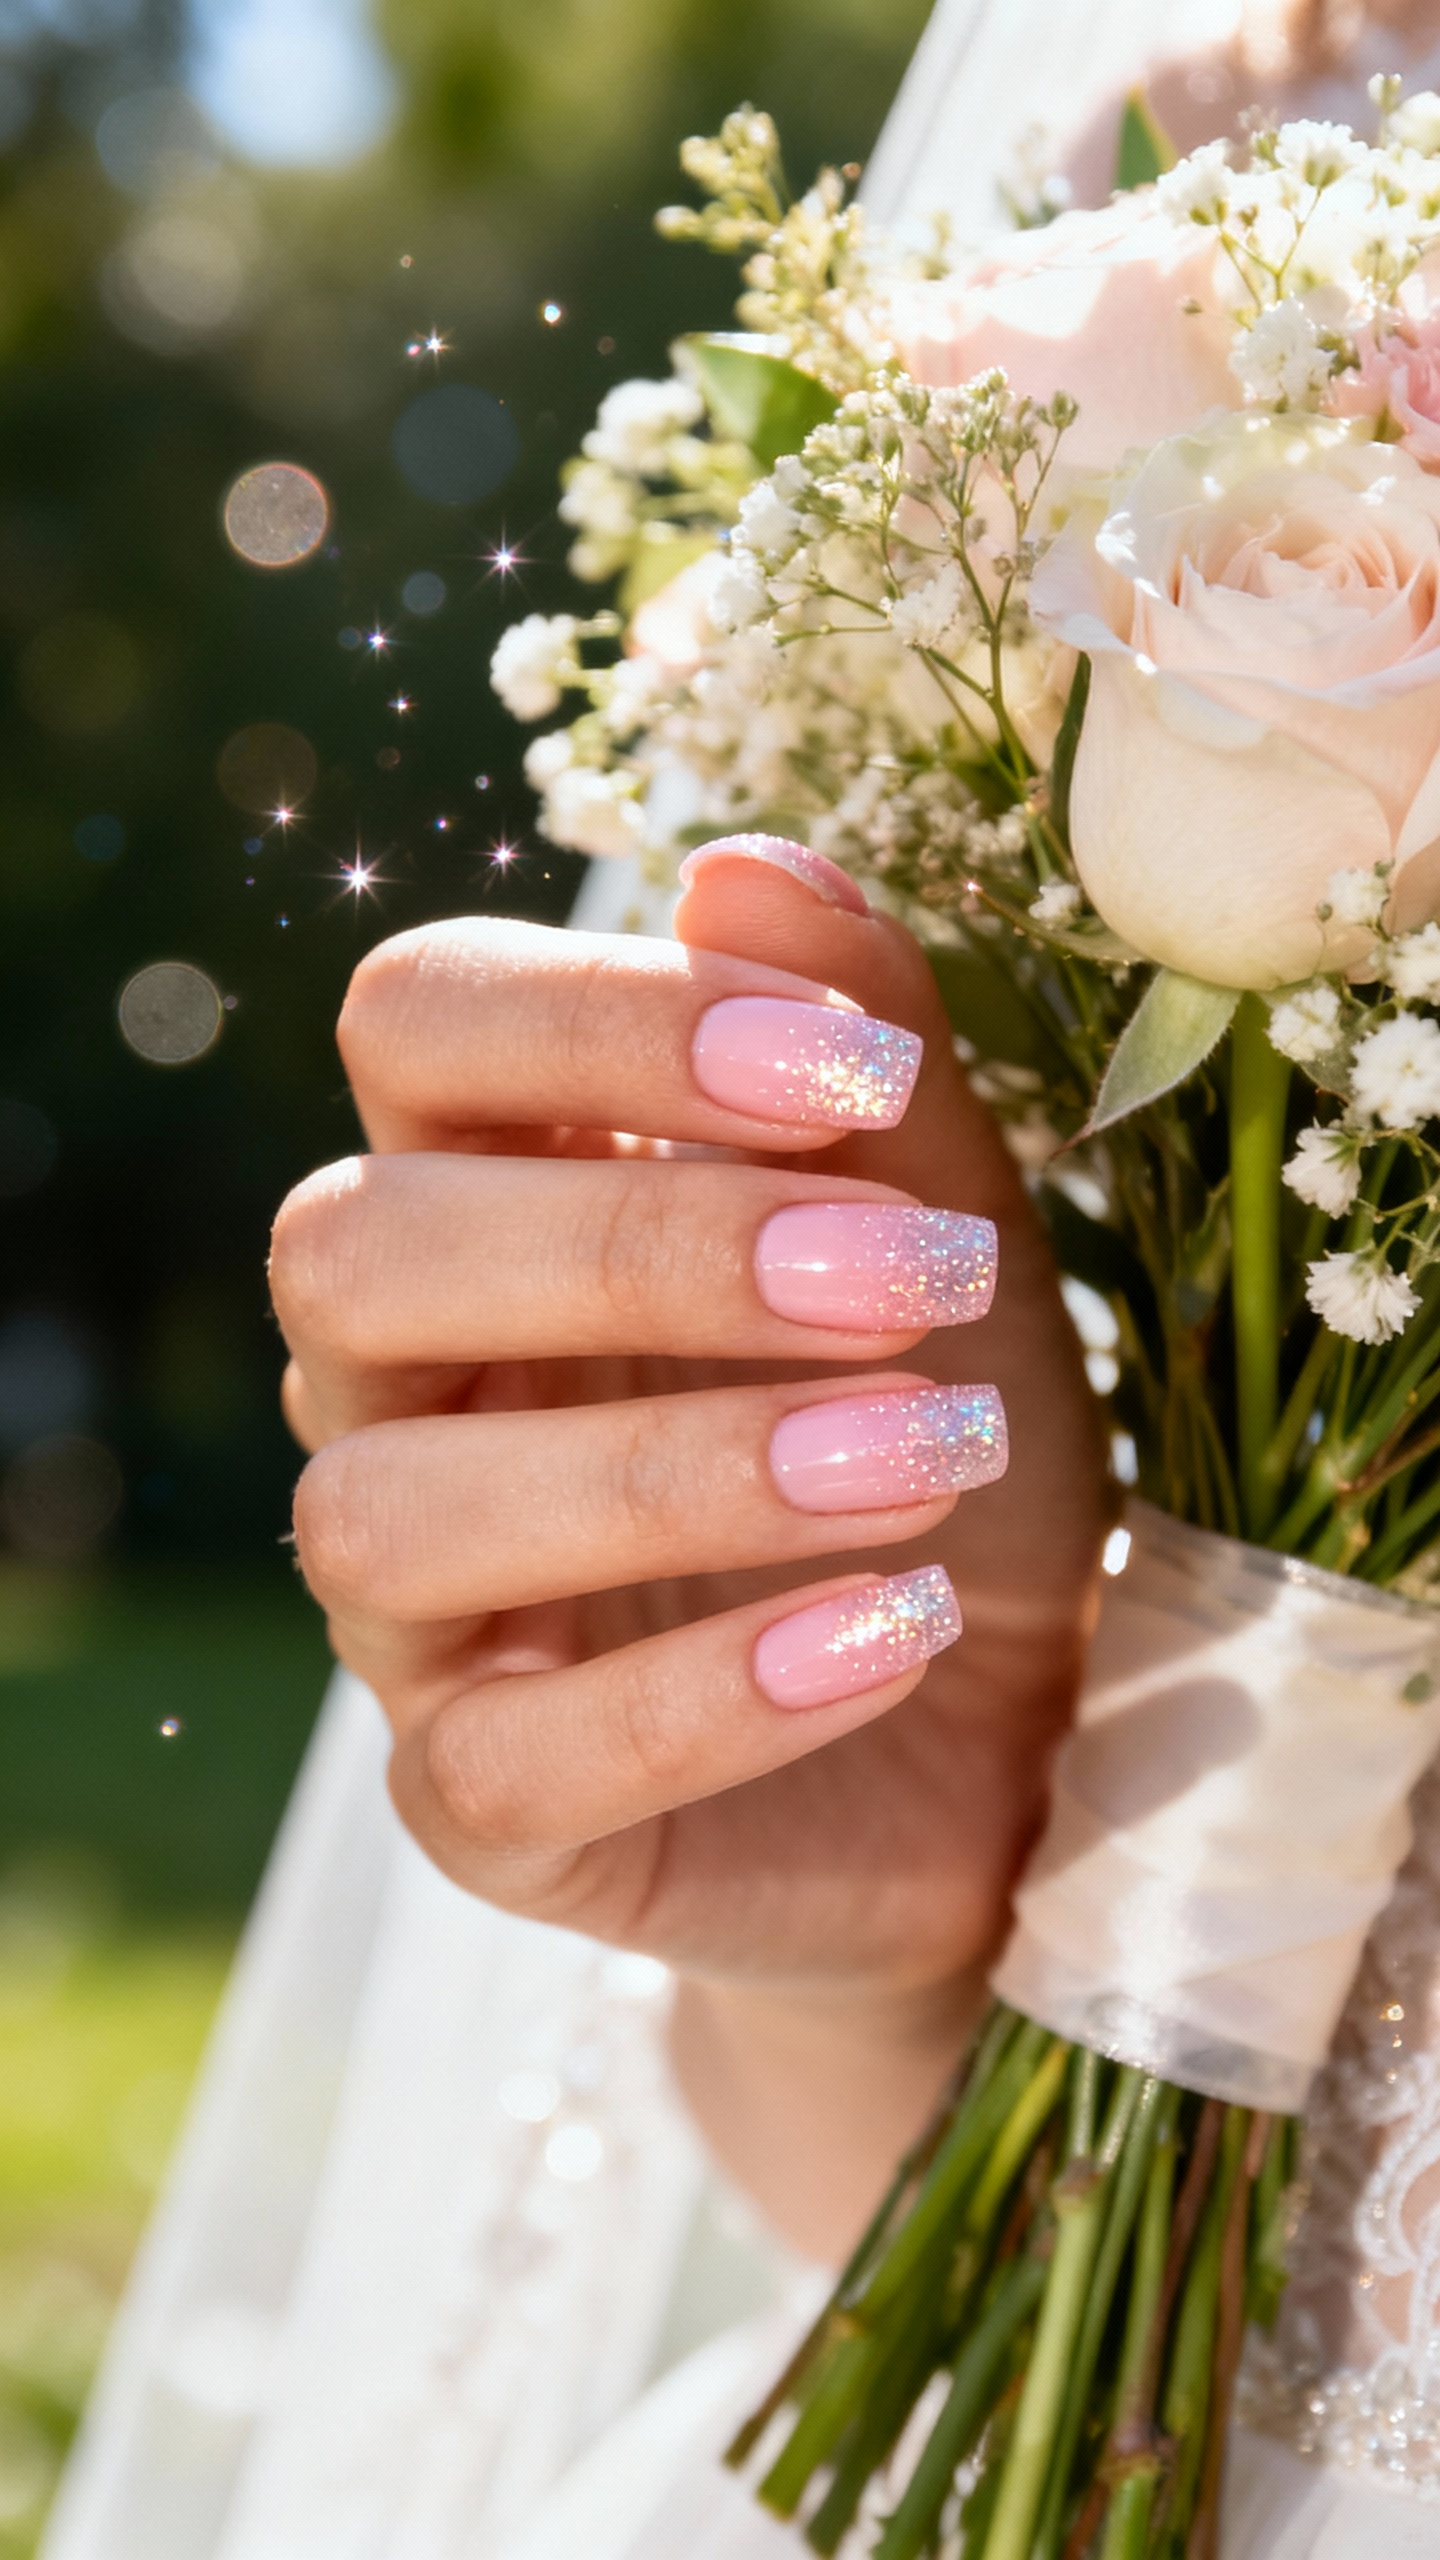
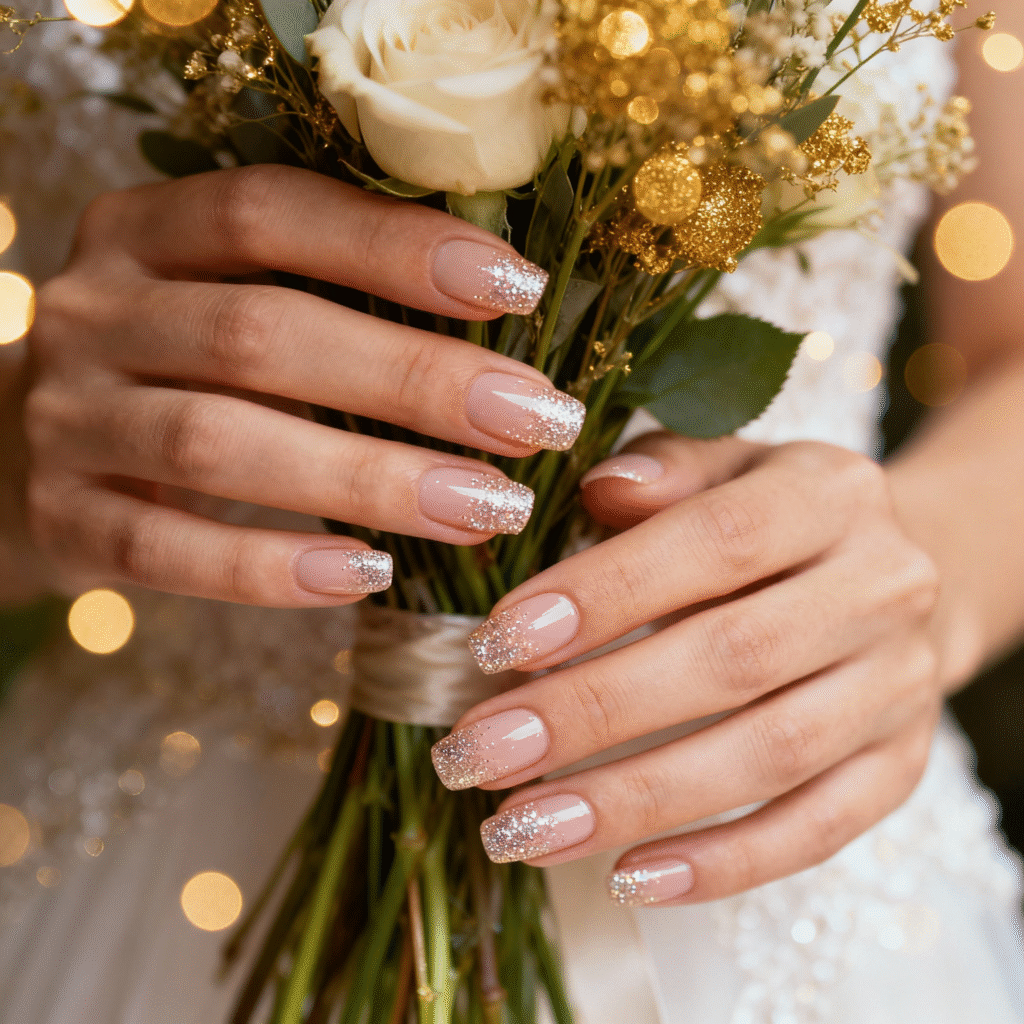
29. Sheer Glitter Gradient Nails
About the Design:
Sheer glitter gradient nails transition from clear or nude bases into soft glittery tips. The subtle sparkle gives an ethereal, floating effect ideal for brides who want understated shimmer.
What Makes This Design Unique:
The fading glitter creates an illusion of light movement. It looks delicate and elegant, capturing just enough glow to complement the wedding ring beautifully.
How to Do It (Step by Step):
- Start with a sheer nude polish as your base and let it dry.
- Dab glitter polish at the tips using a sponge for gradient blending.
- Build up the glitter slowly for a natural fade effect.
- Apply a clear top coat for extra shine and smoothness.
30. White Nails with Tiny Silver Hearts
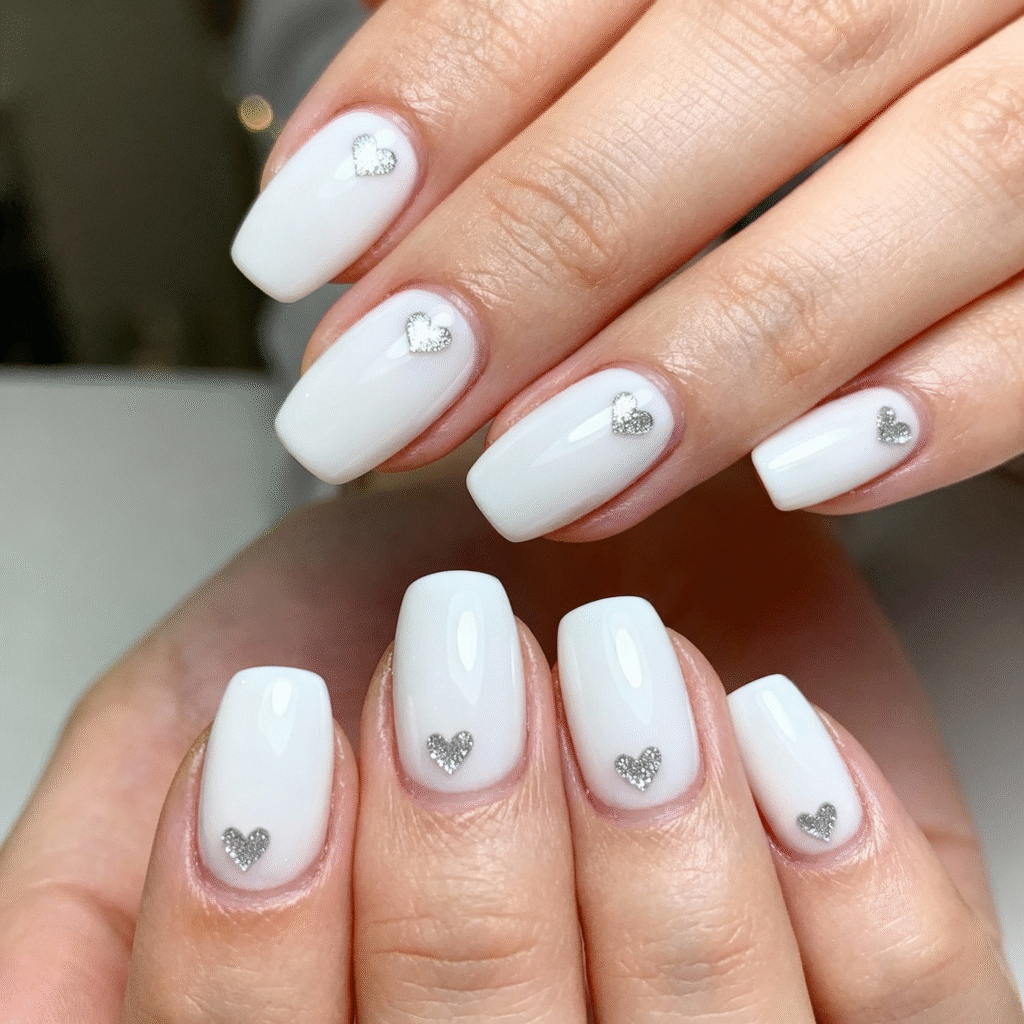
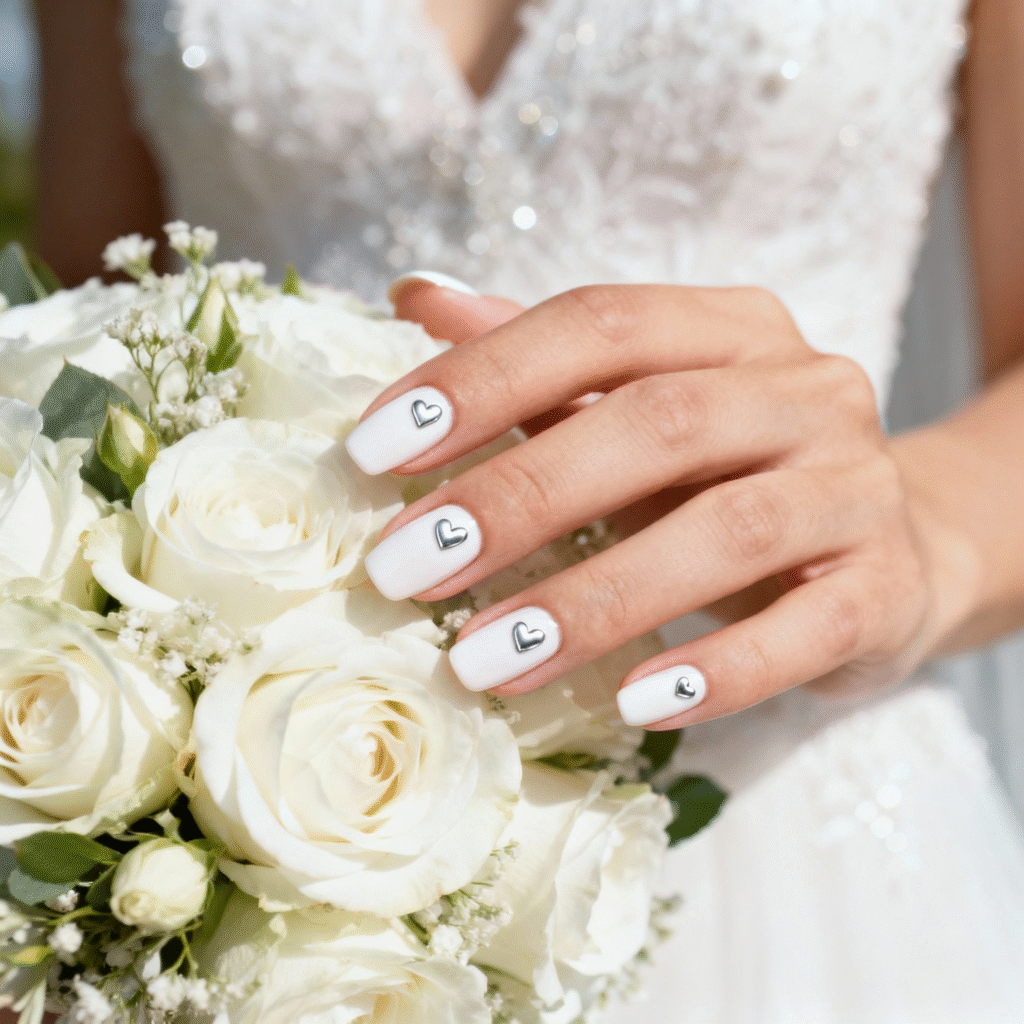
About the Design:
White nails decorated with tiny silver hearts are the epitome of bridal romance. This design is delicate, sweet, and symbolic—perfect for expressing love through minimalist nail art.
What Makes This Design Unique:
Each silver heart adds a subtle yet meaningful detail. It’s charming and elegant, symbolizing eternal love while maintaining a soft, refined look perfect for any wedding theme.
How to Do It (Step by Step):
- Apply a smooth white base polish and let it dry completely.
- Use a fine detail brush or stickers to add tiny silver heart shapes.
- Space them evenly for a balanced and delicate finish.
- Seal with a glossy top coat for protection and a long-lasting gleam.
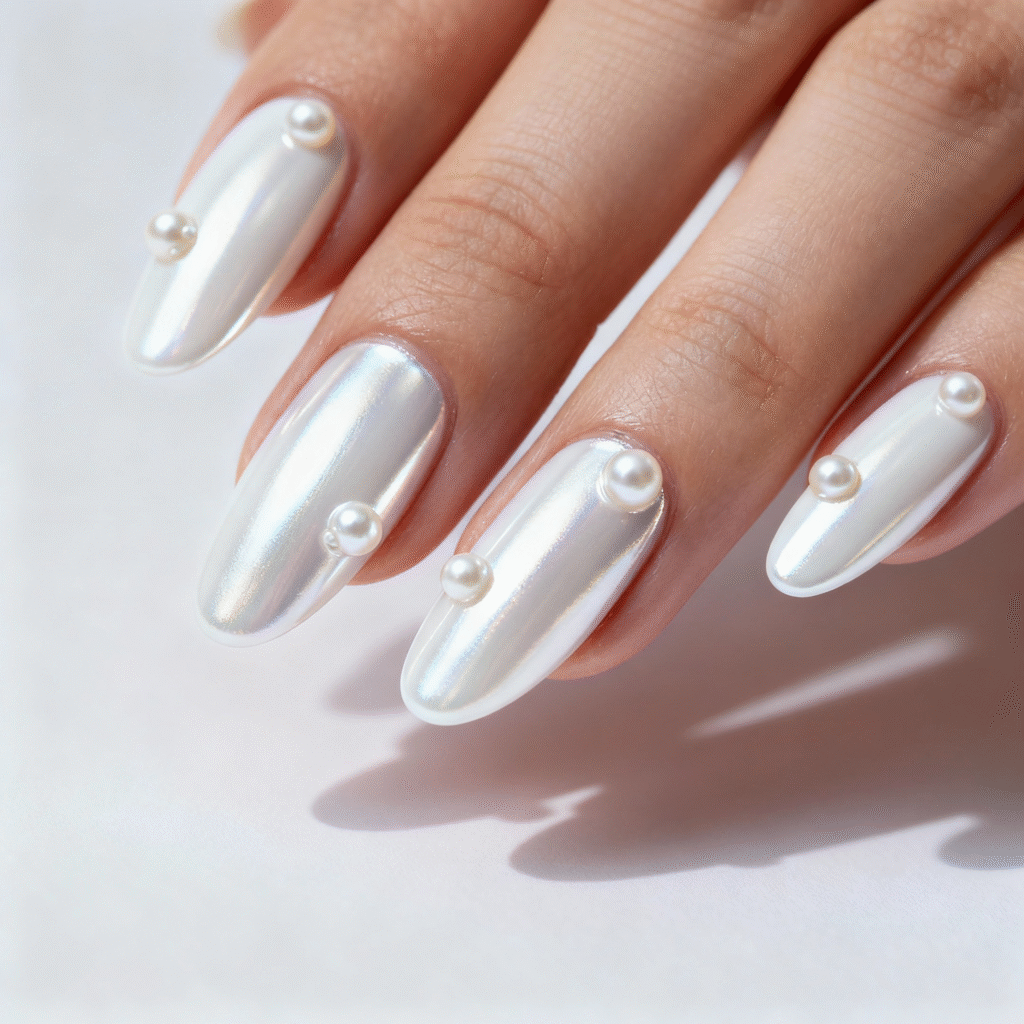
31. Ivory Nails with Micro Crystals
About the Design:
Ivory nails with micro crystals are the definition of bridal luxury. The soft ivory tone enhances natural elegance, while micro-sized crystals create a refined sparkle that looks mesmerizing in both daylight and candlelight.
What Makes This Design Unique:
Unlike large embellishments, micro crystals offer a delicate shimmer without heaviness. The result is sophisticated and luminous—perfect for brides who want something glamorous yet graceful.
How to Do It (Step by Step):
- Apply two thin coats of ivory polish and let them dry thoroughly.
- Use a fine-tipped tool to place micro crystals evenly near the cuticles or tips.
- Press each crystal gently to secure it firmly into the polish.
- Apply a thick gel or glossy top coat to protect and enhance shine.
32. Frosted White Nails
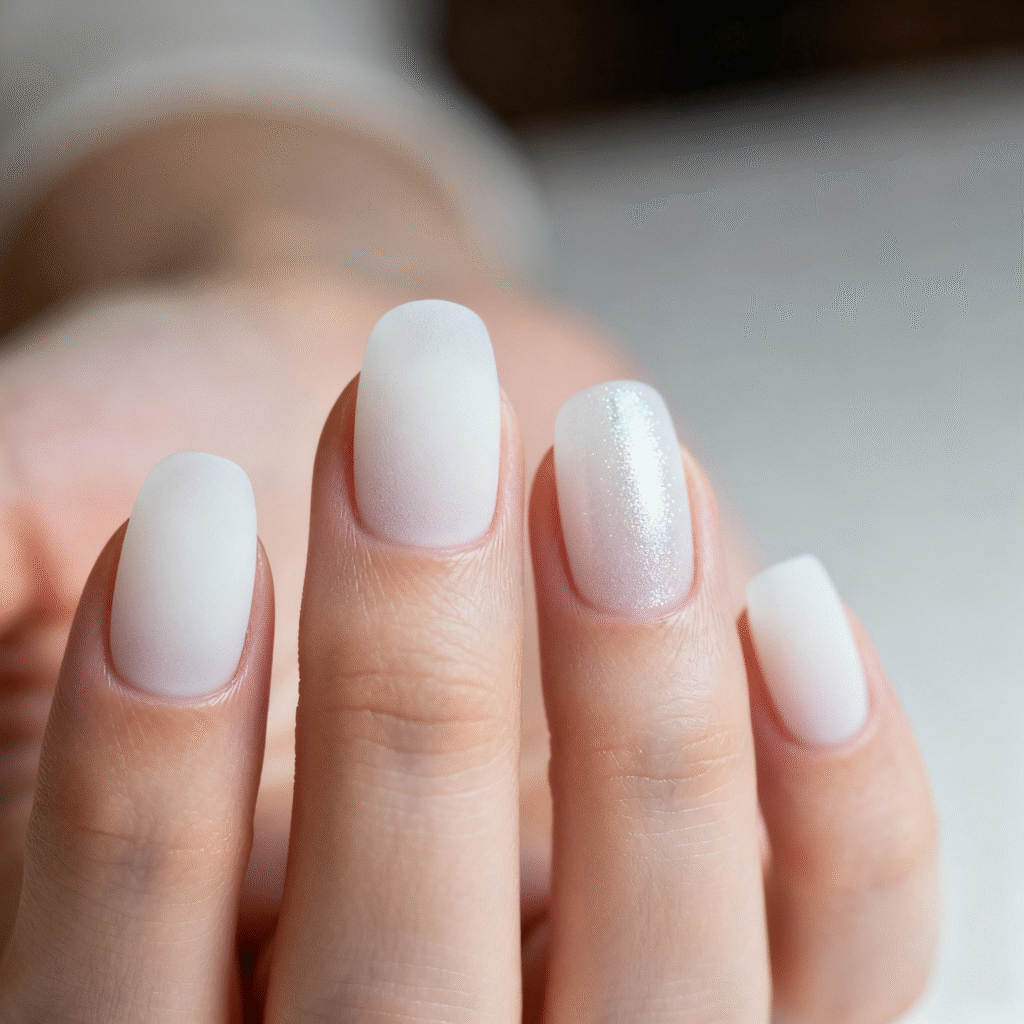
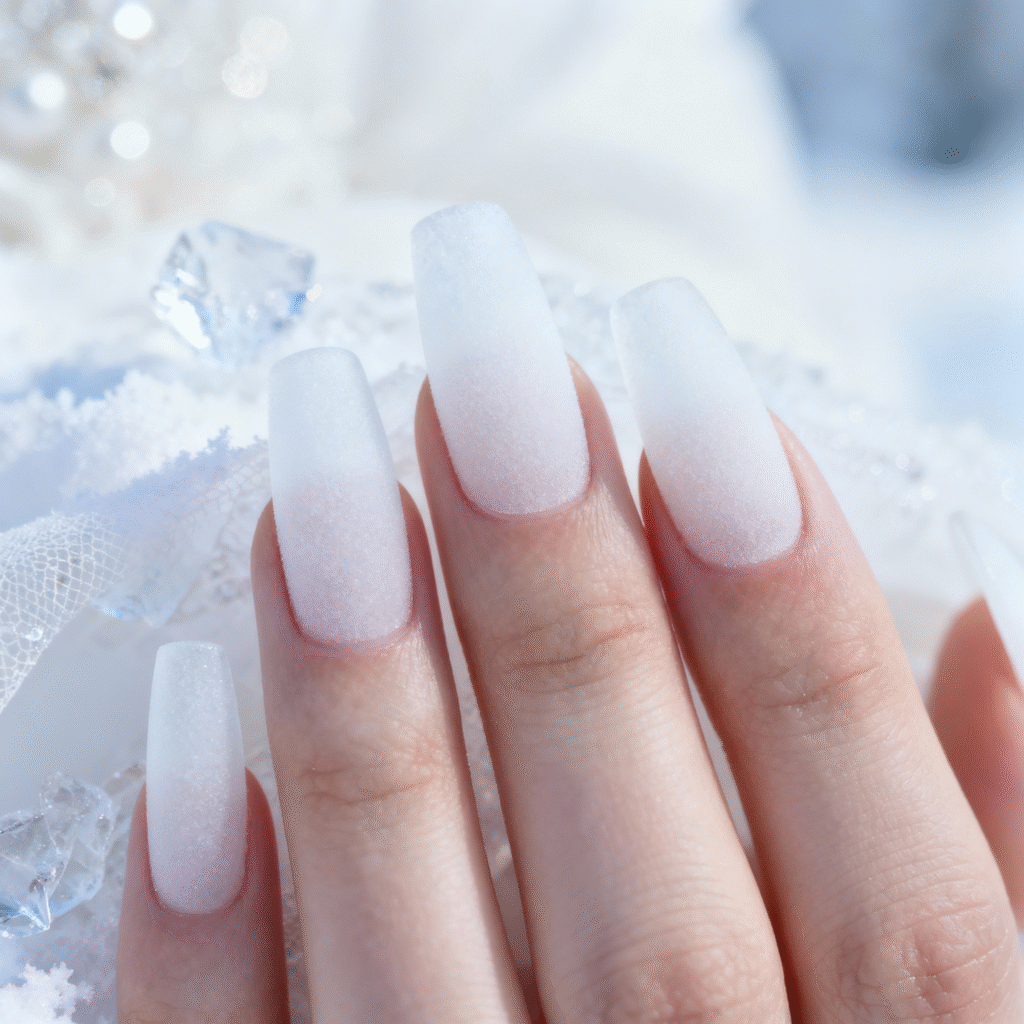
About the Design:
Frosted white nails bring the look of icy elegance to the bridal aesthetic. The semi-matte finish reflects soft light beautifully, evoking wintery charm while staying minimal and timeless.
What Makes This Design Unique:
The frosted texture adds visual depth without any glitter or shine. It’s ideal for brides who love clean lines and understated sophistication—especially for winter or evening weddings.
How to Do It (Step by Step):
- Apply a layer of pure white polish as the base color.
- Once dry, lightly buff the surface for a smooth, matte effect.
- Add a thin coat of frosted matte top coat for that soft, icy look.
- Let dry fully to preserve the unique velvety finish.
33. Nude Nails with White Leaf Art

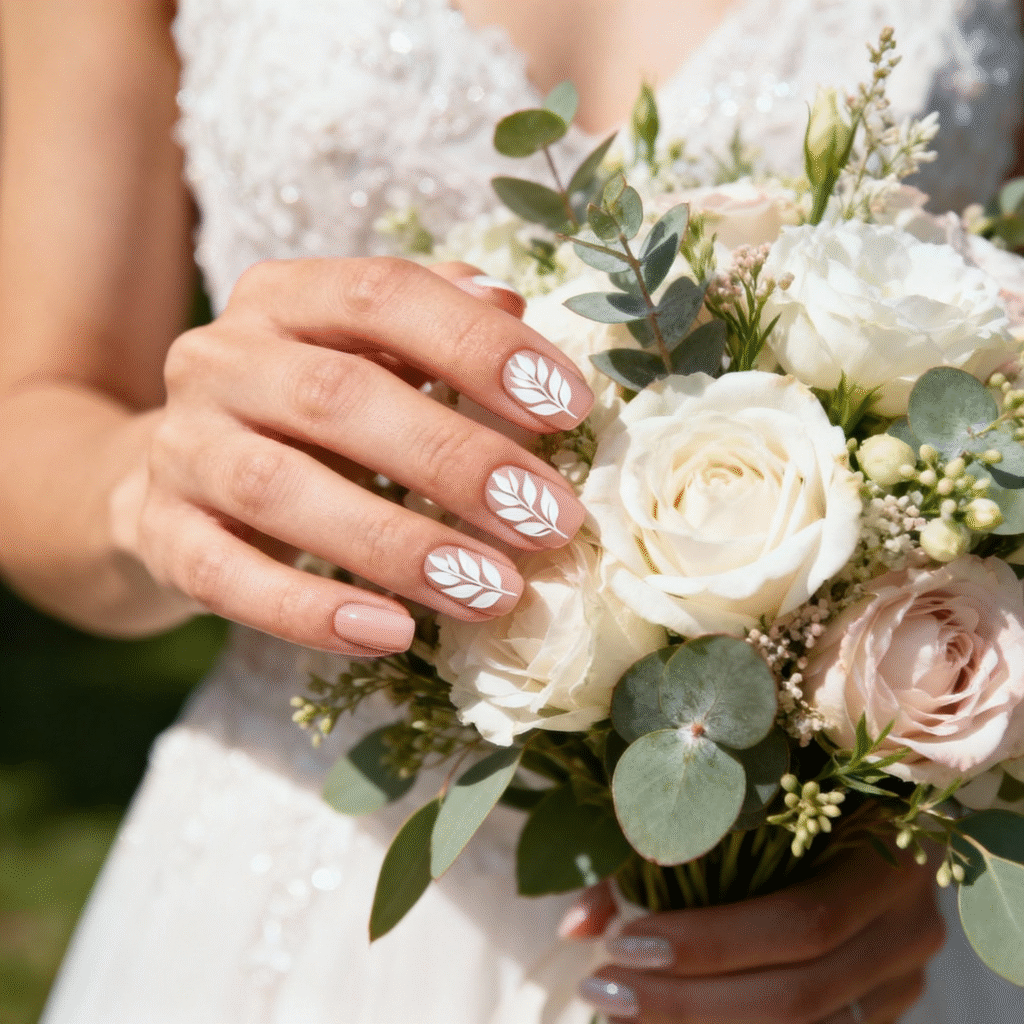
About the Design:
Nude nails with fine white leaf art evoke natural beauty and soft femininity. The design mimics delicate leaves flowing gracefully across each nail, symbolizing growth and new beginnings—perfect for weddings.
What Makes This Design Unique:
Each leaf pattern can be hand-painted, giving every nail its own character. The subtle white-on-nude palette ensures the look remains elegant and organic, ideal for garden or bohemian-style brides.
How to Do It (Step by Step):
- Apply a neutral nude polish and allow it to dry.
- Use a thin detailing brush to draw small white leaf shapes on each nail.
- Add veins or outlines to enhance the natural texture of the leaves.
- Finish with a top coat for long-lasting shine and smoothness.
34. Clear Nails with Gold Glitter Crescent Moons
About the Design:
This celestial-inspired design uses clear polish as the base, decorated with tiny crescent moon shapes made of gold glitter. The result is magical and radiant—perfect for brides who want a mystical or modern fairytale vibe.
What Makes This Design Unique:
The crescent moon detail symbolizes romance and eternal love. The transparent base keeps it delicate and dreamy, while the gold adds a luxurious celestial glow that shines beautifully in photos.
How to Do It (Step by Step):
- Apply a clear or sheer base polish to each nail.
- Use gold glitter polish or decals to form small crescent moons near the cuticles.
- Perfect the shapes using a fine brush or detailing tool.
- Seal everything with a glossy top coat for smoothness and durability.
35. White Chrome Nails with Pearl Accents
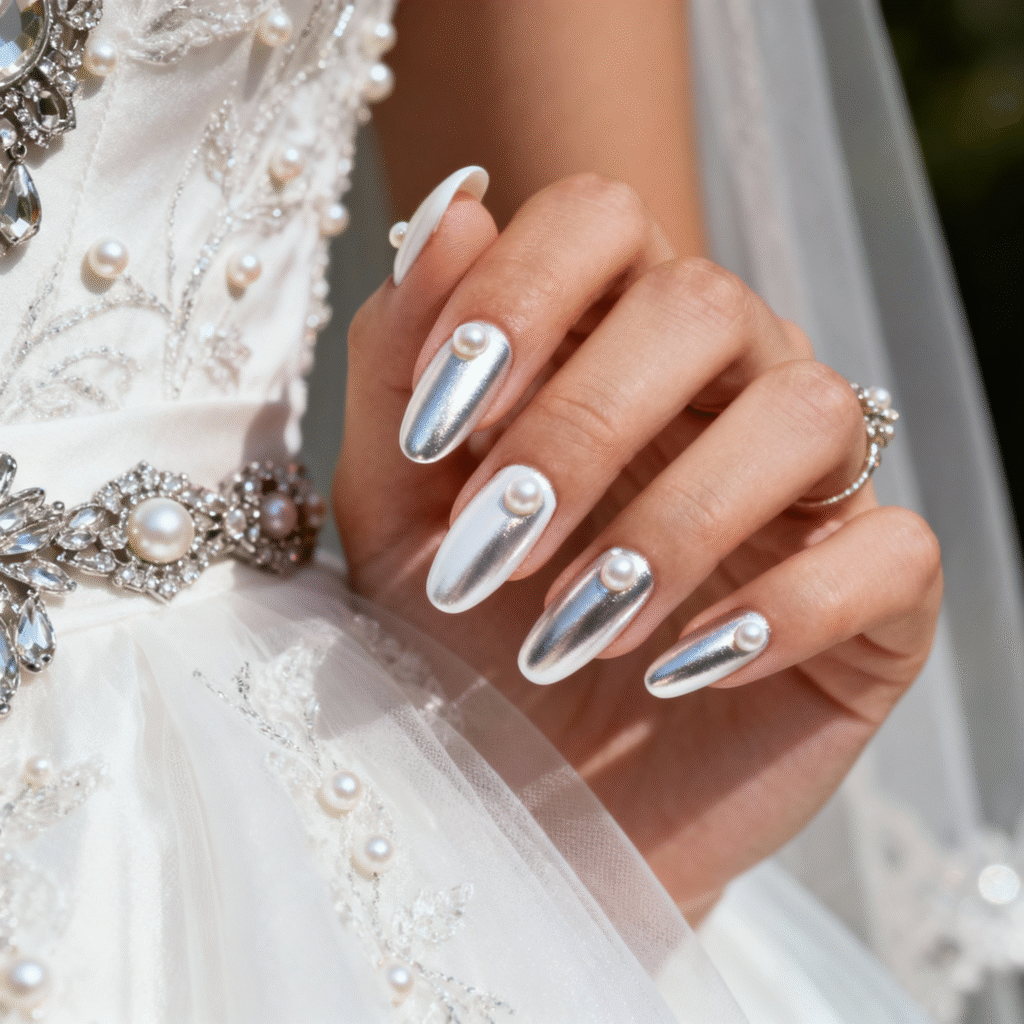
About the Design:
White chrome nails radiate futuristic bridal elegance. Adding small pearls enhances their sophistication, combining modern shimmer with timeless romance. This design suits both minimalist and glam bridal aesthetics perfectly.
What Makes This Design Unique:
The pairing of chrome and pearls blends two contrasting textures—metallic and organic. The result is striking yet balanced, representing purity and strength in one cohesive bridal statement.
How to Do It (Step by Step):
- Apply a white gel polish base and cure under a UV lamp.
- Rub chrome powder over the cured layer using a soft applicator.
- Place small pearls strategically along one side or base of each nail.
- Add a strong, glossy top coat to secure and protect the design.