Your New Obsession Is 16 Snowman Nails Design
Winter is here, and what better way to celebrate than with the cutest, most cheerful snowmen right at your fingertips? Forget boring manicures; these 16 snowman nail designs are about to become your new obsession. Get ready to transform your nails into tiny canvases of frosty fun and spread some serious holiday cheer!
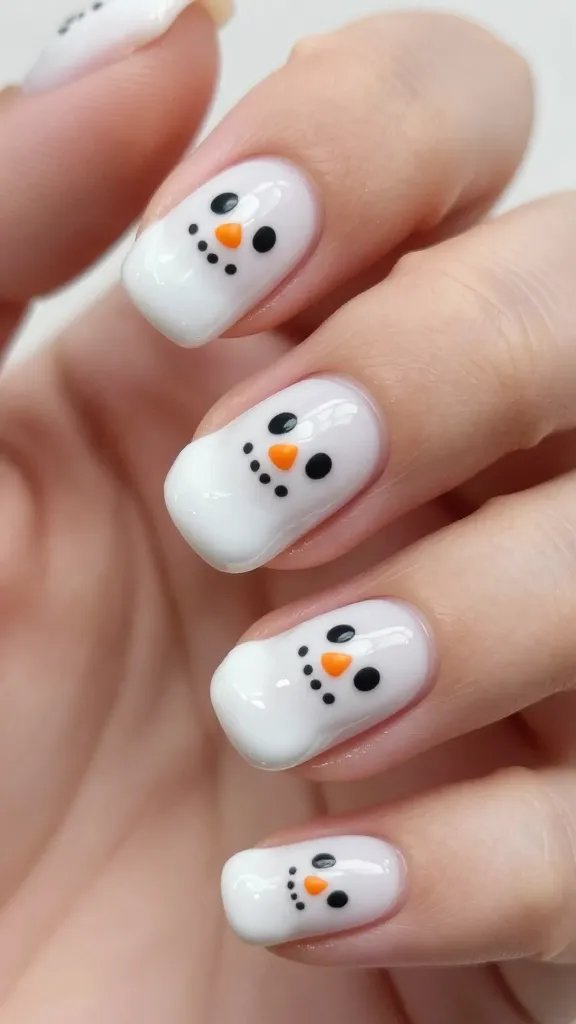
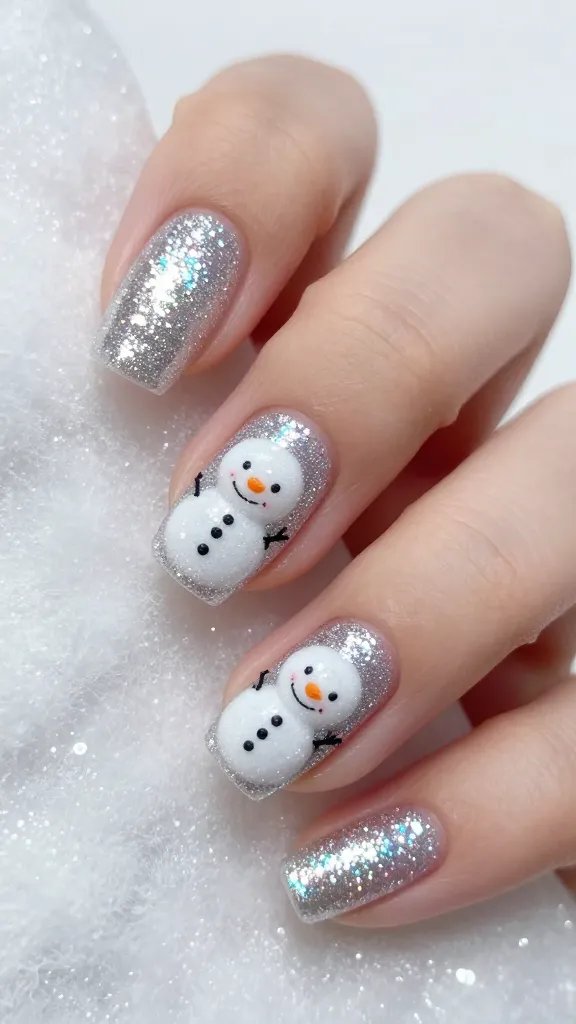
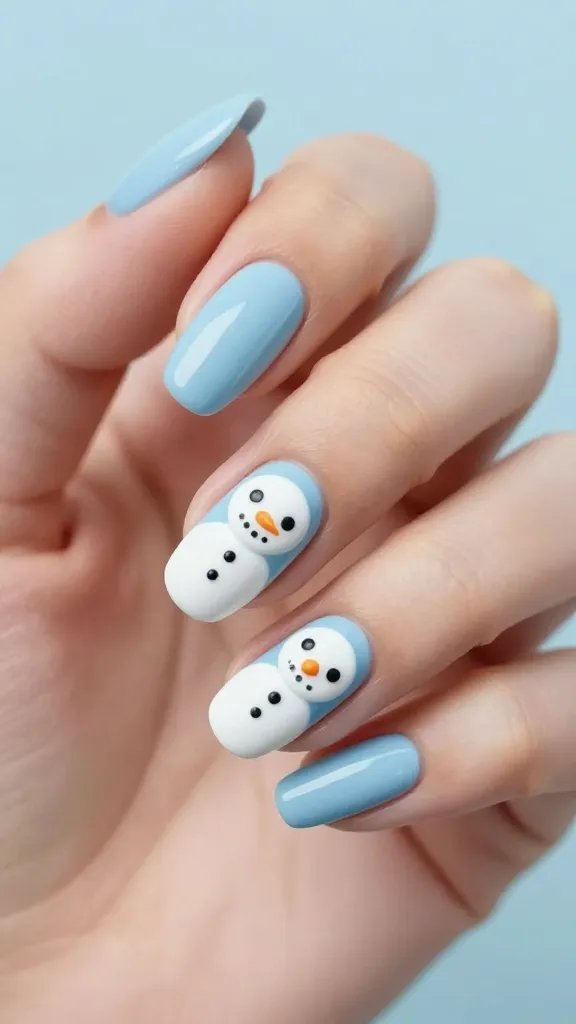
1. The OG Snowman Smile: Classic & Cute
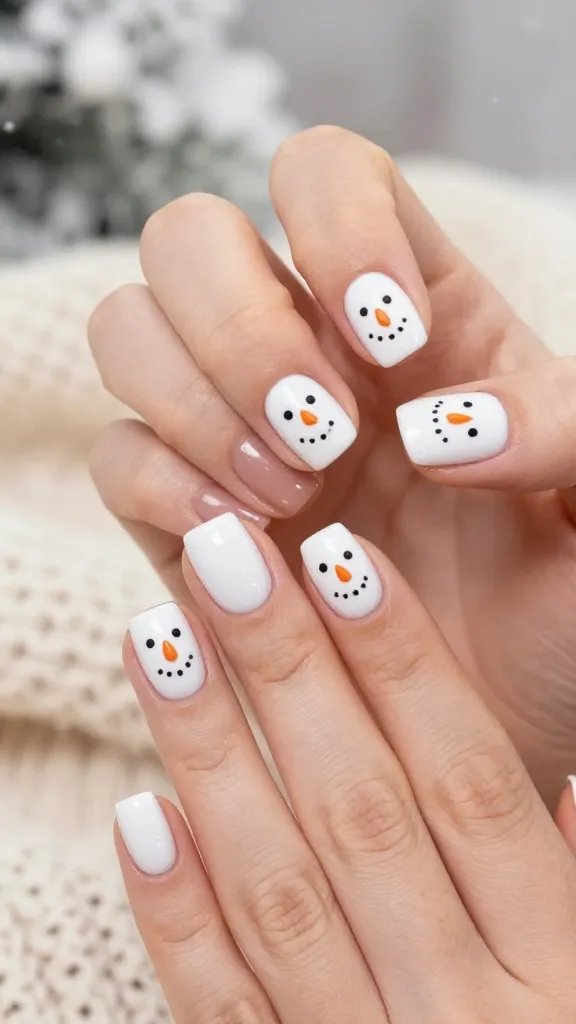
Sometimes, you just can’t beat a classic! This design brings back all the cozy winter feels with a simple, adorable snowman face on your nails. It’s the perfect way to dip your toes (or should I say, fingers?) into festive nail art without feeling overwhelmed.
Think of it as your go-to cheerful winter accessory. Seriously, who can resist a happy little snowman peeking back at them?
What You’ll Need:
- White nail polish for the snowy base.
- Orange polish for that iconic carrot nose.
- Black polish for the eyes and a dotted smile.
- A dotting tool or toothpick for precision.
Start with a crisp white base – that’s your snowy canvas! Then, use your dotting tool to create two small black dots for the eyes. For the nose, a tiny orange triangle or a short line will do the trick. Finish with a series of small black dots for a charming, goofy smile. Trust me, it’s that easy!
This design is fantastic for adding a touch of winter whimsy to your everyday look, or for a quick festive update before a holiday party. It’s universally loved and always brings a smile!
2. Full-Body Frosty: The Accent Nail Star

Why stop at just a face when you can have the whole adorable package? This design features a full-body snowman, usually on an accent nail, making it the star of your winter manicure. It’s a bit more detailed but oh-so-worth it for the impact.
Imagine a tiny, perfectly formed snowman waving from your ring finger – pure joy!
Pro Tips for Perfection:
- Choose a light blue or snowy white base for the background.
- Use two white circles for the body (one slightly larger for the base).
- Add tiny black dots for buttons, eyes, and a dotted smile.
- A small orange triangle serves as the carrot nose.
For the full body, you’ll typically paint two stacked white circles on one nail. The bottom one slightly larger than the top. Then, add all the little details: tiny black buttons down the front, stick arms (thin brown lines), and of course, the classic face. You can even add a tiny red scarf with a thin brush for extra flair!
This design is perfect when you want to make a statement without going overboard on every nail. It’s an eye-catching detail that screams winter fun.
3. Scarf Style Snowman: Cozy & Colorful
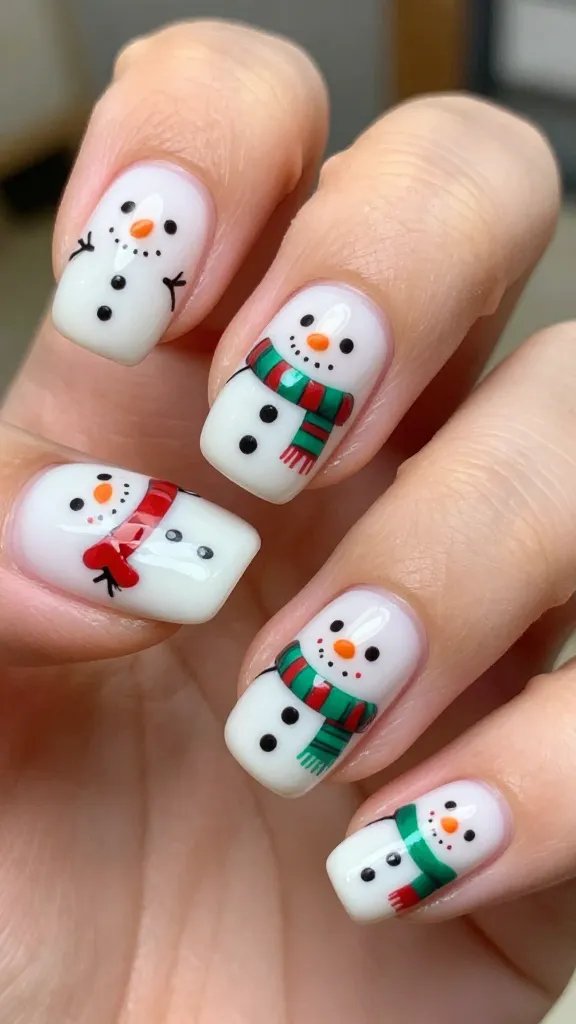
Our little snowman needs to stay warm, right? This design incorporates a cute, colorful scarf around your snowman’s neck, adding a pop of color and personality to your nails. It’s a fantastic way to introduce more vibrant hues into your winter palette.
Think of it as accessorizing your snowman, just like you would yourself!
Key Elements:
- A snowman face or upper body as the main feature.
- A thin, curved line of brightly colored polish for the scarf.
- Optional: tiny fringes or stripes on the scarf for texture.
After you’ve painted your basic snowman face, grab a thin brush and your chosen scarf color – red, green, blue, or even rainbow! Paint a curved line just below the head, and then add a short, dangling piece on one side. You can even add tiny stripes in a contrasting color for a knitted look. Seriously cute!
The scarf design is ideal for those who love adding a touch of warmth and personality to their seasonal nail art. It’s a cheerful detail that truly brings your snowman to life.
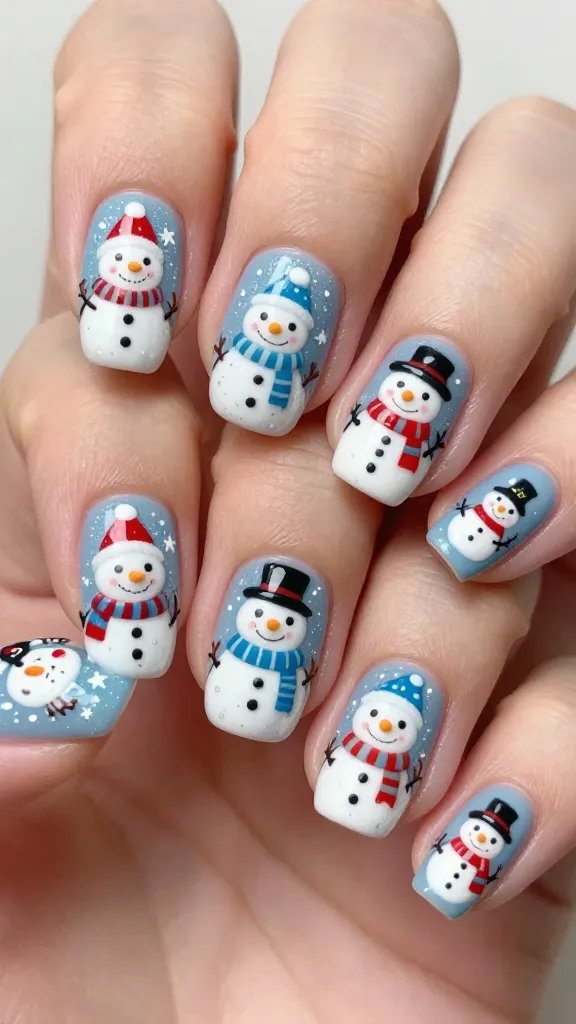
4. Top Hat & Beanie Brigade: Fashion-Forward Frosty

Who says snowmen can’t be fashionistas? This design gives your frosty friend a stylish hat – be it a classic top hat, a cozy beanie, or even a whimsical Santa hat. It instantly elevates the snowman’s character and adds a unique touch to your manicure.
It’s like giving your snowman a personality makeover, and honestly, they deserve it!
Hat-tastic Ideas:
- A black top hat for a dapper look.
- A striped or solid beanie for a modern vibe.
- A tiny red Santa hat for extra holiday cheer.
Once your snowman’s head is dry, use a thin brush to paint on the hat. For a top hat, a black rectangle with a slightly wider base works perfectly. For a beanie, a rounded shape with a small pom-pom dot on top is adorable. You can even add a tiny band or buckle to the top hat for extra detail. FYI, dark colors really make the hat pop!
This design is perfect for those who enjoy adding character and a bit of playful sophistication to their nail art. It shows your snowman has style!
5. The Meltdown Masterpiece: Humorous & Unique
Winter might be cold, but this design brings a little bit of humorous warmth! The melting snowman design is incredibly unique and often gets a chuckle. It depicts a snowman in various stages of melting, usually with just the head or a puddle remaining, complete with eyes and a carrot nose.
It’s a fantastic conversation starter and a testament to your playful side.
Melting Magic:
- A white “puddle” shape at the base of the nail.
- The snowman’s eyes and nose floating in the puddle.
- Optional: a small black top hat tilting over.
To create this, start with a light blue or clear base. Then, paint an irregular, melting-puddle-like shape in white near the cuticle or tip. On top of this white puddle, add the classic black dot eyes and an orange carrot nose. You can even paint a small black top hat slightly askew, as if it’s just fallen off the melting head. It’s seriously clever!
This design is ideal for those with a sense of humor who want to stand out from the typical festive nails. It’s unexpected and wonderfully whimsical.
6. Snowman Family Gathering: Multiple Miniatures
Why have one snowman when you can have a whole family? This design features multiple snowmen of varying sizes on one or more nails, creating an adorable little winter scene. It’s incredibly heartwarming and shows off your artistic flair.
Imagine a tiny family portrait right on your nails – too cute to handle, IMO!
Family Fun Tips:
- Use different sized dotting tools for the bodies.
- Vary the hats and scarves for each snowman.
- Paint them on a light blue or glittery snow base.
Start by painting two or three white circles of different sizes on your nail, stacking them slightly or placing them side-by-side. Then, add the individual details to each: eyes, noses, smiles, and perhaps tiny scarves or hats in different colors. You can even make one a “baby” snowman with just a head peeking out!
This design is perfect for those who love telling a story with their nails and appreciate intricate, charming details. It’s a whole winter wonderland in miniature.
7. Minimalist Frosty Silhouette: Chic & Subtle
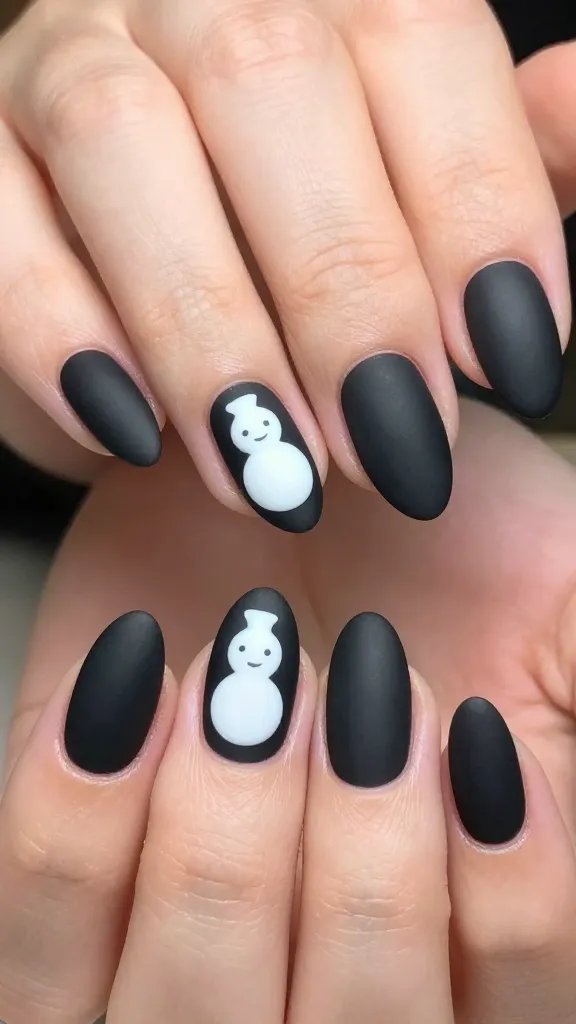
Not everything has to be super detailed to be effective! The snowman silhouette design offers a chic, subtle nod to winter without all the bells and whistles. It’s sophisticated, modern, and perfect for those who prefer understated elegance.
This is for the minimalist who still wants to embrace the festive spirit.
Clean & Crisp:
- A dark background color (navy, black, deep green).
- A simple white outline or solid white shape of a snowman.
- No facial features needed, just the recognizable form.
Choose a dark, moody background color like deep blue or black. Then, using a thin brush and white polish, paint the outline of a snowman’s body – two stacked circles. You can keep it as just an outline or fill it in completely for a solid white silhouette. No need for eyes or a nose; the shape itself is enough to convey the image. Add a tiny dot of glitter for a star if you’re feeling fancy.
This design is excellent for a sophisticated winter look that’s still festive but avoids overt cuteness. It’s subtly stylish and very versatile.
8. Glitter Snowman: Sparkle & Shine
What’s a snowman without a little sparkle? This design incorporates glitter, either as the snowman’s body itself or as a snowy background, making your nails truly shine. It’s festive, glamorous, and captures the magic of freshly fallen snow.
Get ready to dazzle everyone with your shimmering snowmen!
Sparkle Factor:
- Use glitter polish for the snowman’s body.
- Apply a glitter top coat over a regular white snowman.
- Paint a glittery background for your snowman.
You have a few options here! You can paint your snowman as usual and then apply a clear glitter top coat over just the white parts. Or, for a truly sparkly snowman, paint the white circles with a white glitter polish. You can even use a chunky glitter polish for a textured, snowy effect. A light blue base with a fine silver glitter top coat makes for an amazing snowy backdrop.
This design is perfect for holiday parties and festive gatherings where you want your nails to truly sparkle and catch the light. It’s pure winter magic!
9. Abstract Snowman Dots: Modern & Playful
Who said snowmen have to look perfectly realistic? This abstract design uses simple dots and lines to suggest a snowman, making it incredibly modern, easy, and playful. It’s a fantastic option if you’re short on time but still want a festive, artistic look.
Think of it as minimalist art for your nails – super chic and fun!
Dotting Delight:
- Use three white dots of increasing size for the body.
- Add a tiny orange dot for the nose.
- Two small black dots for the eyes.
On a colored base (like light blue or mint green), use a dotting tool to create three white dots, one on top of the other, getting progressively smaller towards the top. Then, add two tiny black dots for eyes on the smallest white dot, and a slightly larger orange dot for the nose. You can even add a couple of black dots for buttons. It’s surprisingly effective!
This design is great for those who prefer a modern, artistic twist on traditional holiday themes. It’s quick, easy, and still undeniably cute.
10. Snowman with Holly & Berries: Festive Flora
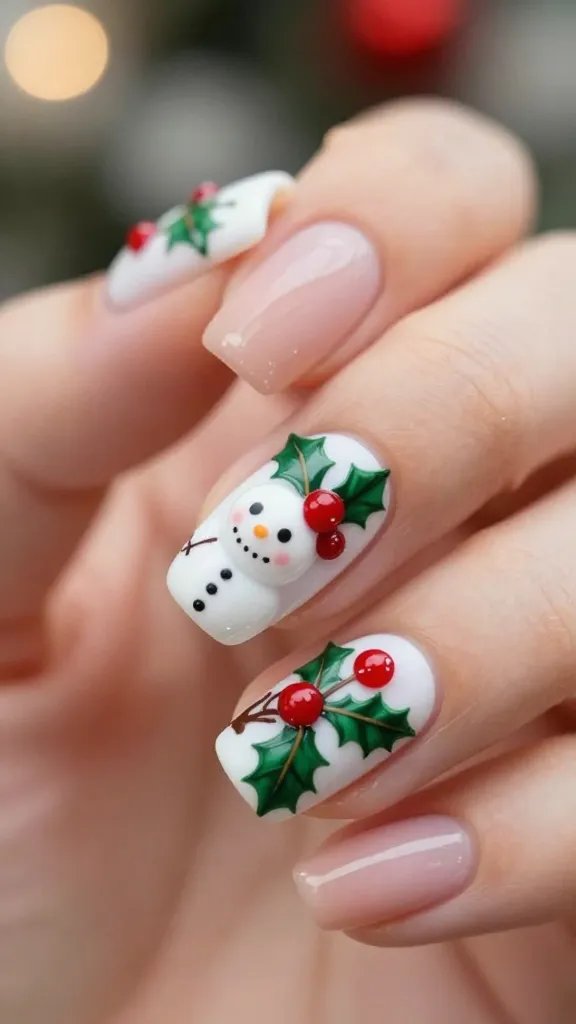
Combine two winter favorites into one stunning design! This look pairs your adorable snowman with classic holly leaves and bright red berries, creating a truly festive and traditional manicure. It’s a beautiful way to embrace all aspects of winter charm.
Your nails will look like a cozy Christmas card, seriously!
Nature’s Touch:
- Paint your snowman on one part of the nail.
- Add small green holly leaves (two small curved lines meeting at a point).
- Dot bright red berries next to the holly.
After your snowman is complete, use a thin brush to paint small, pointed green leaves near his head or body. Then, add two or three tiny red dots for berries nestled amongst the leaves. This adds a beautiful contrast and a touch of natural winter elegance. You can put the holly on the same nail as the snowman or on an adjacent accent nail.
This design is perfect for those who love traditional holiday motifs and want to incorporate a bit of nature into their festive nail art. It’s elegant and cheerful.
11. Snowman & Twinkling Lights: Bright & Playful
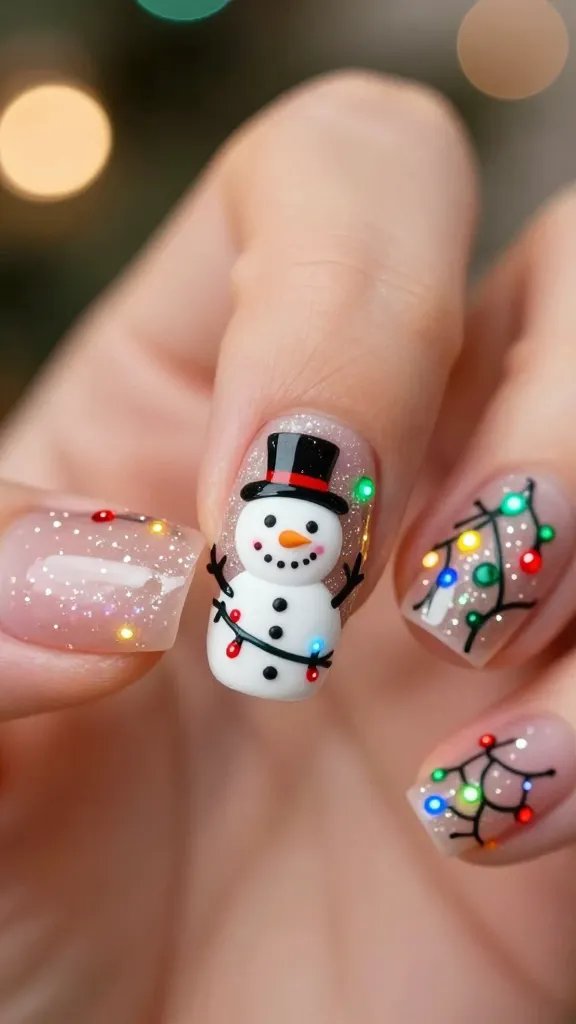
Light up your nails with this super fun design that combines a snowman with tiny, colorful Christmas lights! It’s playful, vibrant, and captures the joyful spirit of the holiday season. Your nails will practically be glowing with cheer.
Get ready for some serious festive sparkle that will make everyone smile!
Light It Up:
- Paint your snowman as the central figure.
- Use a thin brush to draw a “string” of lights around him.
- Add small, colorful oval dots for the light bulbs.
Once your snowman is dry, use a thin black or dark green brush to draw a wavy line (the light string) around or above him. Then, using various bright colors like red, blue, yellow, and green, paint tiny oval shapes along the string to represent the light bulbs. You can even add a tiny white dot in the center of each bulb for a “glow” effect. It’s truly eye-catching!
This design is fantastic for those who want to express their vibrant holiday spirit and love a manicure that’s full of fun and color. It’s a party on your nails!
12. French Tip Frosty: Peek-a-Boo Snowman

Give the classic French manicure a winter twist! This clever design features a snowman peeking over the traditional white tip, making it both elegant and undeniably festive. It’s a subtle yet charming way to incorporate snowmen into a more sophisticated look.
Who knew a snowman could be so chic? This is a serious game-changer for French tip lovers.
Chic & Creative:
- Start with a classic French tip base (nude or pink with white tips).
- Paint the snowman’s head just above the white tip line.
- Add eyes, nose, and smile, making it look like he’s peeking up.
First, create your perfect French manicure. Once the white tips are dry, use a dotting tool to paint a white circle (the snowman’s head) just above the white tip line, making it look like his body is hidden behind the tip. Add the eyes, nose, and smile to this peeking head. You can even add a tiny hat that extends onto the clear part of the nail.
This design is ideal for those who prefer subtle festive touches and want to elevate their everyday manicure with a playful, seasonal element. It’s elegant with a wink!
13. Snowman Sweater Nails: Cozy & Textured
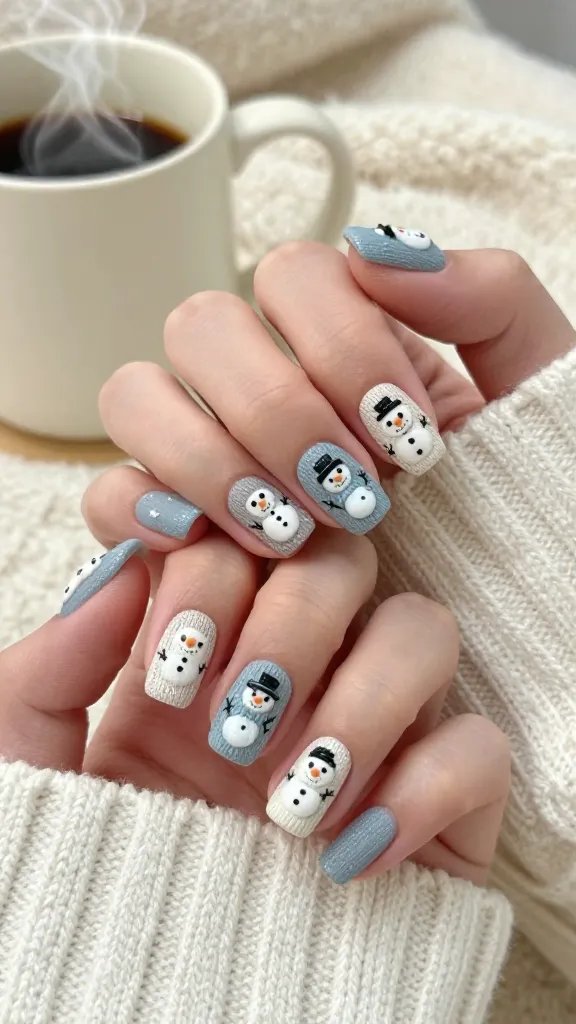
Embrace the cozy vibes of winter with snowman sweater nails! This design mimics the look of a knitted sweater, often with a textured finish, and incorporates a snowman motif. It’s incredibly charming and perfect for those chilly days when you just want to snuggle up.
Your nails will feel as warm and fuzzy as your favorite winter jumper, trust me!
Sweater Weather Style:
- Use a matte top coat for a fabric-like finish.
- Paint a snowman design, then use 3D gel or acrylic powder for texture.
- Alternatively, use a special “sweater effect” gel polish.
Paint your snowman design on a nail, perhaps on a cozy blue or red background. To get the sweater effect, you can either use a matte top coat over your design for a soft, fabric-like finish. Or, for a true textured look, use a special 3D gel or mix acrylic powder with gel polish to create raised lines and dots that resemble knitting, outlining your snowman or adding details. It’s a bit more advanced but incredibly rewarding!
This design is fantastic for creating a tactile and visually warm manicure that perfectly complements your winter wardrobe. It’s all about comfort and cuteness.
14. Snowman with Hot Cocoa: The Ultimate Comfort Scene
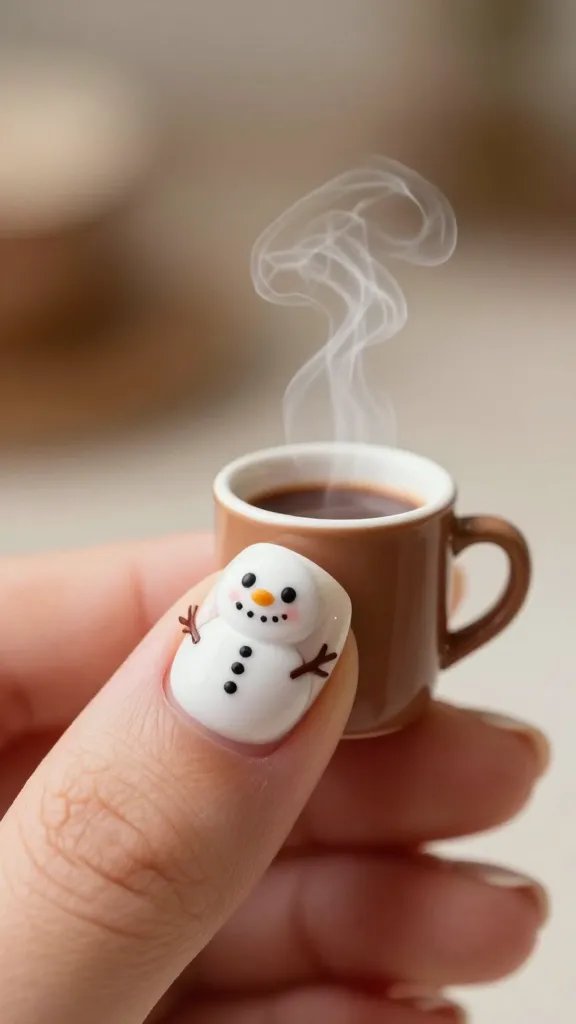
What’s better than a snowman? A snowman enjoying a hot cocoa! This heartwarming design captures a cozy winter scene, often featuring a tiny snowman holding or peeking from behind a mug of steaming hot chocolate. It’s incredibly sweet and evokes feelings of warmth and comfort.
Your nails will be serving up major cozy vibes, guaranteed to make you smile.
Cozy Scene Essentials:
- Paint a snowman’s head or upper body.
- Add a small brown or red mug next to or in front of him.
- Include tiny white “steam” lines rising from the mug.
On your chosen nail, paint a snowman’s head and maybe a bit of his body. Next to him, paint a small mug shape in brown, red, or even a festive green. You can add a tiny white blob for whipped cream or marshmallows on top of the cocoa. Finish by drawing a few wavy white lines above the mug to represent steam. It’s a whole story on one nail!
This design is perfect for those who love wholesome winter imagery and want a manicure that feels like a warm hug. It’s the epitome of winter comfort.
15. Snowman on a Snowy Landscape: A Full Winter Wonderland
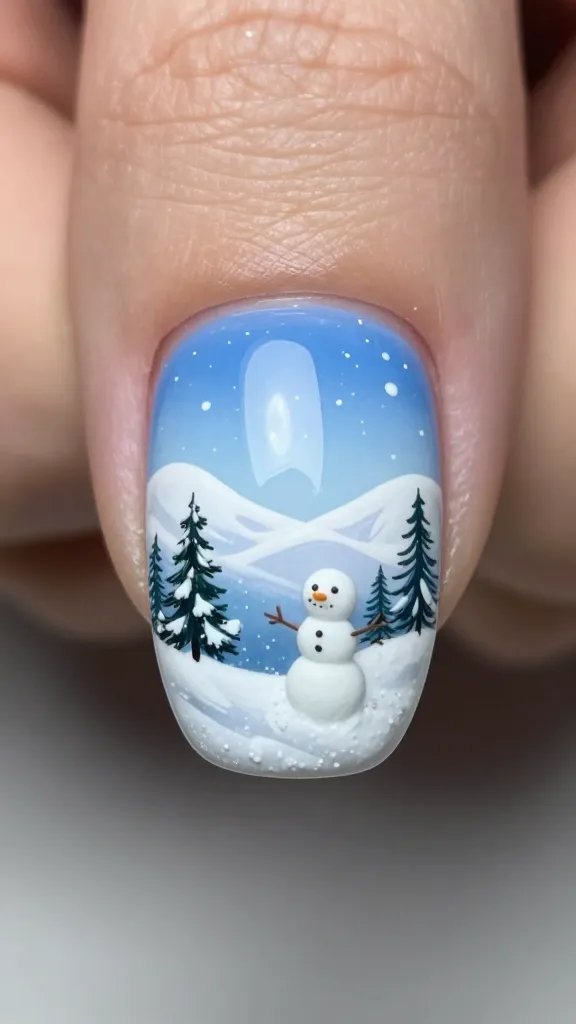
Go beyond just a snowman and create an entire miniature winter wonderland on your nails! This design features a snowman nestled within a snowy landscape, complete with rolling hills, trees, and perhaps even tiny falling snowflakes. It’s an ambitious but incredibly rewarding design.
Your nails will be a tiny masterpiece, telling a beautiful winter tale.
Landscape Layout:
- Start with a gradient blue sky background.
- Add white wavy lines for snowy hills.
- Paint your snowman in the foreground.
- Include tiny green pine trees and white snow dots.
Begin with a gradient blue background, fading from light to dark. Then, paint wavy white lines across the bottom for snowy hills. Place your snowman (full body or just the head) on one of these hills. Add tiny green triangles for pine trees in the background, and finish with small white dots scattered across the sky for falling snow. It’s like a tiny painting!
This design is ideal for those who enjoy detailed nail art and want to create a truly immersive and beautiful winter scene on their fingertips. It’s a miniature work of art!
16. Snowman Under the Stars: Enchanting Night Scene
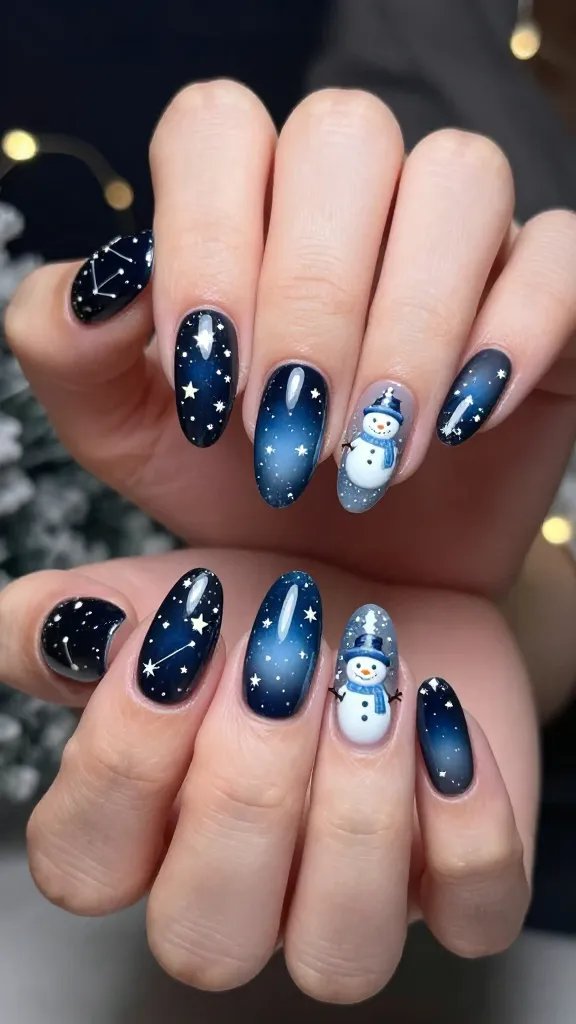
Capture the magic of a winter night with this enchanting design featuring a snowman under a starry sky. This look often uses darker background colors, making the white snowman and shimmering stars truly pop. It’s elegant, mystical, and absolutely captivating.
Imagine your snowman wishing upon a star – pure magic right on your nails!
Night Sky Necessities:
- A dark blue or black base coat for the night sky.
- Paint your snowman in crisp white.
- Add tiny white or silver glitter dots for stars.
- Optional: a small crescent moon.
Start with a deep navy blue or black polish for your night sky. Once dry, paint your snowman (a full body or just a head works beautifully) in bright white. Then, using a fine brush or dotting tool, add tiny white or silver glitter dots all around him to create a shimmering starry effect. You can even paint a delicate crescent moon in silver in one corner. The contrast is stunning!
This design is perfect for those who appreciate elegance and a touch of winter wonder. It’s a truly magical way to celebrate the season and will make your nails feel utterly enchanting.
There you have it – 16 adorable snowman nail designs to inspire your next winter manicure! Whether you go for a classic smile or a full-blown snowy landscape, these ideas are sure to bring joy and festive cheer to your fingertips. So grab your polishes, unleash your inner artist, and get ready to rock the cutest nails of the season!