Scream-Worthy 23 Freddy Krueger Nails
Ready to dive headfirst into the dream world of horror fashion? Forget basic manicures, because we’re about to transform your fingertips into a tribute to the ultimate boogeyman. These 23 Freddy Krueger nail designs are so wickedly creative, they’ll have everyone screaming… with delight, of course!
1. The Classic Sweater Stripes
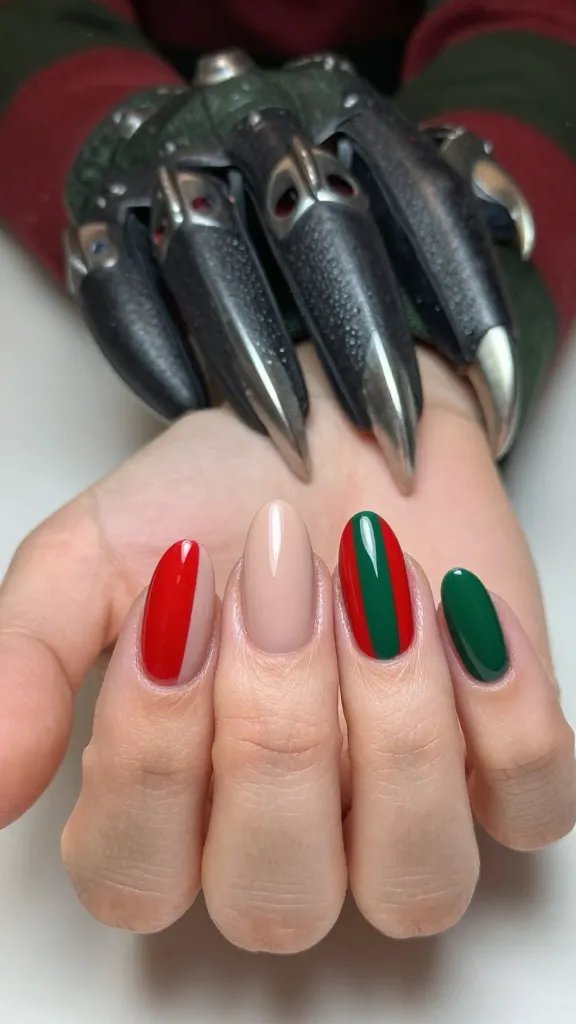
Let’s start with the OG! Freddy’s iconic red and green striped sweater is instantly recognizable and totally achievable on your nails. It’s a bold statement that screams “I’m ready for Elm Street.”
How to Nail It:
- Base Coat: Apply a light nude or white base.
- Stripes: Use a thin striping brush for crisp red and dark green horizontal lines.
- Finish: A glossy top coat makes those colors pop!
This design is perfect for a subtle nod to the horror icon, proving you don’t need blood and guts to be terrifyingly chic.
2. Blade-Wielding Accent Nail
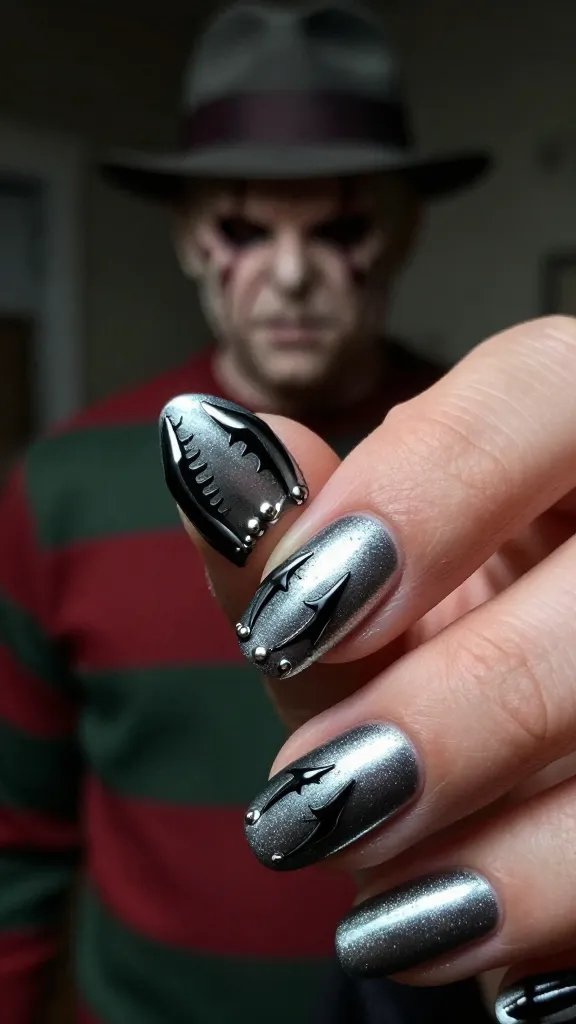
What’s Freddy without his infamous glove? Dedicate one accent nail to his razor-sharp blades. This design is all about metallic sheen and a touch of danger.
Paint your ring finger a metallic silver or gunmetal grey, then use a fine brush and black polish to etch in the distinct claw shapes. You can even add tiny rivets for extra detail. It’s a small touch that packs a major punch.
This look is ideal for those who want to hint at Freddy’s menacing presence without going full-on gore. Seriously, it’s sharp!
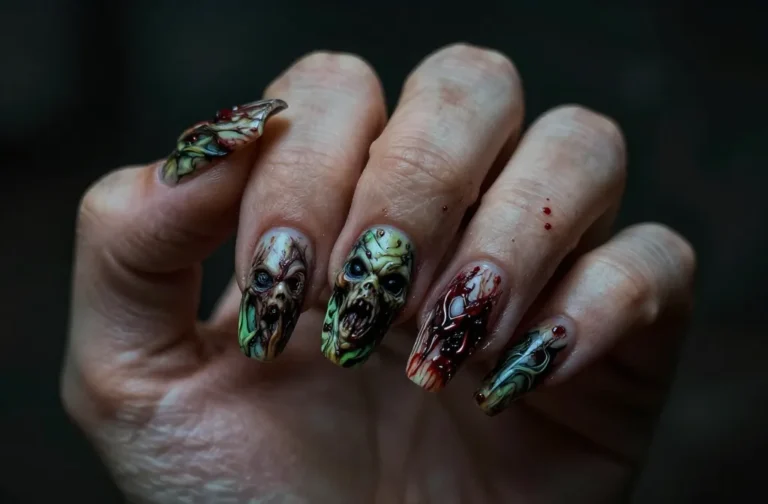
3. Burned Skin Texture
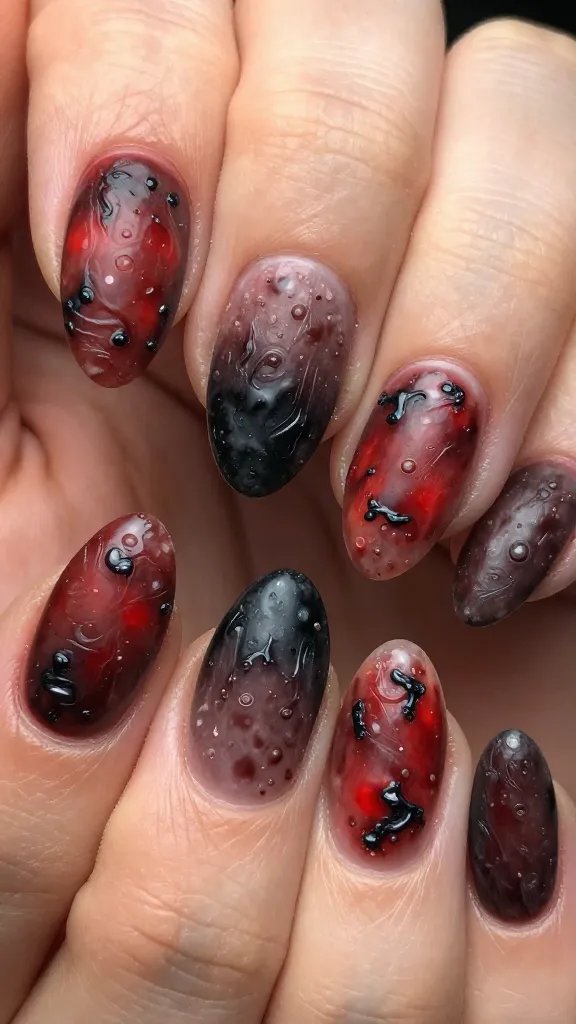
Freddy’s scarred face is his signature, and you can mimic that eerie texture on your nails. This design involves layering and sponging for a truly grotesque, yet artistic, effect.
Materials You’ll Need:
- Brown, deep red, and black nail polish
- Small makeup sponge or stippling brush
- Matte top coat
Sponge on the colors, blending them roughly to create that burned, mottled look. Finish with a matte top coat to enhance the skin-like texture. It’s unsettlingly brilliant!
4. Freddy’s Silhouette in the Shadows
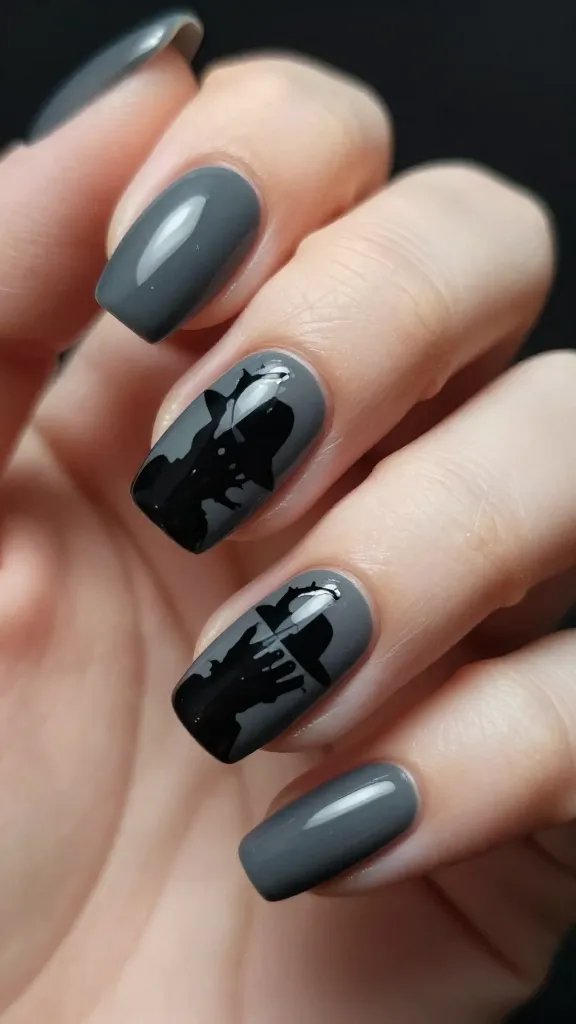
Sometimes, less is more, especially when it comes to true horror. A simple black silhouette of Freddy’s hat and claw on a contrasting background is incredibly effective.
Choose a smoky grey or deep purple base for your nails, then meticulously paint Freddy’s profile in jet black. The subtle hint of his form is enough to send shivers down spines, showcasing a sophisticated scare.
5. Dripping Blood French Tips
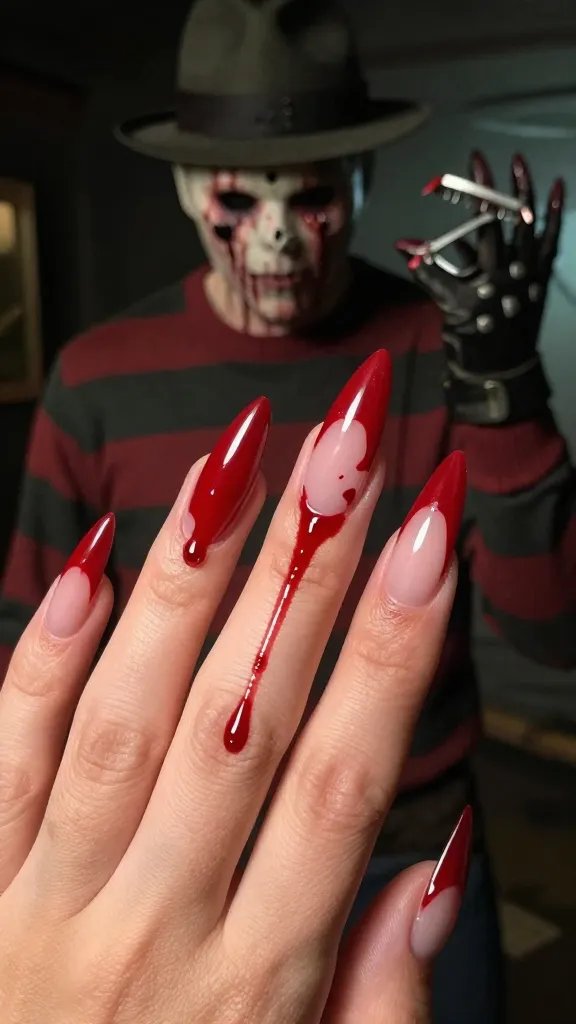
Who said French tips had to be prim and proper? Give them a gruesome twist with a blood-red, dripping effect. This is a classic horror staple reimagined for your fingertips.
Instead of a clean white line, create an uneven, wavy line of bright red polish at your nail tips, letting a few “drops” extend down. It’s gory, glamorous, and perfectly Freddy-esque.
6. The Nightmare Clock

Time is a cruel mistress in the dream world. A distorted, melting, or fractured clock face on an accent nail is a fantastic way to represent the surreal horror of Freddy’s realm.
Paint a base of deep blue or starry black. Then, with a fine brush, create a warped clock face, maybe with hands pointing ominously. It’s a subtle nod to the time-bending terror he inflicts.
7. Hat & Sweater Combo
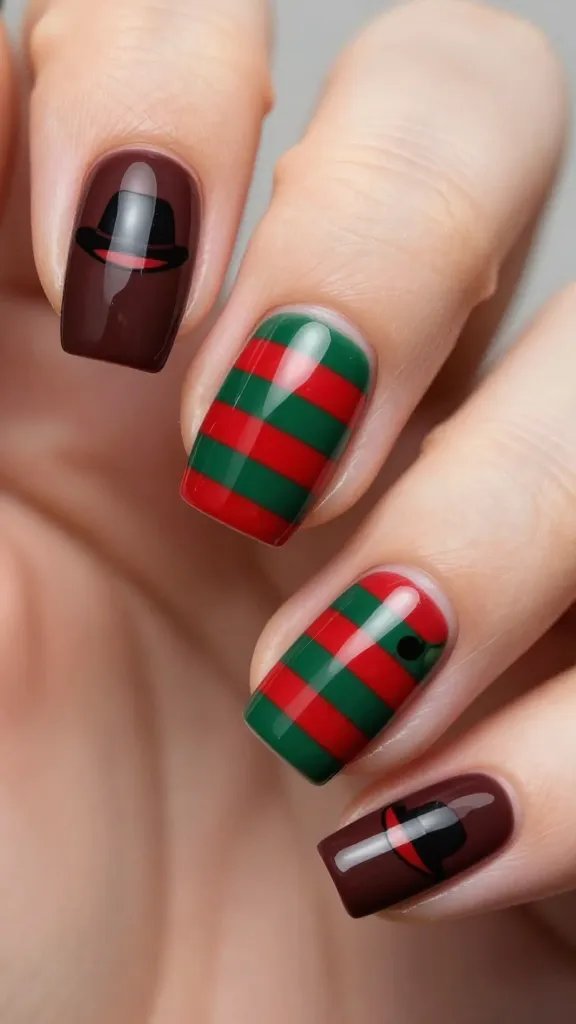
Can’t decide between his hat or his sweater? Why not both? This design splits the nail, dedicating half to his iconic fedora and the other half to his striped jumper.
Divide your nail vertically or diagonally. One side gets the dark brown of his hat, the other the red and green stripes. It’s a dynamic design that captures two essential Freddy elements in one go.
8. “One, Two, Freddy’s Coming For You” Lettering

The chilling nursery rhyme is synonymous with Freddy. Spell out parts of it across several nails for a truly iconic and creepy manicure.
Use a stark white or blood-red polish on a dark base to write out “One, Two,” on one nail, “Freddy’s” on another, and “Coming For You” on the rest. Make the font look a little jagged for extra menace. It’s a lyrical nightmare!
9. Glow-in-the-Dark Slime Effect

Freddy thrives in the shadows and the surreal. A glow-in-the-dark green or yellow “slime” design evokes the otherworldly, dreamlike quality of his attacks.
Apply a dark base, then use glow-in-the-dark polish to create wavy, dripping lines or abstract shapes. Imagine these nails under a blacklight – pure nightmare fuel, in the best way!
10. Matte Black with Glossy Blood Splatter
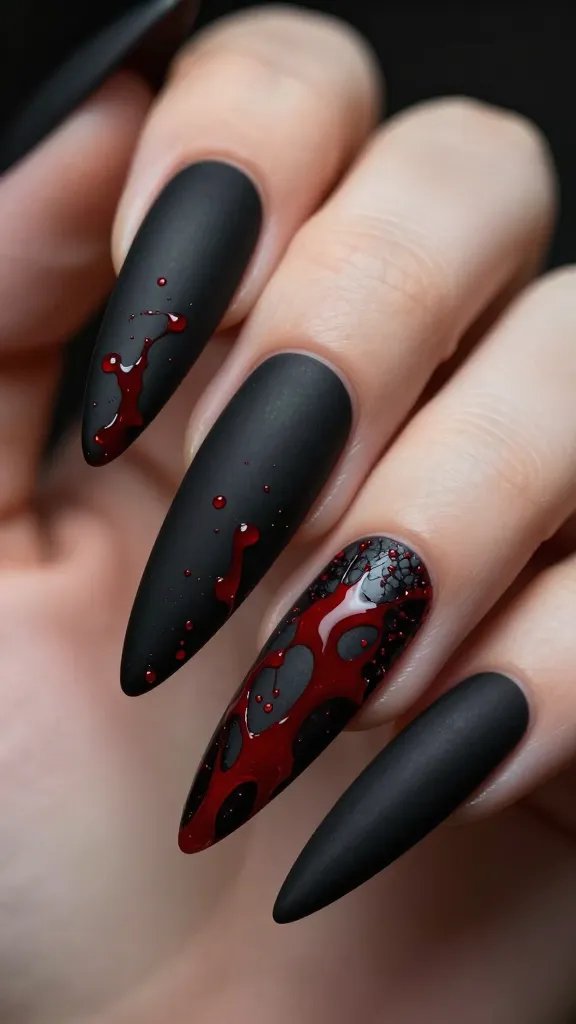
Contrast is key for maximum impact. A sophisticated matte black base provides the perfect canvas for shiny, wet-looking blood splatters. It’s elegant horror.
After your matte black polish dries, use a glossy red to create random splatters. You can use a thin brush or even flick a brush gently for a realistic effect. The textural difference is *chef’s kiss* terrifying.
11. Ombre Burn Effect

Mimic the intensity of Freddy’s burns with a dramatic ombre. Transitioning from deep red to black creates a fiery, scorched look that’s incredibly striking.
Start with a dark red at the cuticle, blending into a rich black at the tip. Use a sponge to create a seamless gradient. This design is fierce and visually stunning, capturing the essence of his torment.
12. The Menacing Freddy Eye
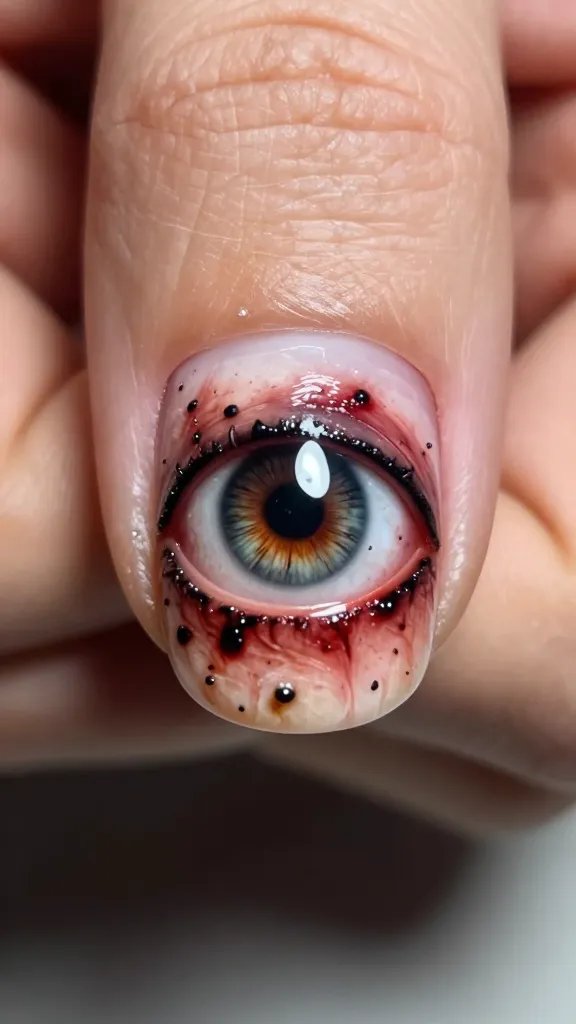
Picture it: one piercing, malevolent eye staring back from your nail. This design focuses on the terrifying intensity of Freddy’s gaze.
On an accent nail, meticulously paint a bloodshot eye with a dark pupil, perhaps even adding a hint of his burned skin around it. It’s incredibly detailed and unnervingly captivating.
13. Broken Dreamcatcher Motif
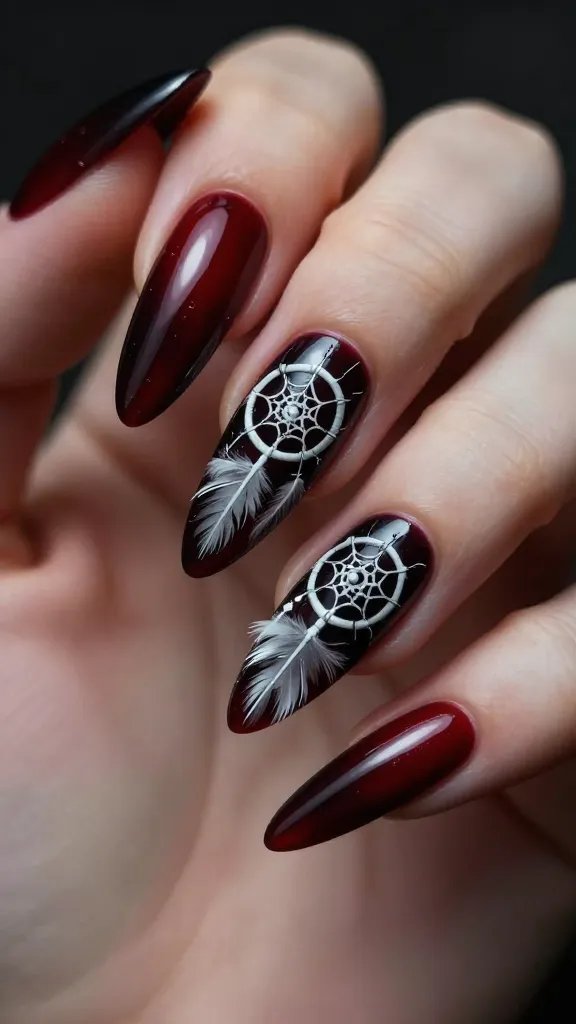
Dreamcatchers are meant to ward off bad dreams, but what if they’re broken? A shattered or twisted dreamcatcher design symbolizes the invasion of nightmares.
Paint a delicate, almost skeletal dreamcatcher design on a dark base, perhaps with a few “broken” feathers or threads. It’s a poetic and unsettling take on the dream world.
14. Subtle Barbed Wire Accents
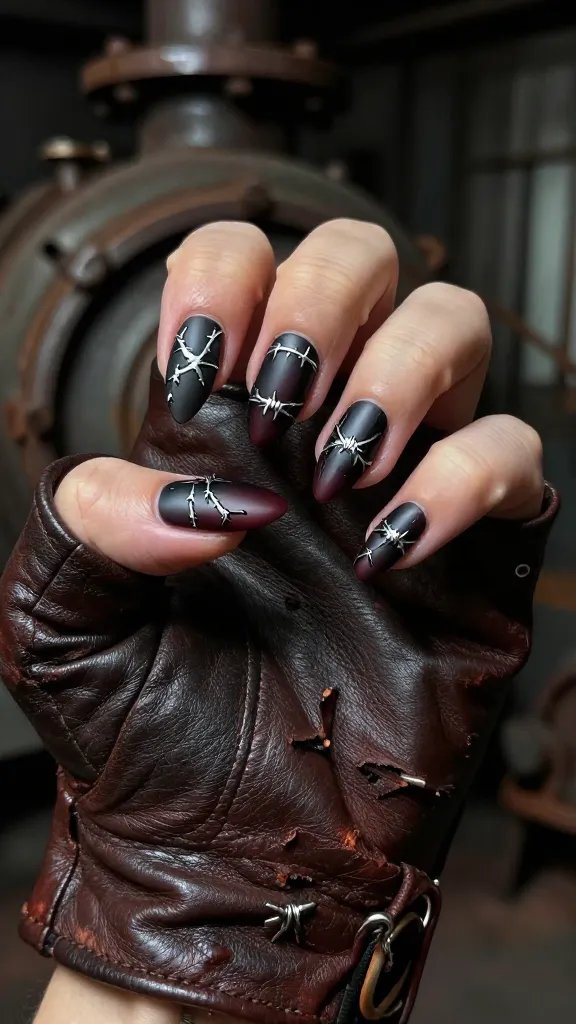
For a touch of industrial horror, incorporate delicate barbed wire designs. It suggests entrapment and danger without being overtly bloody.
Use a very fine brush and black or silver polish to draw thin, intricate barbed wire patterns along the edge of your nail or as a full design. It’s edgy and surprisingly chic for a horror theme.
15. Smoke & Shadows Swirls
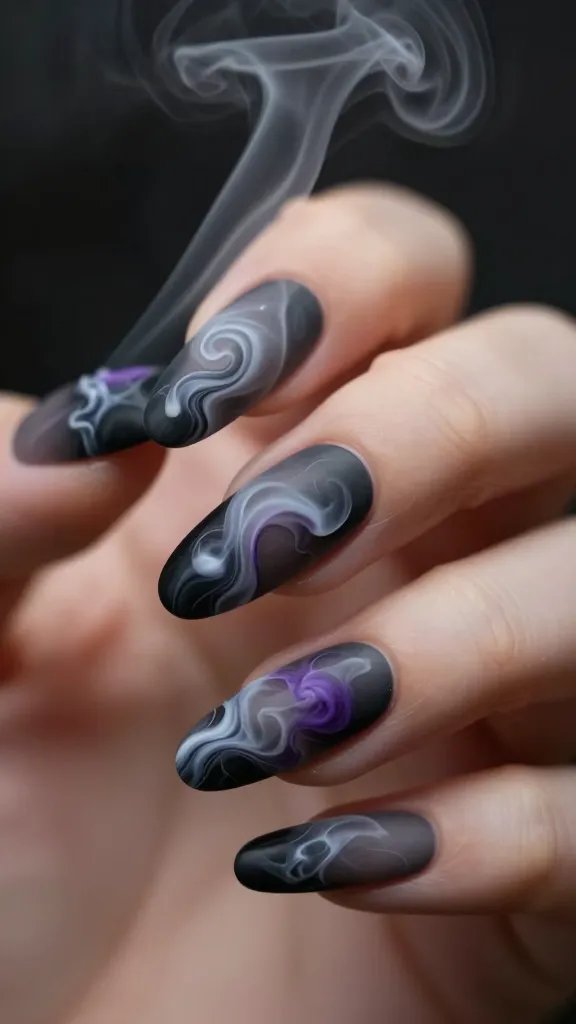
Freddy often appears from, or disappears into, wisps of smoke and shadow. Capture this ethereal, ghostly quality with swirling, smoky nail art.
On a dark grey or black base, use lighter greys, whites, or even deep purples to create soft, swirling smoke patterns. It’s atmospheric and mysterious, just like the dream demon himself.
16. All-Out Blood Spatter Chaos
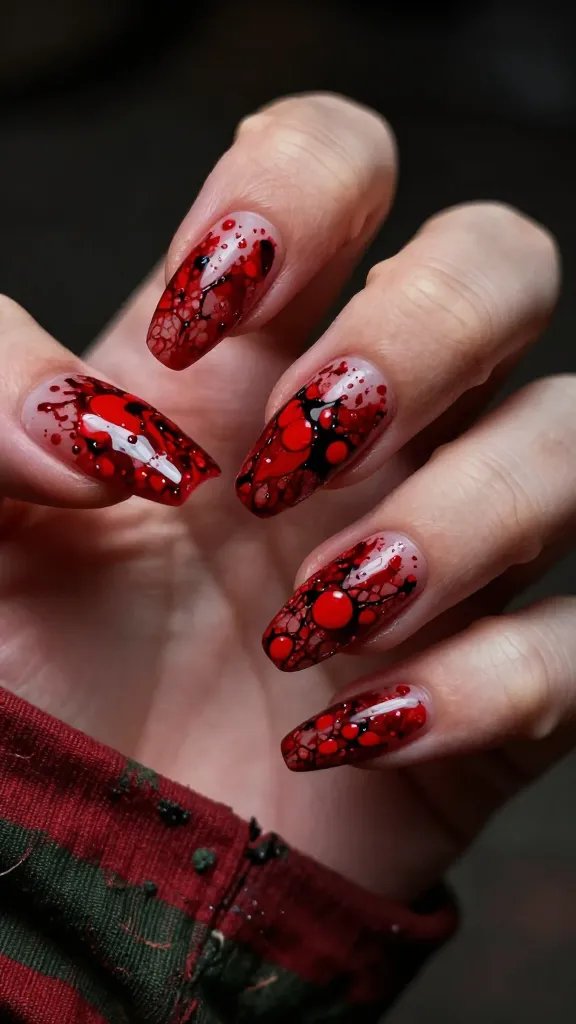
Sometimes you just need to go for it! Dedicate all your nails to chaotic, random blood splatters. This is for the bold and the brave who aren’t afraid of a little gore.
Using a bright red polish, flick it onto your nails with a brush or use a dotting tool for varied splatter sizes. No two nails have to be the same, making it truly chaotic. It’s a bloody good time!
17. Metallic 3D Claws
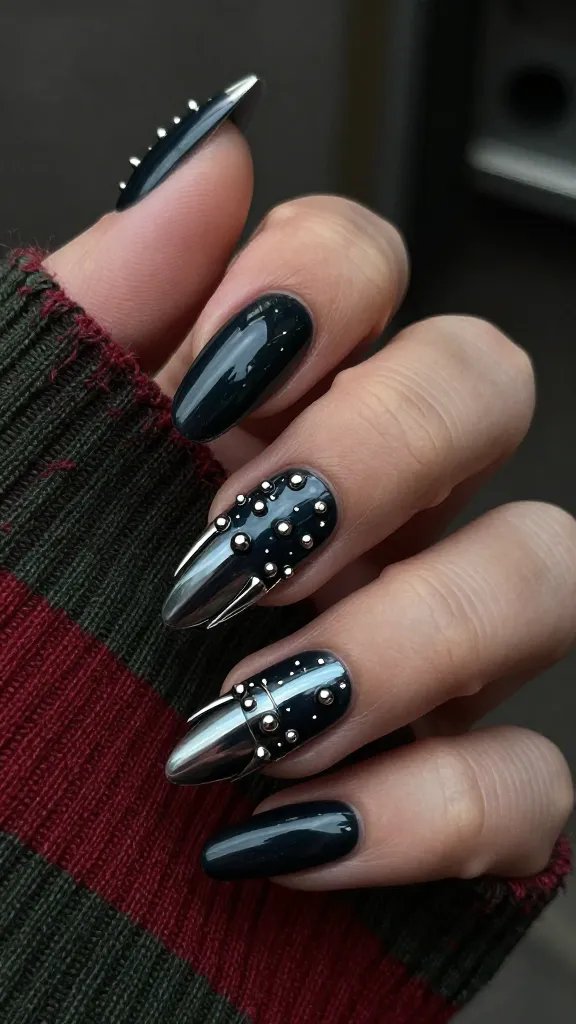
Take the blade concept to the next dimension with small metallic studs or embellishments arranged to look like tiny, sharp claws. This design literally pops!
After your base coat, carefully place small, thin metallic studs or strips in the shape of Freddy’s claws on an accent nail. Seal them with a strong top coat. This adds a fantastic tactile element.
18. “Never Sleep Again” Calligraphy
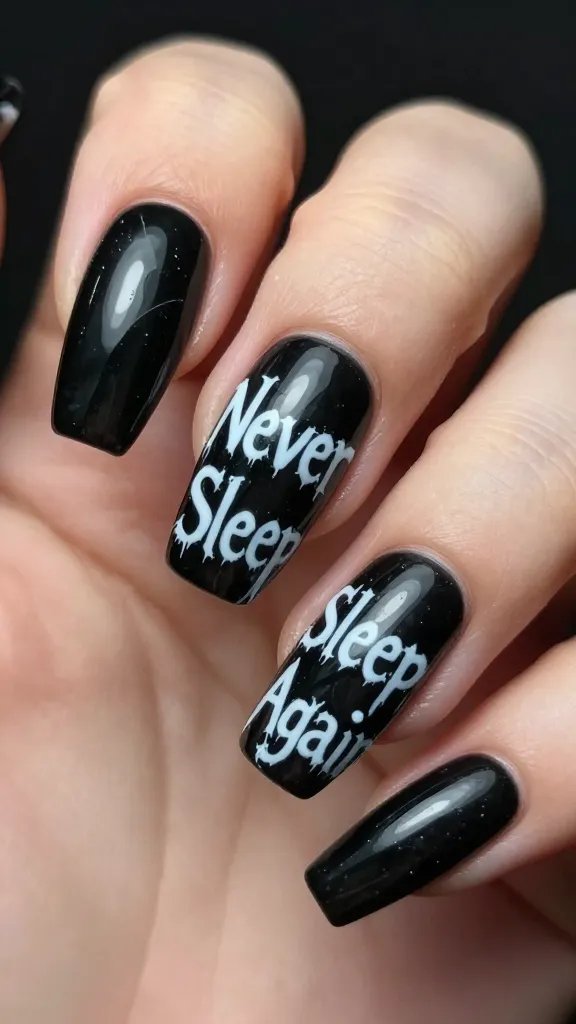
The ultimate warning from Freddy. Spell out “Never Sleep Again” in a spooky, gothic font across your nails. It’s a direct, chilling message.
Use a contrasting polish (white on black, or black on red) to carefully hand-letter the phrase. Make the letters look a bit distressed or jagged to enhance the horror vibe. Talk about a conversation starter!
19. Shattered Mirror/Broken Glass Effect
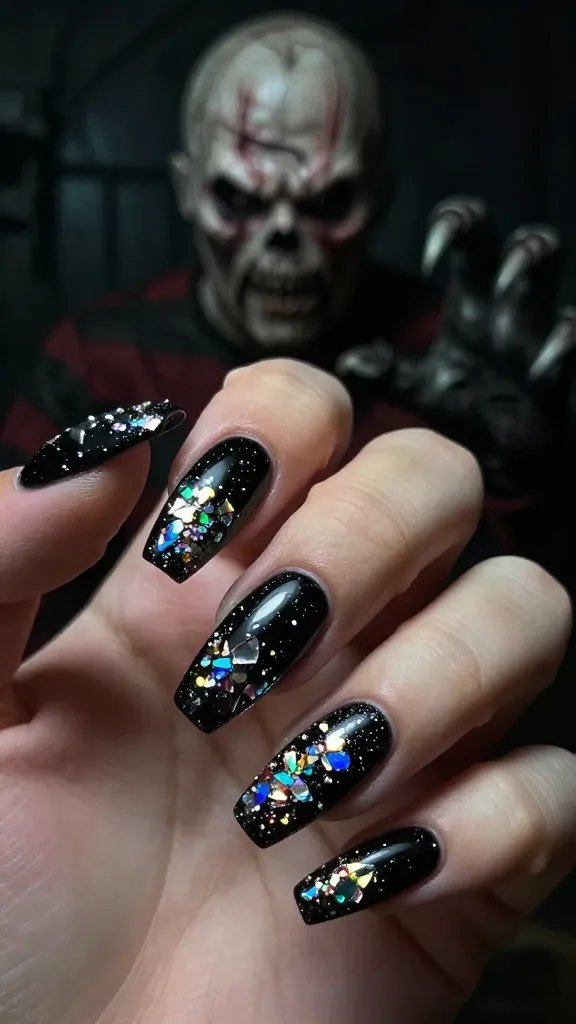
Dreams are fragile, and reality can shatter. Use iridescent foils or glitter to create a broken glass effect, symbolizing the fractured nature of Freddy’s victims’ minds.
Apply a dark base, then carefully place small, irregular pieces of iridescent foil or glitter to resemble shattered glass. A glossy top coat will make it look like actual shards. It’s visually stunning and deeply unsettling.
20. Victim’s Scratch Marks
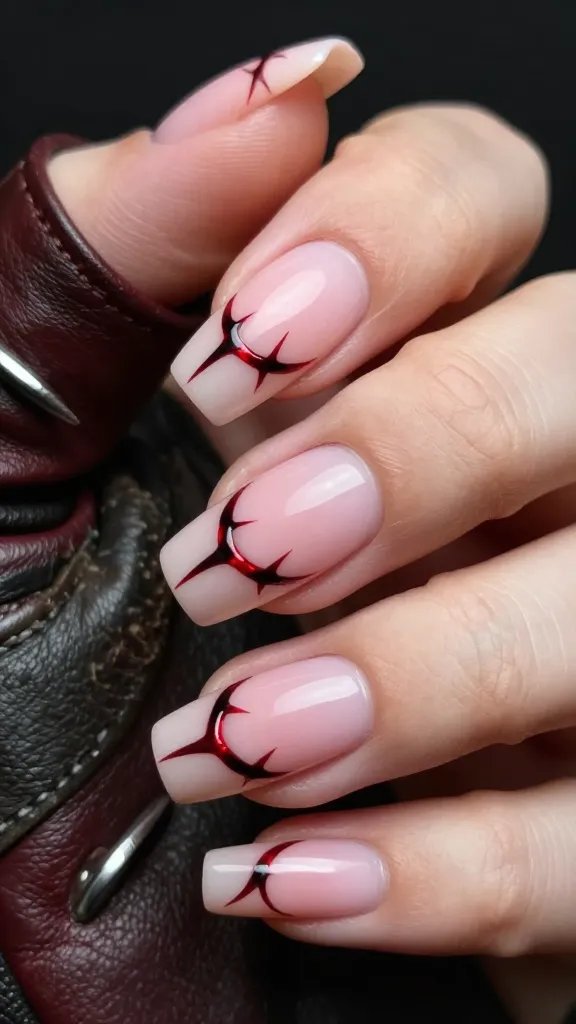
Imagine the frantic struggle against Freddy’s claws. Parallel, deep red or black lines on a neutral or flesh-toned base can represent fresh scratch marks.
On a nude or pale pink base, use a fine brush to draw three or four parallel, slightly curved lines in deep red or black, mimicking claw marks. It’s a visceral, chilling design that tells a story.
21. Freddy’s Toothy Grin

That terrifying, knowing smile. Dedicate a nail to Freddy’s creepy grin, complete with jagged teeth. It’s a bold and instantly recognizable feature.
On a dark background, paint a wide, unsettling smile with sharp, pointed teeth. You can add a hint of shadow around the mouth for extra depth. It’s a grin that truly chills to the bone!
22. Asymmetrical Sweater Stripes
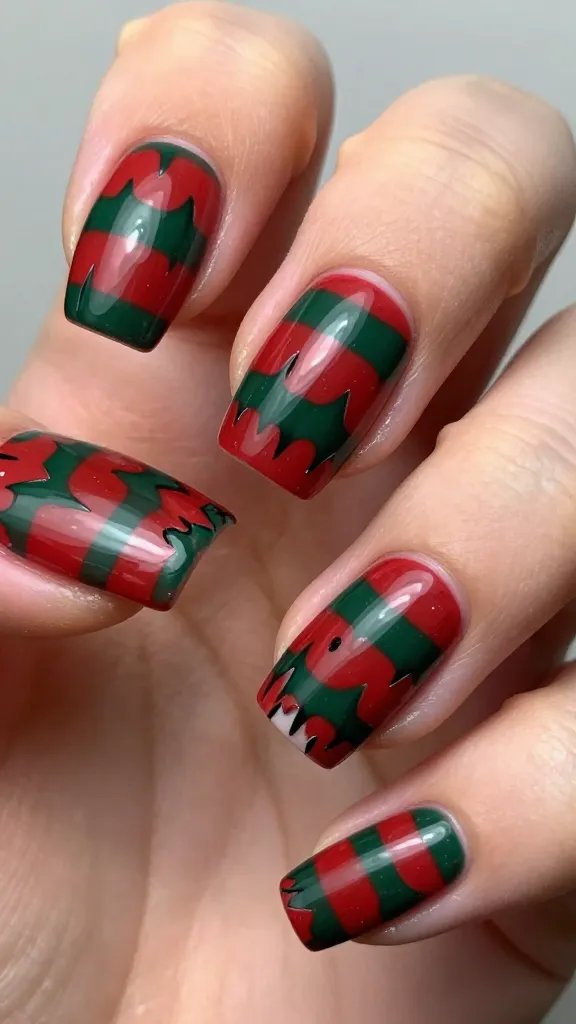
Who says stripes have to be perfectly straight? An asymmetrical, jagged, or uneven take on Freddy’s sweater stripes adds a touch of chaotic, dreamlike energy.
Instead of neat horizontal lines, create diagonal, wavy, or broken stripes of red and green. This gives the classic design a more dynamic and unsettling feel, perfect for a dream demon.
23. Minimalist Freddy Nod
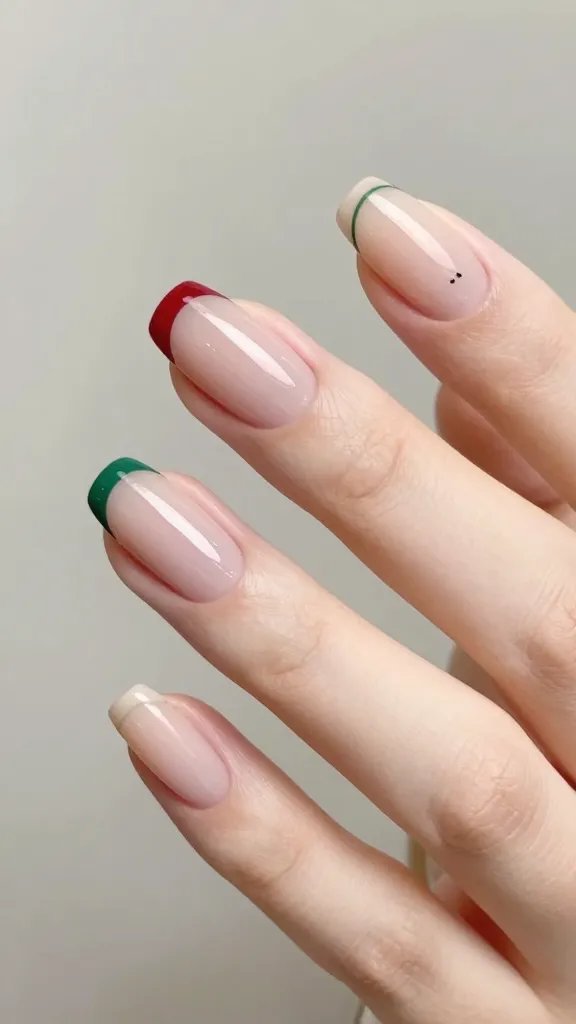
For those who love subtlety but still want to show their Freddy love, a minimalist design is key. Think one red stripe, one green stripe, or just a tiny claw symbol on an otherwise bare nail.
Paint two nails with a single, clean red stripe and two with a single green stripe. Or, on a nude nail, simply add a tiny, delicate black claw mark near the cuticle. It’s understated, chic, and still screams “Nightmare on Elm Street” to those in the know. IMO, it’s genius!
There you have it, 23 ways to bring the terror of Freddy Krueger right to your fingertips! Whether you go for subtle hints or full-blown gore, these designs are sure to make a statement. So grab your polishes and get ready to create some seriously killer nails – just try not to fall asleep while you’re doing it!