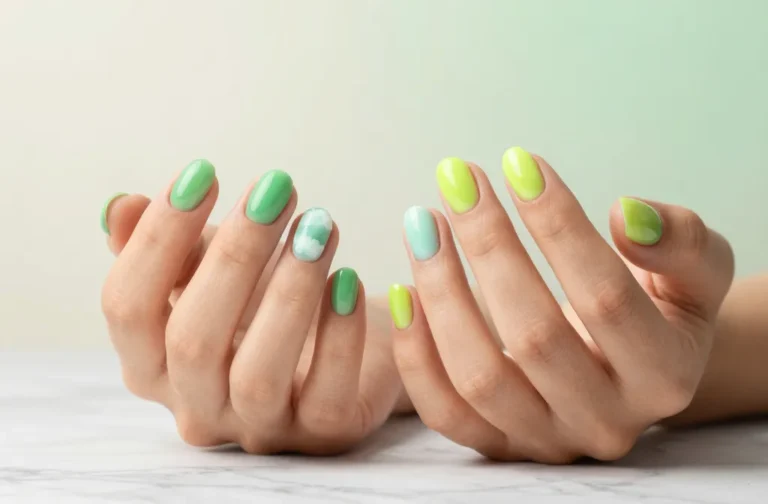
Unearth Epic Style with 28 Mummy Nails
Forget basic manicures; we’re diving into ancient mysteries with a seriously spooky twist! If you’re tired of predictable polish and crave nails that tell a story, you’ve hit the jackpot. These 28 mummy nail designs are about to resurrect your style game, turning your fingertips into miniature archaeological wonders. Get ready to wrap your head around some seriously epic nail art!
1. The Classic Bandage Wrap
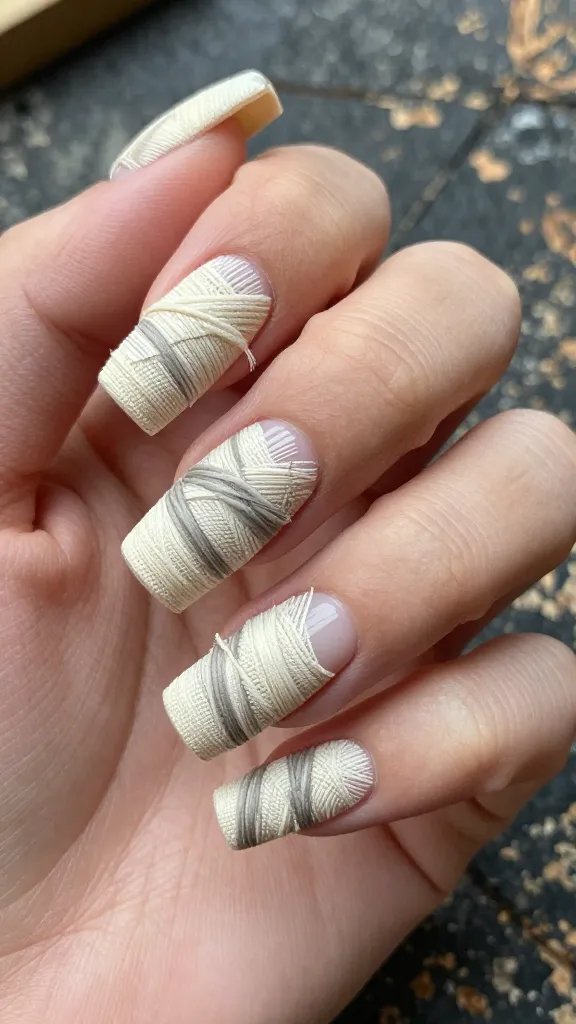
Let’s start with the OG: the classic mummy wrap. This look is all about creating the illusion of aged linen strips tightly wound around your nails, giving off major ancient artifact vibes.
You’ll want a creamy off-white or beige polish as your base. Once dry, use a thin striping brush and a slightly darker, muted brown or grey to paint thin, overlapping lines. Don’t be afraid to make them a little uneven; it adds to the authenticity!
This design is perfect for Halloween parties or whenever you want to feel like a queen from the Nile. It’s surprisingly simple but super effective.
2. Distressed Edge Mummy
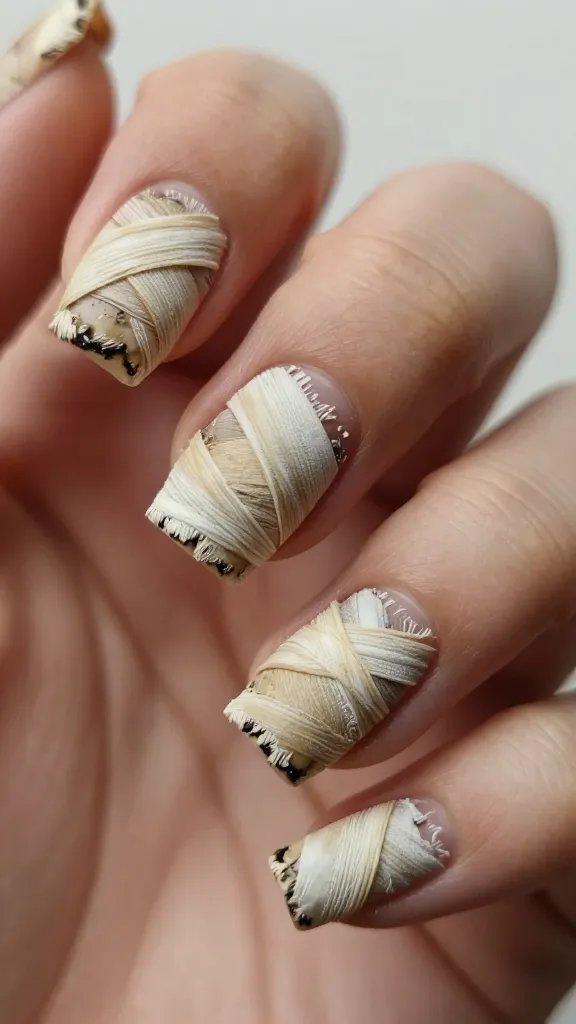
Taking the classic wrap up a notch, the distressed edge adds an element of decay and time. Think bandages that have seen a few millennia.
Start with your classic bandage wrap base. Then, using a tiny sponge or a dotting tool, lightly dab a darker, almost black-brown polish along the edges of your “bandages” and around the nail perimeter. This creates a weathered, frayed look.
This style screams “just unearthed from a tomb” and is fantastic for a truly authentic, eerie aesthetic.
3. Golden Thread Mummy
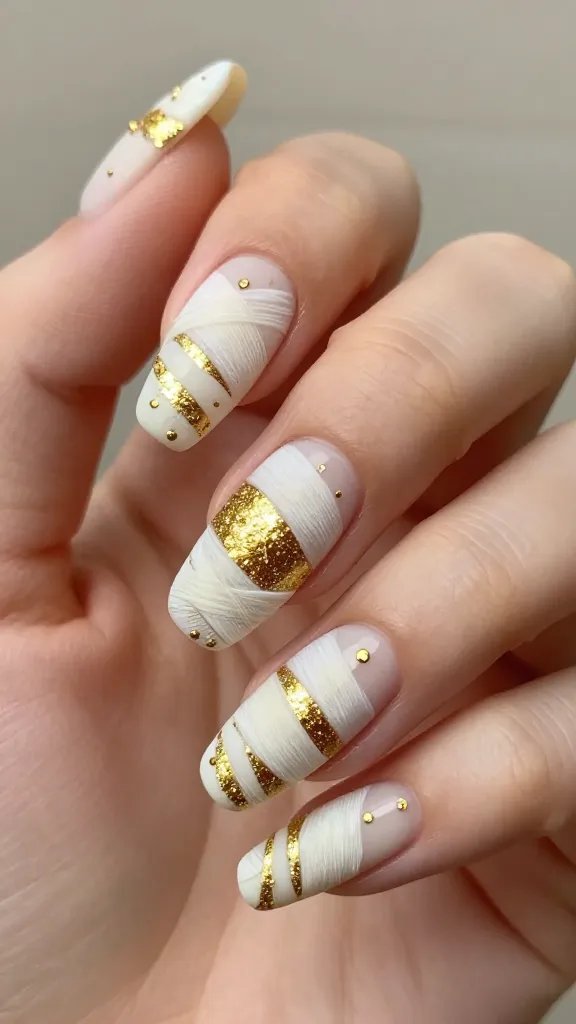
Who says mummies can’t be glamorous? This design infuses a touch of opulent ancient Egyptian gold into the classic wrapped look.
After your off-white base and bandage lines are set, grab a super fine gold glitter polish or even thin gold nail striping tape. Carefully apply it over some of your bandage lines, making them shimmer. You can even add tiny gold dots for extra sparkle.
This look is for the pharaohs among us, adding a luxurious twist to the spooky theme. It’s elegant yet still perfectly on theme.
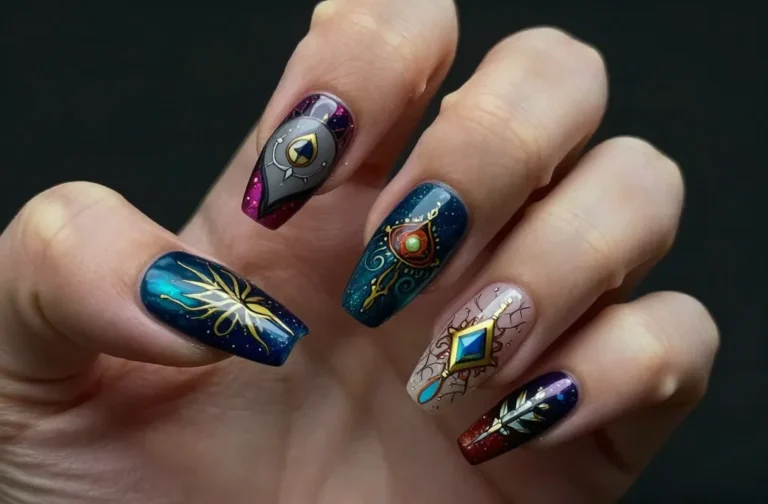
4. Hieroglyph Hues
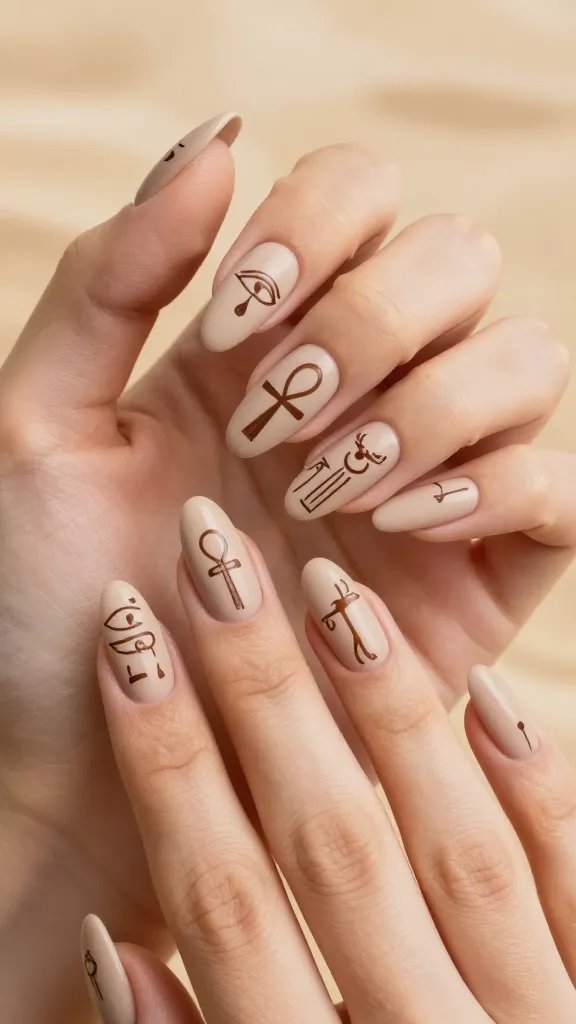
Bring the ancient language of Egypt right to your fingertips! This design uses actual hieroglyphs as the main artistic element.
Choose a muted, sandy base color like beige, light grey, or even a dusty blue. Then, with a fine brush and black or dark brown polish, carefully paint simple hieroglyphic symbols. Think the Eye of Horus, an ankh, or even simplified bird or human figures.
This is a sophisticated way to pay homage to ancient Egypt, showcasing your love for history and unique art.
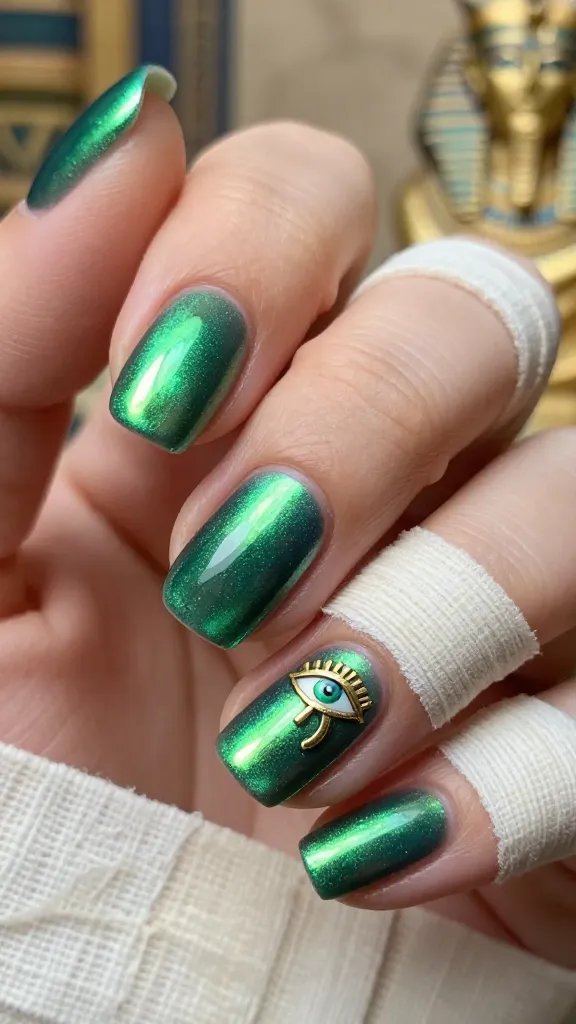
5. Eye of Horus Accent
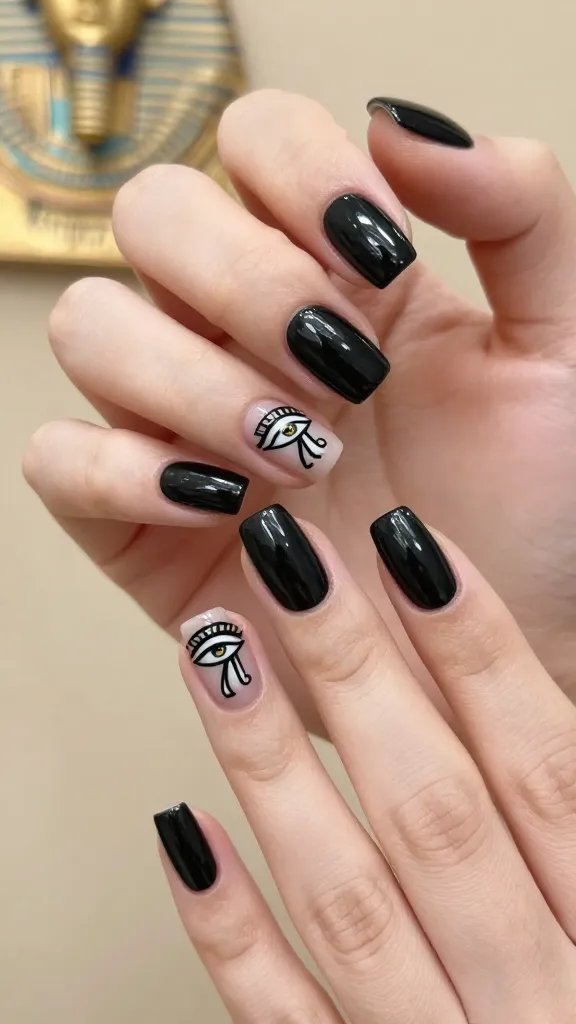
The powerful Eye of Horus is a symbol of protection, royal power, and good health. Why wouldn’t you want that on your nails?
Paint all your nails in a dark, mysterious color like deep blue or black. Then, on one or two accent nails, meticulously draw the Eye of Horus. Use white for the main shape and black for the details. You can even add a tiny gold dot in the pupil.
This design is bold and iconic, making a strong statement and offering a touch of ancient mysticism.
6. Ankh Symbol Statement
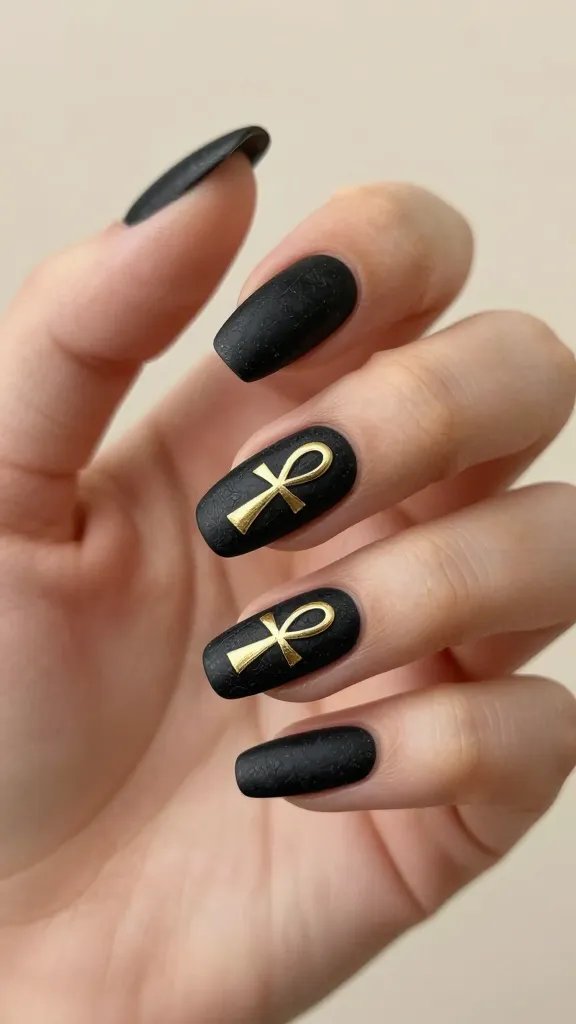
The Ankh, the key of life, is another instantly recognizable Egyptian symbol that translates beautifully to nail art.
You can go minimalist with this one: a simple matte black base on all nails, with a single, crisp gold or white ankh painted on one accent nail. Or, incorporate it into a hieroglyphic pattern on multiple nails.
It’s a chic, understated nod to ancient culture, perfect for those who appreciate symbolism without being overtly “spooky.”
7. Scarab Beetle Bliss
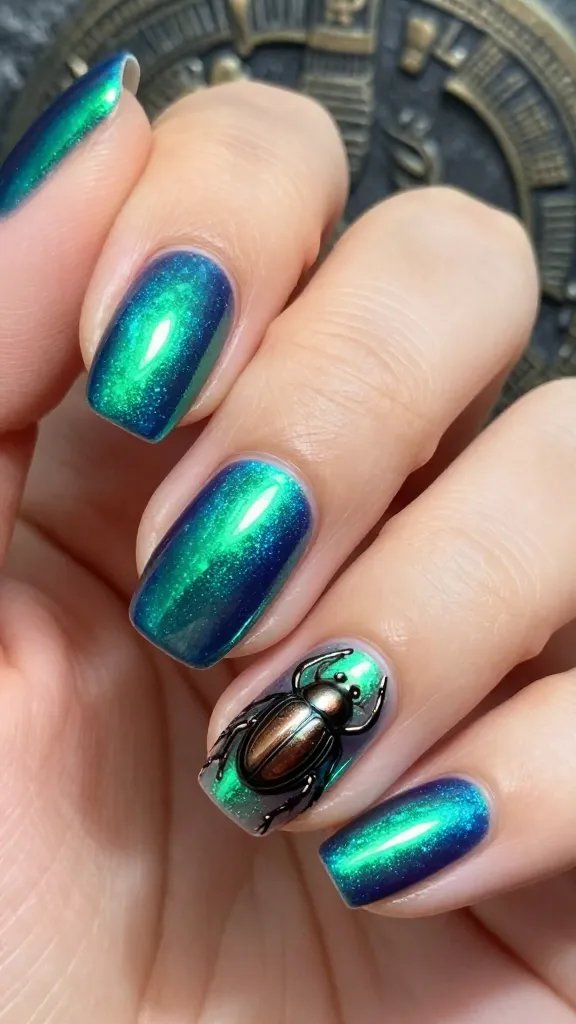
Scarab beetles were symbols of rebirth and regeneration in ancient Egypt. Plus, they just look cool! Think iridescent greens and blues.
Use a metallic green or blue polish with an iridescent or duochrome finish as your base. Then, on an accent nail, carefully paint a stylized scarab beetle in black or a contrasting metallic. You can even use a small beetle charm if you’re feeling adventurous.
This design is vibrant and unique, showcasing a less common but equally fascinating aspect of Egyptian lore.
8. Sarcophagus Gold Leaf
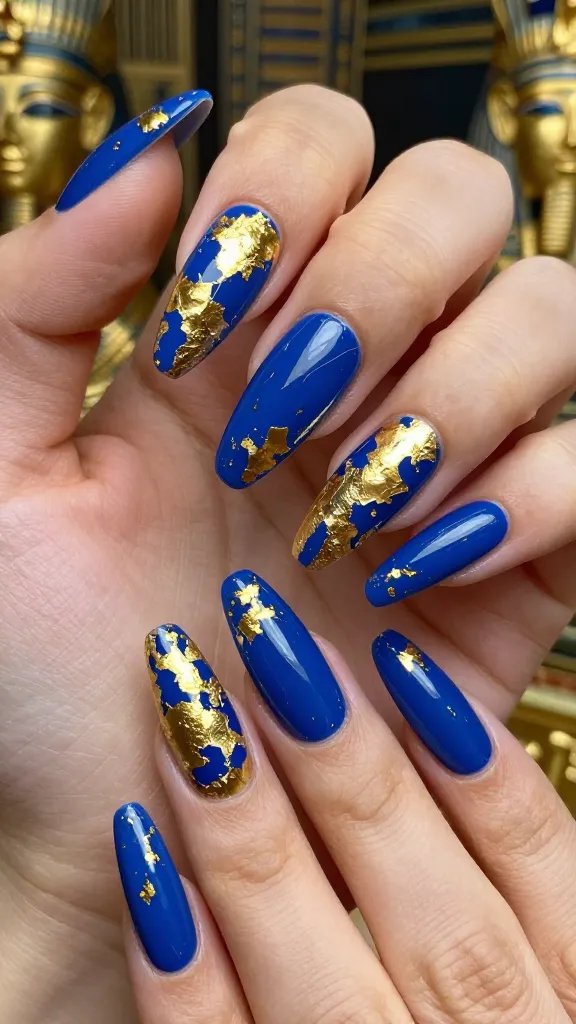
Imagine the grandeur of a pharaoh’s sarcophagus, gleaming with gold. This design brings that luxurious feel to your nails.
Start with a rich, deep base color like royal blue, emerald green, or even black. Once dry, apply gold leaf (available at most craft stores) strategically over parts of your nail. You can cover the whole nail, or just create fractured, aged-looking patches. Seal it with a top coat.
This is a truly opulent look that feels incredibly high-end and captures the treasure-filled essence of a tomb.
9. Cracked Earth Texture
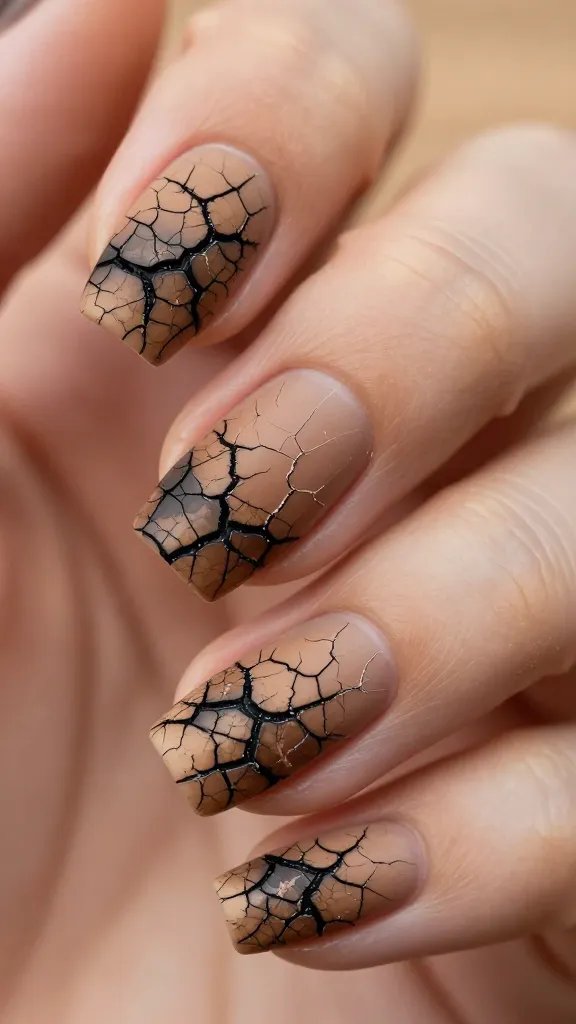
Picture the dry, sun-baked earth of the desert, cracking under the intense heat. This texture adds a realistic, aged feel.
Use a nude or sandy brown base. Once dry, apply a specialized “crackle” polish in a darker brown or black over it. As it dries, it will create fascinating crack patterns, mimicking parched earth. Finish with a matte top coat for extra realism.
This design is fantastic for creating a truly ancient, weathered aesthetic, making your nails look like they’ve been through the desert. Seriously cool, IMO.
10. Desert Sand Ombre

The vast, shifting sands of the desert are a quintessential Egyptian image. An ombre effect captures this beautifully.
Choose two to three shades of sandy browns, beiges, and light oranges. Using a sponge, gently blend these colors from the cuticle to the tip, creating a seamless gradient. A matte top coat will enhance the dusty, desert feel.
This subtle yet stunning design evokes the serene beauty of the Egyptian landscape and is super versatile for everyday wear.
11. Ancient Stone Effect

Think of the weathered stone of pyramids and temples, rich with history and texture. This look aims for that rugged, ancient feel.
Apply a grey or stone-colored base. While it’s still slightly wet, gently dab on tiny specks of darker grey, black, and white polish using a sponge or a fan brush. This creates a mottled, granite-like texture. A matte top coat is key here.
It’s a sophisticated, architectural design that makes your nails look like miniature pieces of an ancient monument.
12. Papyrus Scroll Nails
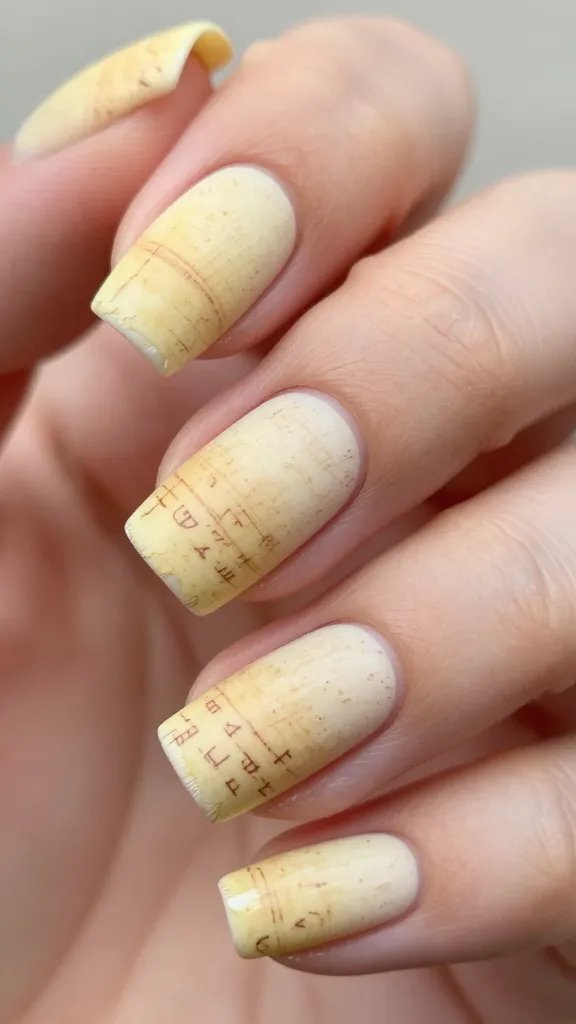
Imagine unrolling an ancient papyrus scroll, its edges frayed, its surface covered in faded script. That’s the vibe we’re going for!
Use a pale yellow or cream base. Once dry, dab on some light brown polish with a crumpled piece of plastic wrap or a dry brush to create a textured, aged paper look. Then, with a fine brush, paint faint, almost illegible “script” in a darker brown.
This design is wonderfully artistic and unique, giving your nails the appearance of precious, ancient documents.
13. Jewel-Toned Pharaoh
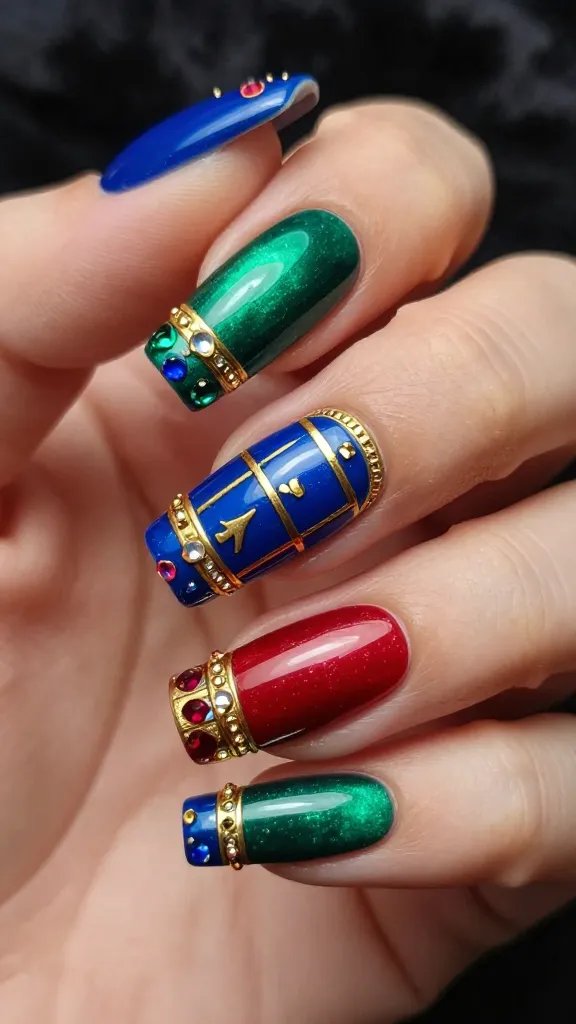
Ancient Egyptian jewelry was all about vibrant, rich jewel tones. Incorporate these into a regal mummy design.
Paint your nails in deep sapphire blue, emerald green, or ruby red. On an accent nail, add gold accents like small dots, stripes, or even tiny painted motifs. You can also use small rhinestones to mimic precious gems.
This look is incredibly luxurious and colorful, perfect for channeling your inner Cleopatra or pharaoh with a touch of modern flair.
14. Glow-in-the-Dark Mummy
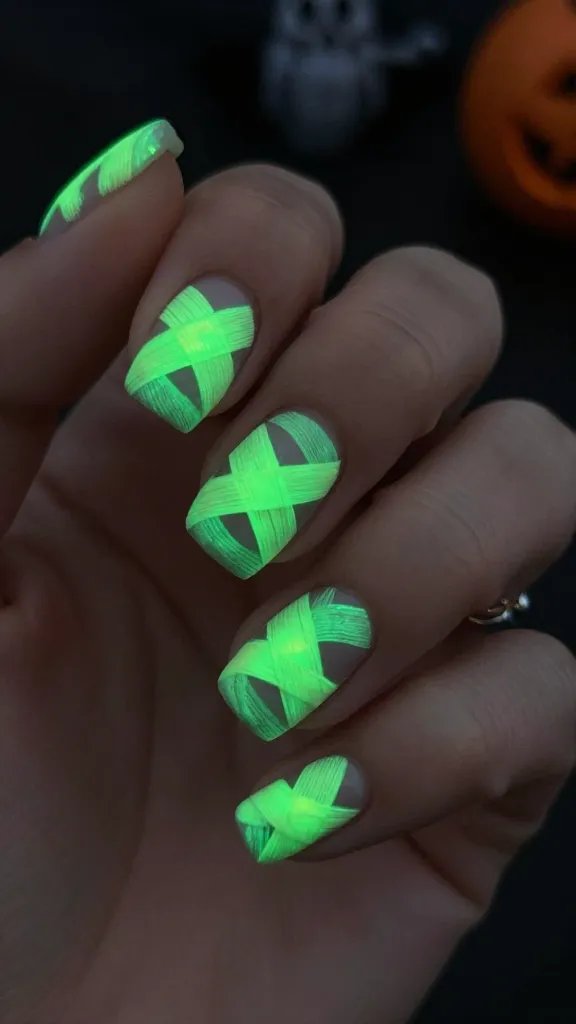
Who said mummies aren’t fun? This design adds a playful, spooky element that literally lights up the night.
Apply your classic bandage wrap design using regular polish. Then, carefully trace over the bandage lines with a glow-in-the-dark polish. Or, use a glow-in-the-dark base and paint the bandage lines in a normal color that will disappear in the dark.
Key Tip: Make sure to “charge” your glow polish under a bright light for maximum effect!
This is an absolute showstopper for parties or just for creeping out your friends in the dark. So much fun!
15. Blood-Stained Bandages
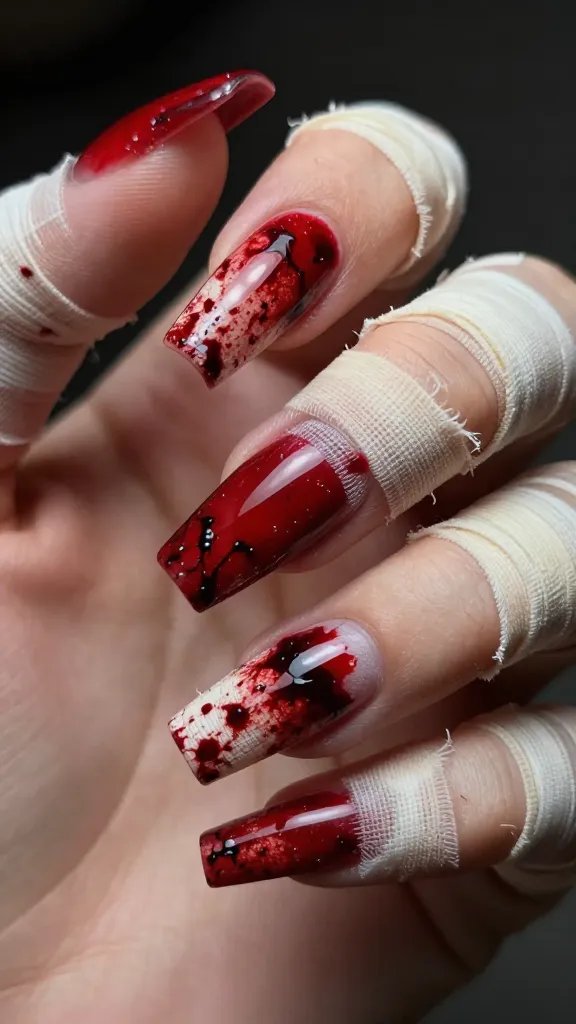
For those who prefer their mummy nails with a side of horror, the blood-stained bandage look is gruesomely effective.
After completing your classic bandage wrap, use a thin brush to carefully add splatters or streaks of a deep, glossy red polish. Focus on the tips or edges of the “bandages” to make it look like fresh blood.
This design is definitely more on the spooky side, perfect for Halloween or if you’re feeling particularly vampiric.
16. Matte Black Mystery

There’s something inherently mysterious and chic about matte black. It provides the perfect backdrop for subtle Egyptian details.
Paint all your nails with a rich, matte black polish. Then, on one or two accent nails, use a glossy black polish to paint a subtle Eye of Horus or an ankh. The contrast in textures is incredibly striking.
This is a sophisticated, edgy take on mummy nails, proving that ancient themes can be totally modern and mysterious.
17. Gilded Age Mummy
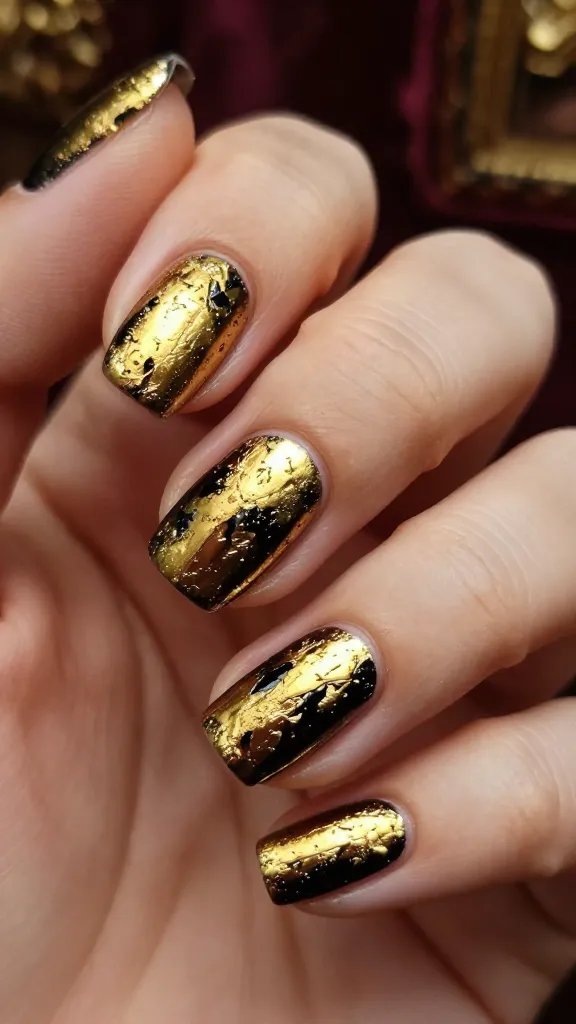
This design is all about heavy, distressed gold, making your nails look like ancient, tarnished treasures.
Start with a dark, almost black base. Then, using a sponge, dab on a metallic gold polish, focusing on creating an uneven, almost chipped effect. You want it to look like the gold is flaking off, revealing the darkness beneath.
It’s a truly rich and decadent look that feels incredibly historical and luxurious. Trust me, it’s stunning.
18. Abstract Bandage Art
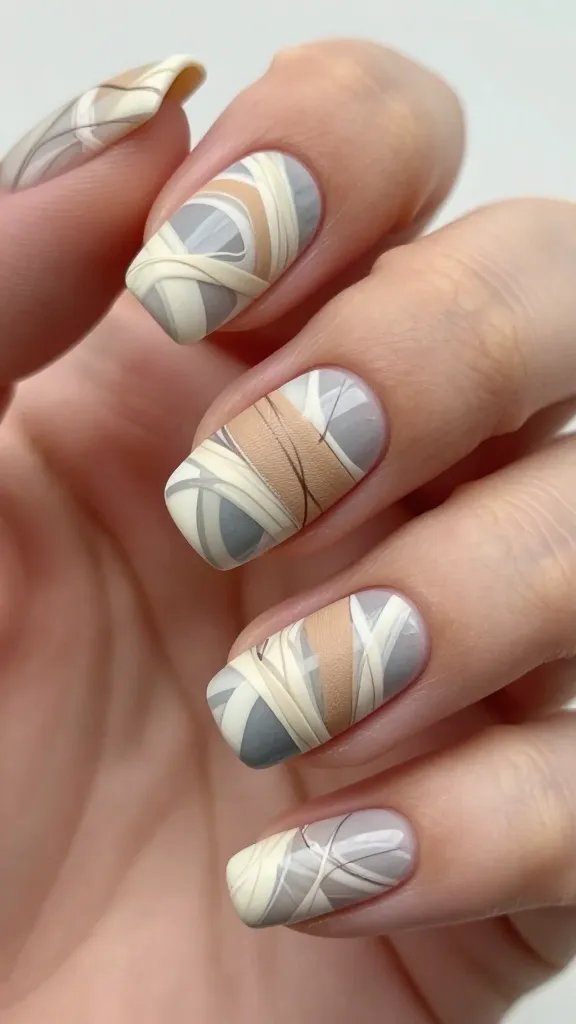
If literal bandages aren’t your thing, try an abstract interpretation. This is about evoking the *feeling* of a mummy wrap without being so literal.
Use a mix of neutral tones like beige, grey, and off-white. Paint broad, sweeping, overlapping strokes across your nails, creating a layered, textured effect. You can even add a few thin, darker lines for depth.
This artistic approach gives a modern, minimalist twist to the mummy theme, perfect for those who like their art subtle.
19. Geometric Mummy Patterns
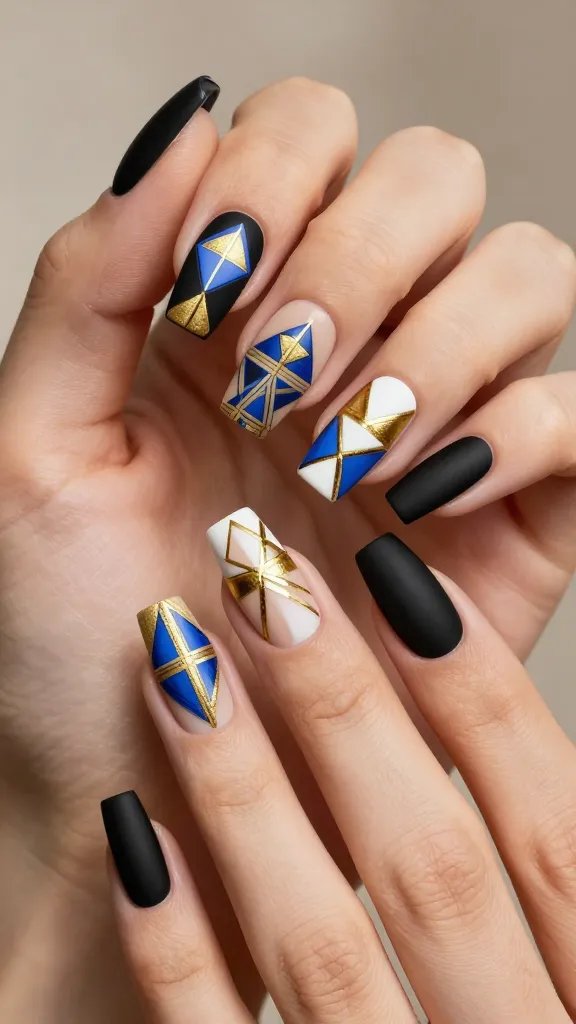
Ancient Egyptian art often featured intricate geometric patterns. Bring that structured beauty to your nails.
Choose a base color like sand or black. Then, using a fine brush and a contrasting color (gold, white, or a deep jewel tone), paint repeating geometric shapes – triangles, squares, or interlocking lines – across your nails. Think pyramid patterns or basket weaves.
This design is sharp, clean, and modern, offering a structured elegance to your ancient-inspired manicure.
20. Minimalist Mummy Lines
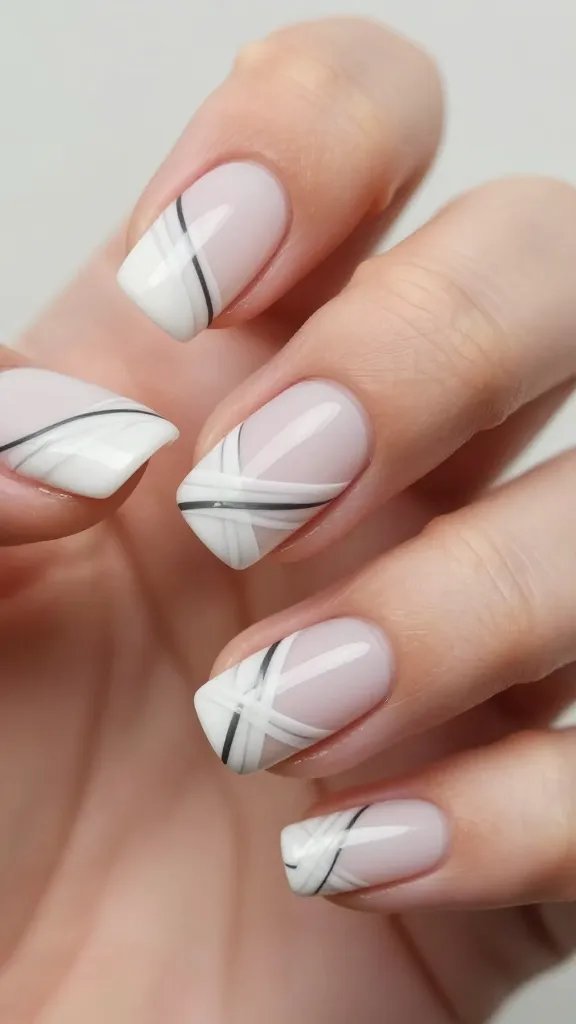
Less is often more, and this design proves it. It’s a subtle nod to the bandage wrap without being overwhelming.
Paint your nails a crisp white or a pale nude. Then, using a super fine striping brush and a thin line of black or dark grey polish, paint just a few strategically placed, slightly curved lines across each nail. Don’t overlap too much.
This is the perfect design for those who want a hint of the mummy theme without going full-on costume. Chic and understated.
21. Pyramid Power Tips

The iconic silhouette of the pyramids makes for a striking nail design, especially on accent nails.
Paint your nails a deep blue or black to represent the night sky. On one or two nails, use a sponge to create a gradient of sandy browns and oranges at the tips, forming the base of a pyramid. Then, with a fine brush, outline the pyramid shape in black or dark brown.
This design is architectural and majestic, celebrating one of the most enduring symbols of ancient Egypt.
22. Lotus Flower Elegance
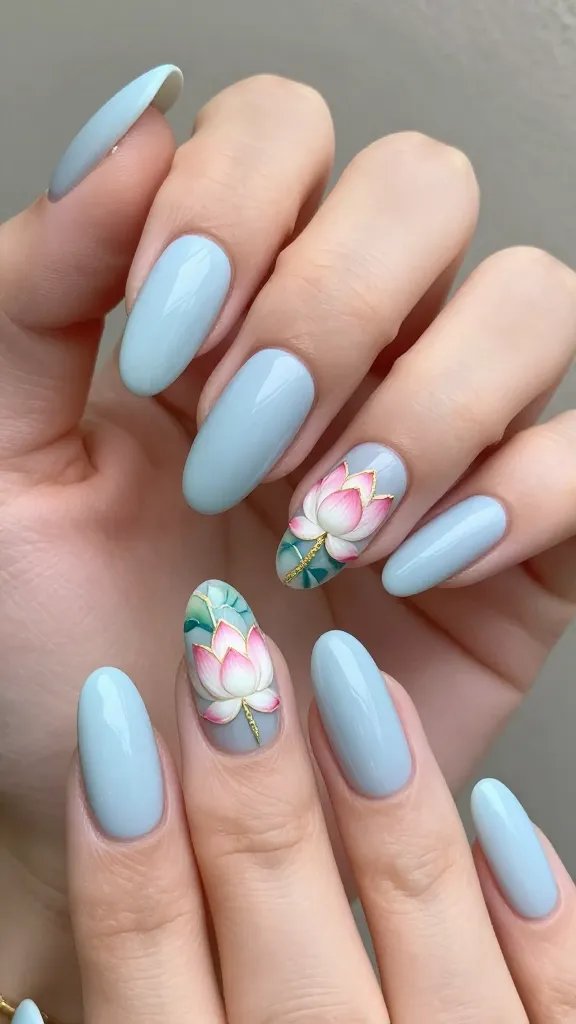
The lotus flower was a sacred symbol in ancient Egypt, representing creation, rebirth, and the sun. It adds a touch of natural beauty.
Choose a soft, elegant base like pale blue or white. Then, on an accent nail, delicately paint a lotus flower in shades of pink, white, and green. You can add a golden outline for extra detail.
This design offers a beautiful, softer side to the ancient Egyptian theme, perfect for those who appreciate natural beauty.
23. Sphinx Silhouette
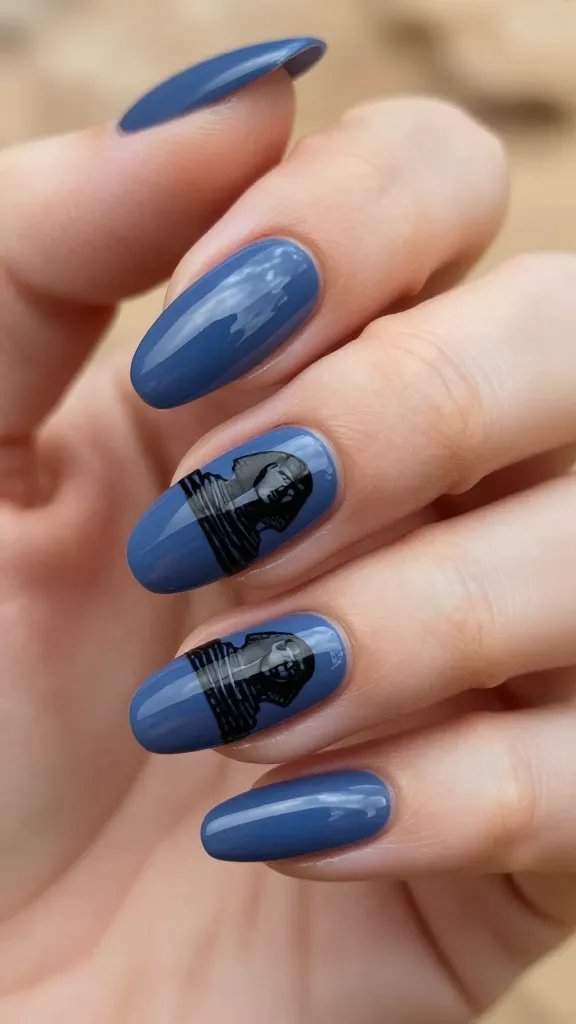
The majestic Sphinx, guardian of the pyramids, can make a powerful statement on your nails.
Paint your nails a deep, dusky blue or a sunset orange. On an accent nail, use a fine brush to paint the silhouette of the Sphinx in black. Keep it simple and recognizable for maximum impact.
This is a powerful and iconic design that truly captures the grandeur and mystery of ancient Egypt.
24. Chrome Mummy Wrap
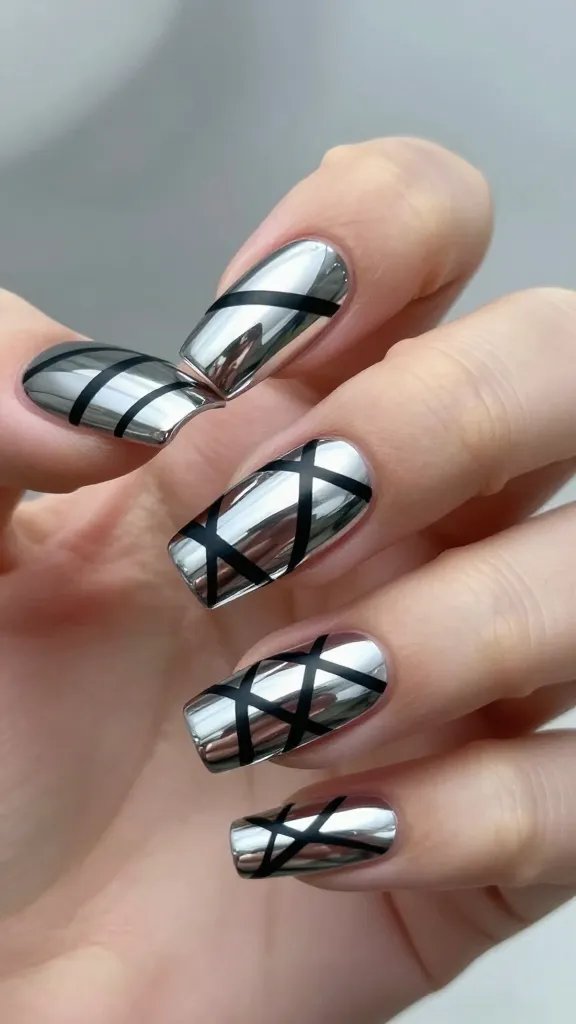
Bring the ancient into the future with a futuristic chrome finish! This gives a metallic, almost alien mummy vibe.
Apply a chrome base polish in silver or gold. Once dry, use a thin striping brush and a contrasting matte black or dark grey polish to paint your bandage lines. The contrast between the shiny chrome and the matte lines is stunning.
This design is edgy, modern, and unexpected, perfect for those who love a futuristic twist on classic themes.
25. Cat Eye Ancient Glare
The “cat eye” polish effect creates a mesmerizing shifting line of shimmer, perfect for mimicking a mysterious ancient gaze.
Use a cat eye polish in a deep jewel tone like emerald green or sapphire blue. Apply it as directed, using a magnet to create the signature line. On an accent nail, you can even paint a tiny Eye of Horus over the cat eye effect for extra intensity.
This design is deeply mystical and captivating, making your nails look like they hold ancient secrets.
26. Shattered Glass Sarcophagus
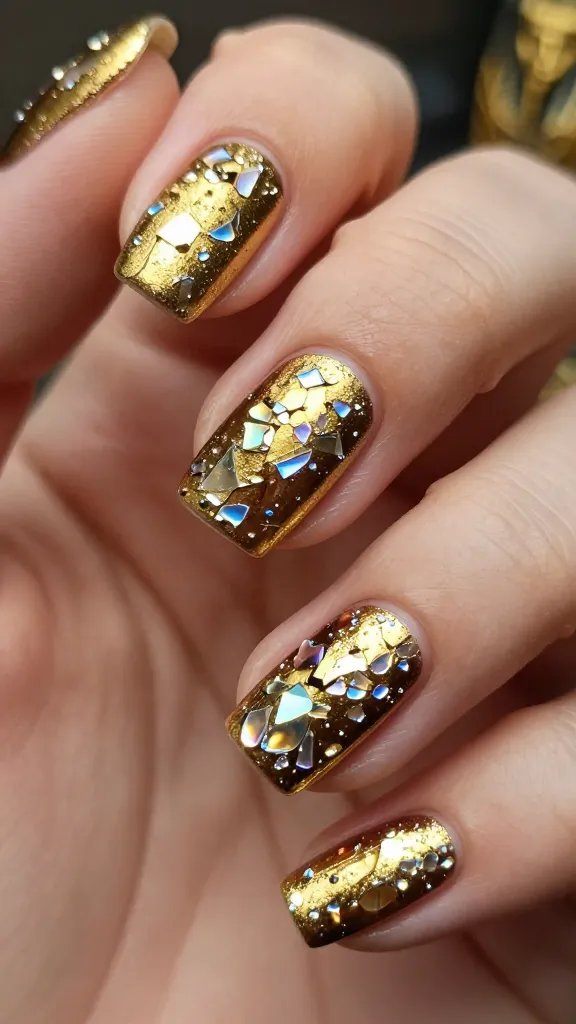
This trendy “shattered glass” effect can be reimagined to look like fragments of a precious, broken sarcophagus.
Paint your nails in a rich, metallic gold or bronze. While it’s still slightly tacky, apply small, irregularly shaped pieces of iridescent cellophane or nail foil. These will catch the light and create a fragmented, jewel-like effect, like a shattered treasure.
It’s a dazzling and unique design that combines modern nail art with an ancient, treasure-hunt aesthetic.
27. Beetle Wing Iridescence
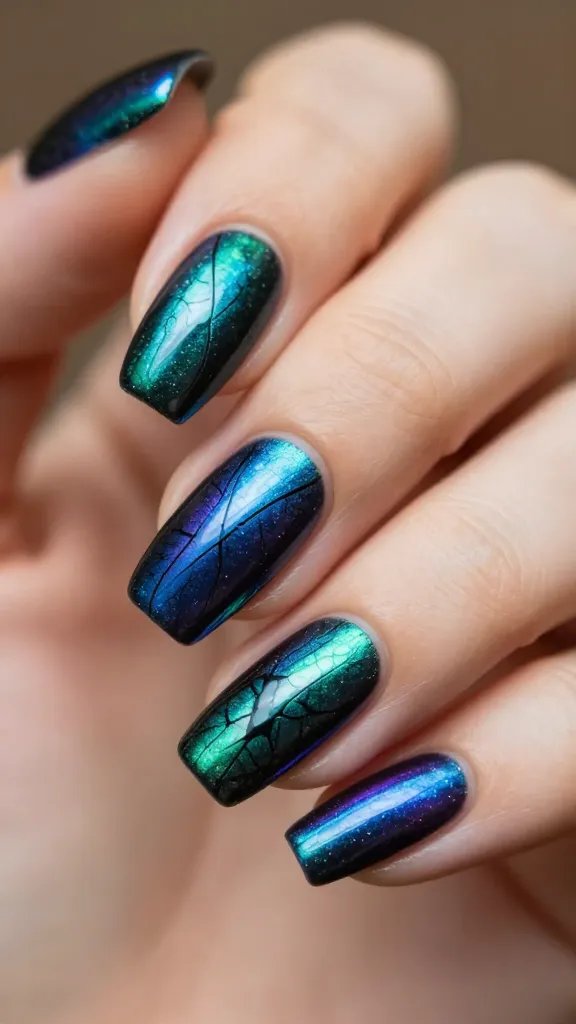
Inspired by the shimmering, colorful wings of scarab beetles, this design focuses on vibrant, shifting colors.
Use a duochrome or iridescent polish that shifts between greens, blues, and purples. Apply it over a black base for maximum impact. You can leave it as is, or add subtle black “veins” with a fine brush to mimic insect wings.
This design is vibrant, exotic, and truly unique, bringing the natural beauty of ancient Egypt’s fauna to your fingertips.
28. Dual-Tone Dusty Relic
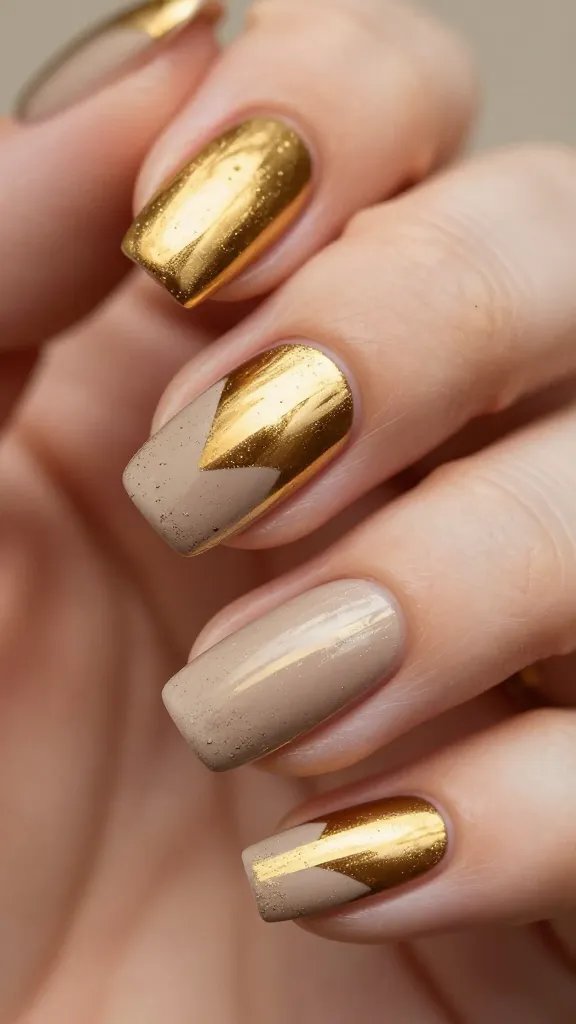
This design combines two contrasting textures or finishes to create the look of an ancient relic, partially preserved and partially weathered.
Paint half of your nail (either horizontally or diagonally) with a glossy, rich metallic gold polish. Paint the other half with a matte, dusty beige or grey. The sharp contrast highlights the idea of something ancient and valuable, partially covered in the dust of ages.
This is a sophisticated and artistic design that tells a story right on your nails, perfect for an intriguing, historical vibe.
There you have it, 28 ways to bring ancient Egypt and its mysterious mummies right to your fingertips! Whether you’re a beginner or a nail art pro, these ideas offer endless possibilities to express your inner archaeologist. So grab your polishes and get ready to unearth some truly epic manicures!