The 19 Easter Nails Design Everyone Wants!
Spring has sprung, and what better way to celebrate than with a fresh, vibrant manicure? Forget the basic pastel polish; we’re diving into some seriously cute and creative Easter nail designs that will make your fingertips the talk of the town. These ideas are easy to love and totally transform your look, making you feel extra festive and fabulous.
1. Pastel Ombre Perfection
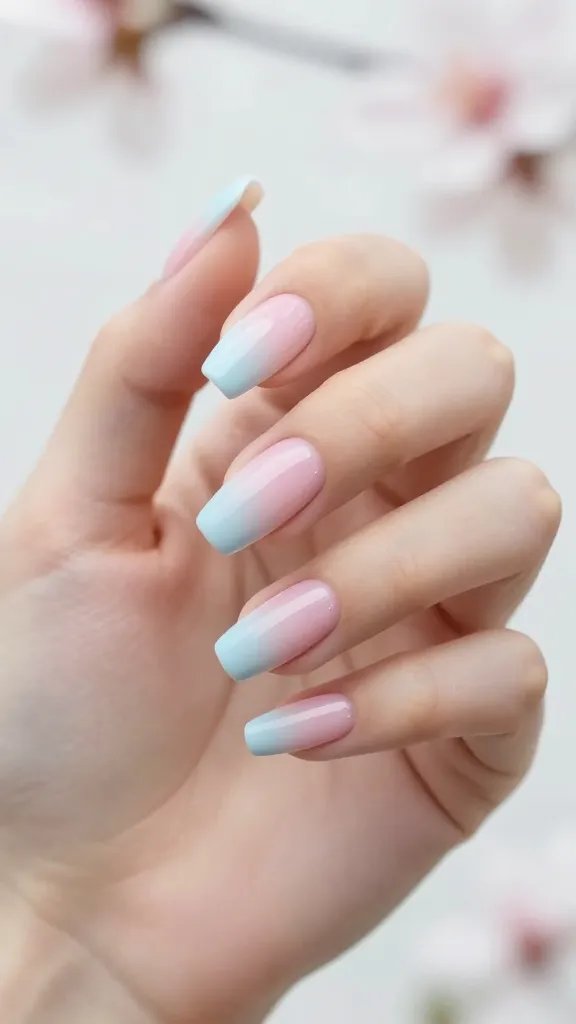
Who said ombre was just for hair? This dreamy design blends two or more soft pastel shades seamlessly across your nail. It’s elegant, understated, and screams spring in the most sophisticated way possible.
Start with a lighter shade at the cuticle and gently sponge on a slightly darker hue towards the tip for that gorgeous gradient effect. You can pick any combination – think lavender fading into mint, or baby blue into soft pink. This look is perfect for those who want a subtle nod to Easter without going full-on bunny.
This design offers a chic, modern take on traditional Easter colors, making your nails look effortlessly stylish for any spring occasion.
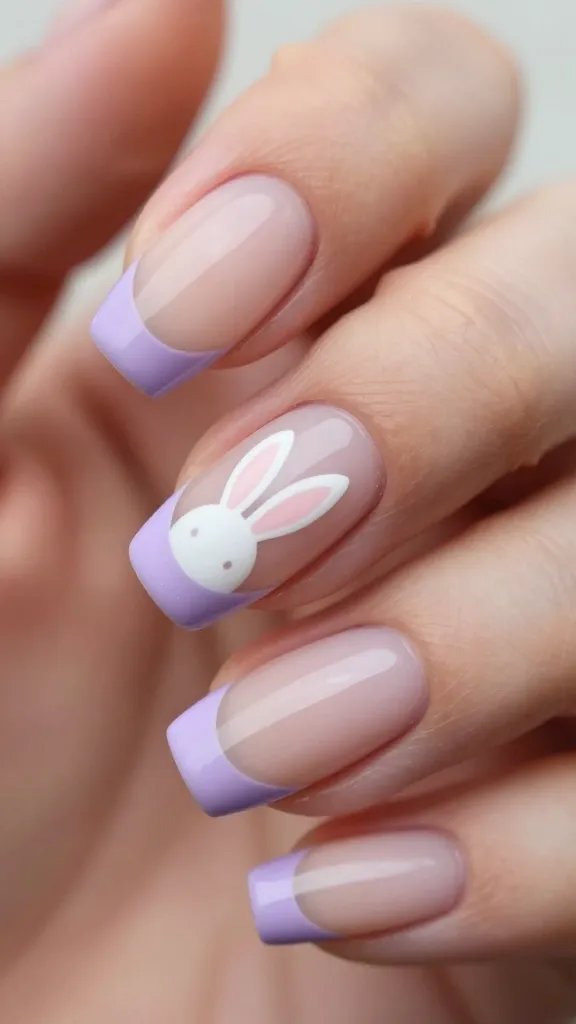
2. Hoppy Bunny Silhouettes
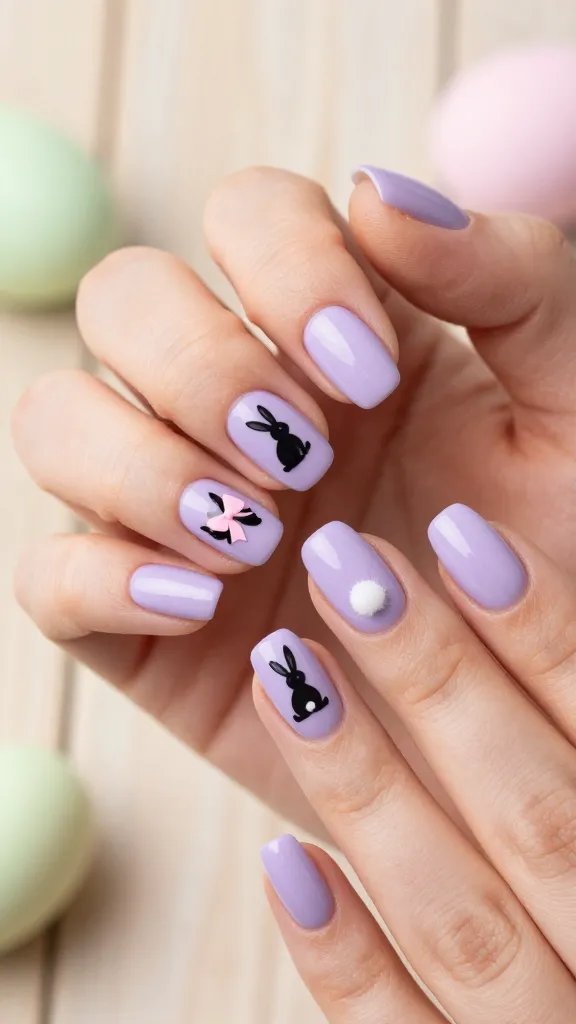
Could anything be cuter than tiny bunny silhouettes hopping across your nails? This design is a classic for a reason, bringing instant Easter cheer to your fingertips. It’s sweet, playful, and surprisingly easy to achieve.
Paint your nails a light pastel base color, then use a thin brush or a nail art pen to draw simple bunny shapes. You can do a full bunny, or just a cute little bunny butt with a fluffy white tail! For extra flair, try adding a tiny bow or a flower near the bunny.
These adorable bunnies are perfect for a fun, festive look that’ll have everyone smiling. Seriously, they’re irresistible!
3. Carrot Patch Accents
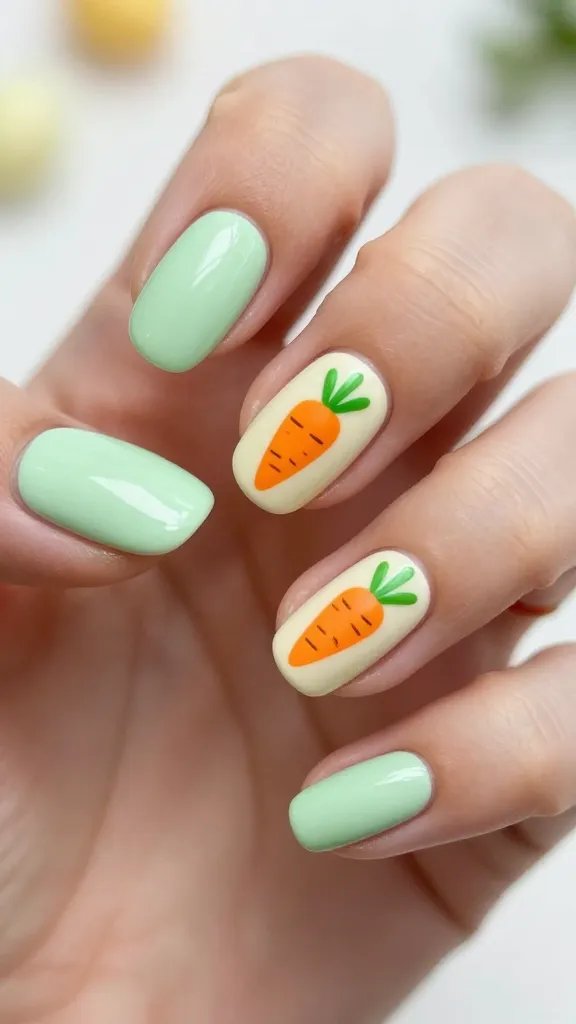
Give a nod to the Easter Bunny’s favorite snack with some adorable carrot accents. This design is whimsical and adds a pop of vibrant orange to your pastel palette, making your nails stand out in the best way.
Paint most of your nails a light green or white, then dedicate one or two accent nails to a tiny orange carrot design. You can draw a simple triangle with a few green leafy bits at the top. For a more detailed look, add some tiny black lines for texture.
This playful design is a fantastic way to add a unique, cheerful touch to your Easter manicure, guaranteeing compliments.
4. Speckled Egg Effect
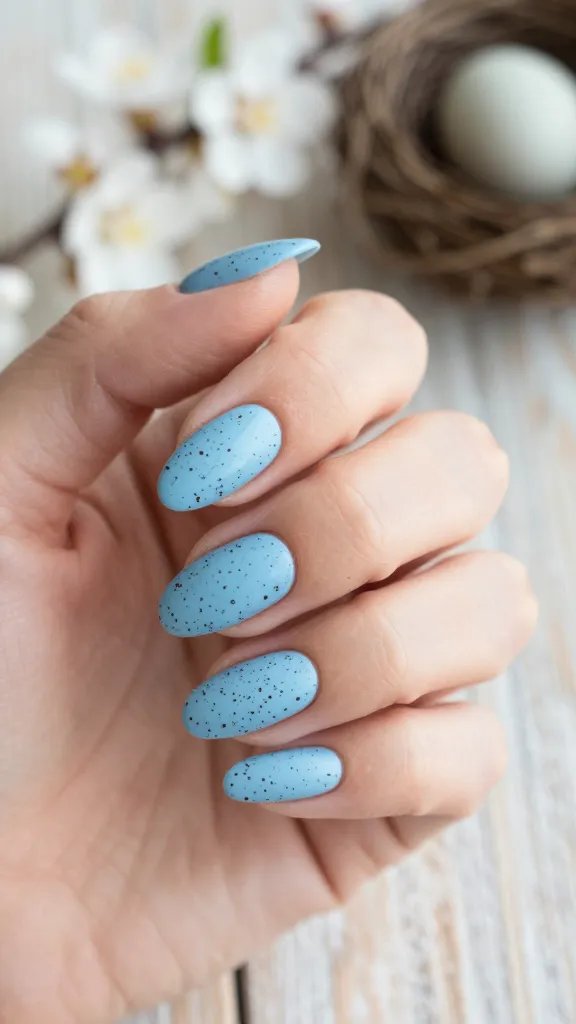
Embrace the beauty of nature with a speckled egg design that’s both rustic and charming. This look is incredibly versatile and can be done in any color combination, making it a truly unique Easter statement.
Choose a pastel base color like robin’s egg blue, cream, or soft pink. Once dry, take a slightly darker contrasting polish, dilute it a tiny bit, and use a stiff brush (like an old toothbrush) or a fan brush to gently flick tiny speckles onto your nails. You can also use a dotting tool for more controlled speckles.
This design gives your nails an organic, sophisticated feel, reminding everyone of springtime rebirth and fresh beginnings.
5. Dainty Floral Sprigs
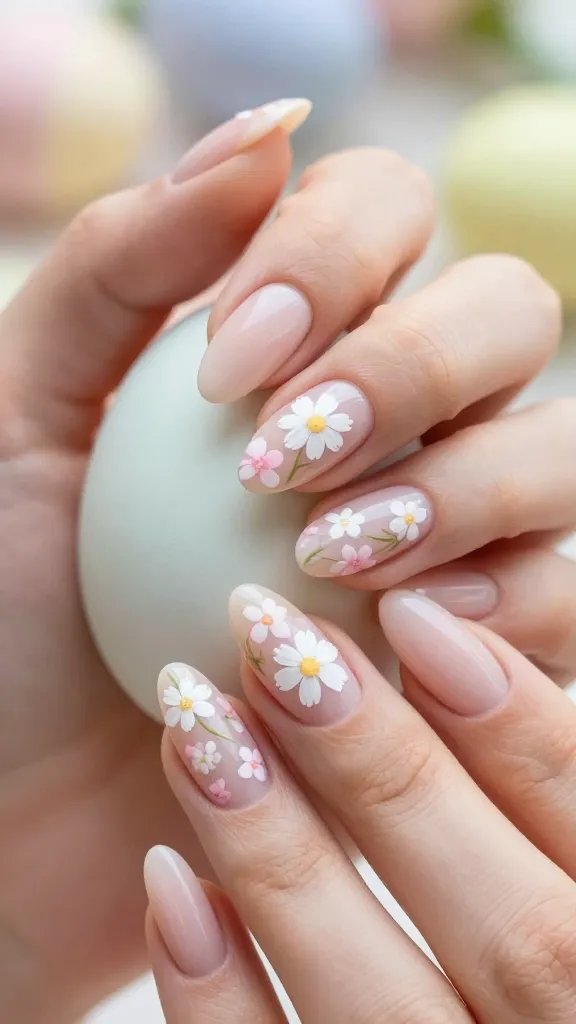
Nothing says spring like fresh flowers, and tiny floral sprigs on your nails are pure elegance. This design is delicate, feminine, and perfect for those who prefer a more subtle, sophisticated Easter look.
Start with a nude or light pastel base. Then, using a fine detail brush, paint small, simple flowers like daisies or cherry blossoms, connecting them with thin green lines for stems. You don’t need to be an artist; even abstract flower shapes look beautiful.
Tips for Florals:
- Use a dotting tool for perfect flower centers.
- Layer different shades of the same color for depth.
- Don’t be afraid to mix flower types.
These dainty florals will make your nails look like a blooming garden, bringing a fresh and graceful vibe to your Easter outfit.
6. Cheerful Chick Peepers
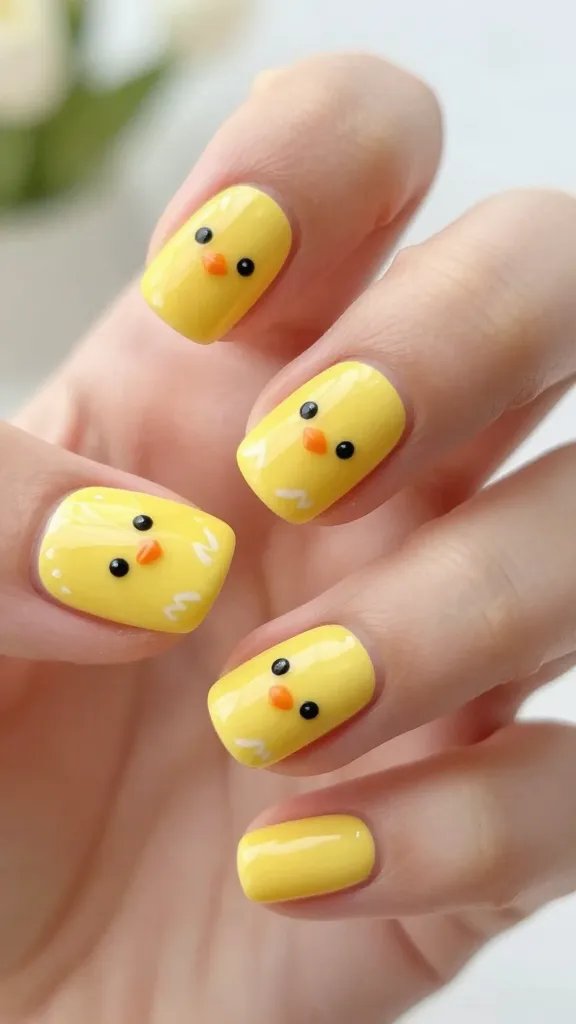
Oh, for goodness sake, how can you resist tiny, fluffy chicks on your nails? This design is undeniably cute and brings a burst of sunny yellow happiness to your manicure. It’s pure joy, IMO.
Paint your nails a bright yellow base. Once dry, use a dotting tool or fine brush to add two small black dots for eyes and a tiny orange triangle for a beak. You can even add a little white highlight to the eyes to make them sparkle! Some people even add tiny wings.
These cheerful chicks are guaranteed to brighten your day and make everyone around you smile. Seriously, they’re adorable!
7. Glitter Gradient Glam
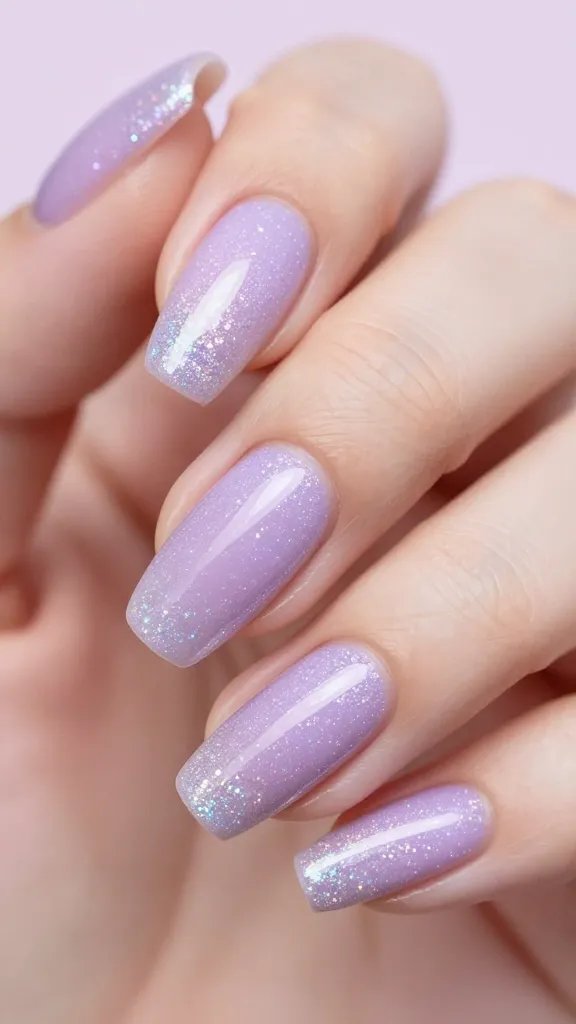
Add some sparkle to your Easter celebrations with a glitter gradient! This design is festive, glamorous, and catches the light beautifully, making your nails feel extra special. Who doesn’t love a little bling?
Apply a pastel base color. While it’s still tacky, or after applying a clear topcoat, gently dab a fine glitter polish from the cuticle up to about halfway, concentrating the glitter more heavily at the base. You can use a sponge for a smoother transition. Gold, silver, or iridescent glitters look amazing over pastels.
This glittery look adds a touch of magic and sophistication, ensuring your nails sparkle as brightly as your Easter spirit.
8. French Tip with a Twist
The classic French tip gets an Easter makeover! Instead of plain white, swap in vibrant pastel colors or add a tiny Easter-themed detail to the tip. It’s a chic way to participate in the holiday fun without going overboard.
Paint your nails a sheer nude or clear base. Then, instead of white, paint your tips in a soft lavender, mint green, or baby pink. For an extra twist, add a tiny bunny ear outline or a small dotting-tool flower on one accent nail’s tip. You can even use a glitter polish for the tip.
This updated French tip is elegant yet playful, offering a sophisticated take on Easter nail art that’s perfect for any age.
9. Abstract Pastel Swirls
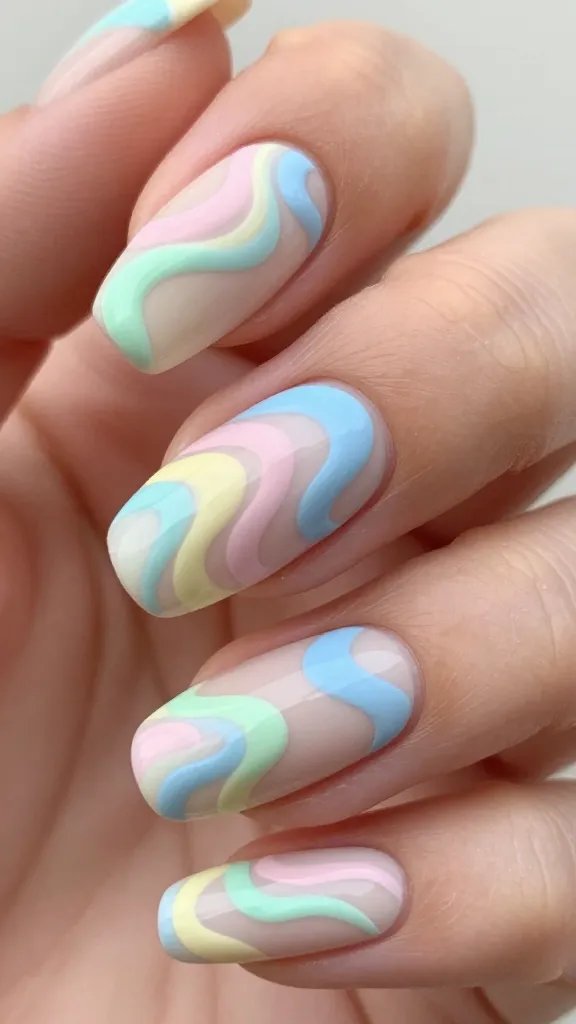
Unleash your inner artist with abstract pastel swirls! This design is modern, artistic, and incredibly forgiving – there’s no wrong way to do it. It’s perfect for those who love a free-spirited, contemporary look.
Start with a light, neutral base. Then, using a fine brush, create flowing, organic swirl patterns with various pastel shades. Don’t overthink it; let the colors blend and overlap naturally. Think soft blues, pinks, yellows, and greens intertwining.
This abstract design offers a unique and artistic expression of spring, making your nails look like a miniature modern art masterpiece.
10. Gingham Garden Party
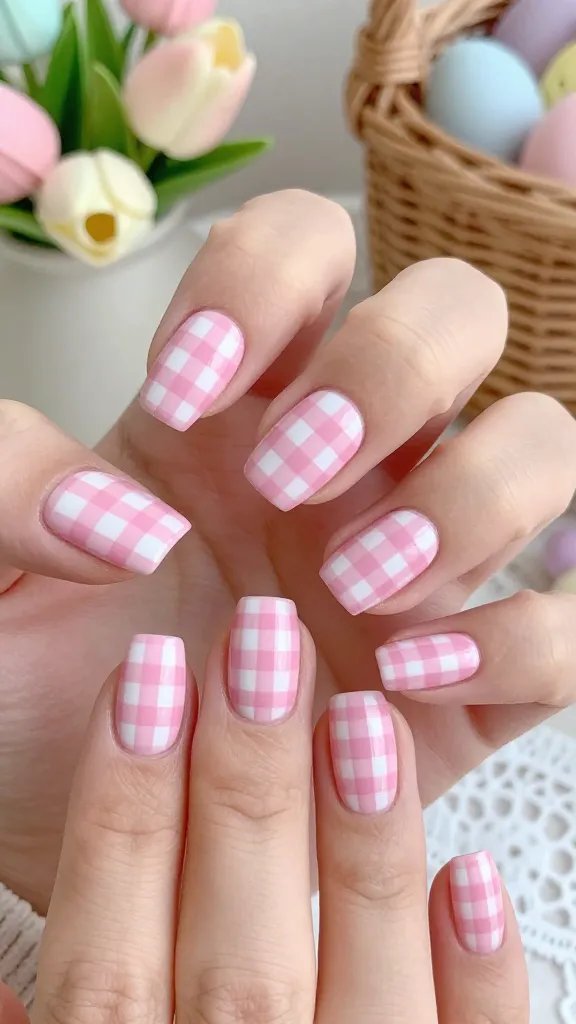
Bring the charm of a spring picnic to your fingertips with a delightful gingham pattern. This design is classic, preppy, and incredibly sweet, evoking images of sunny days and garden parties.
Choose two complementary pastel colors, like light pink and white. Paint your base color, then use a thin striping brush to create horizontal and vertical lines that crisscross to form the gingham pattern. It takes a steady hand, but the result is totally worth it!
This charming gingham pattern adds a touch of rustic elegance and playful sophistication, making your nails perfectly prepped for any spring gathering.
11. Daisy Power
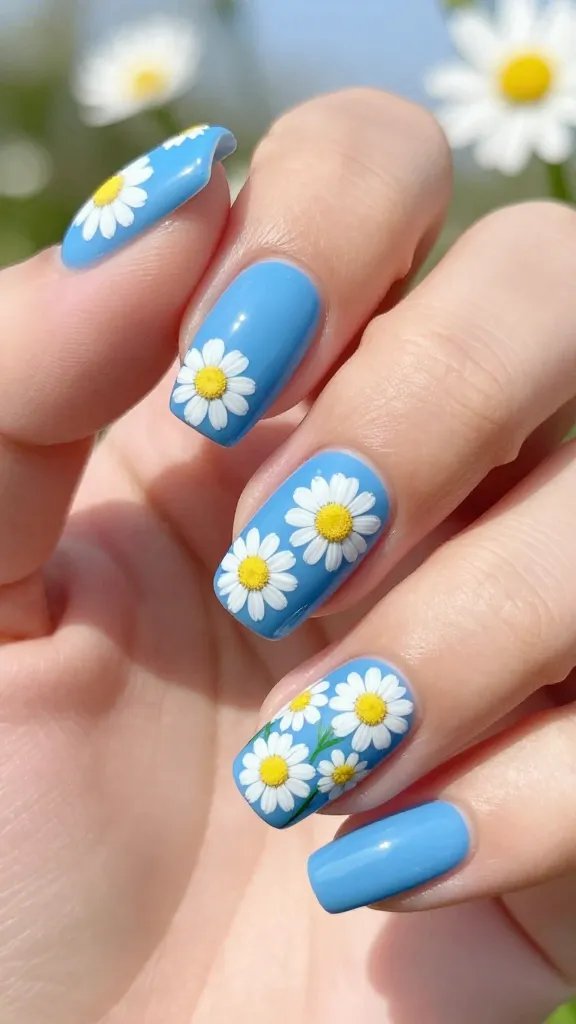
Embrace the simple beauty of daisies, the ultimate symbol of innocence and spring. This design is fresh, cheerful, and relatively easy to create, making it a popular choice for a reason.
Paint your nails a vibrant base color like sky blue or grass green. Use a dotting tool or the end of a bobby pin to create five small white dots in a circle for the petals, then add a yellow dot in the center. You can scatter daisies or create a small bouquet on an accent nail.
These sunny daisies will bring a burst of cheerful energy to your manicure, making your nails feel like a breath of fresh air.
12. Watercolor Wash Wonders
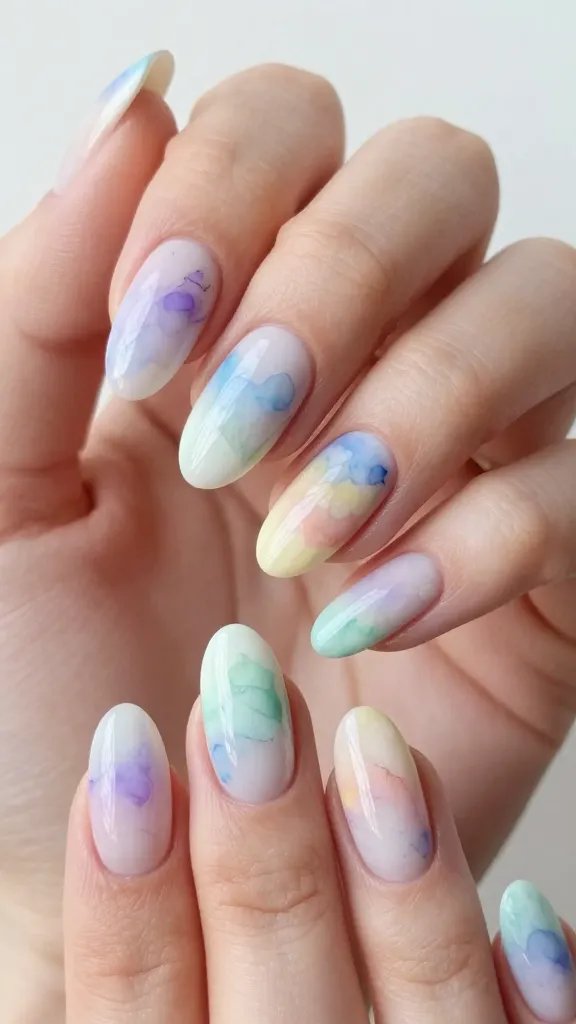
Achieve a soft, ethereal look with a watercolor wash effect. This design is artistic, dreamy, and gives your nails a delicate, almost painted canvas feel. It’s surprisingly simple to do, too!
Apply a white or very light base coat. While it’s still slightly tacky, or after applying a matte topcoat (which helps colors bleed), dab small amounts of different pastel polishes onto your nail. Use a brush dipped in nail polish remover or a clear topcoat to gently blend and swirl the colors together, creating a beautiful, translucent effect.
This watercolor design is pure artistry, giving your nails a unique, soft focus that’s utterly captivating for spring.
13. Minimalist Crosses
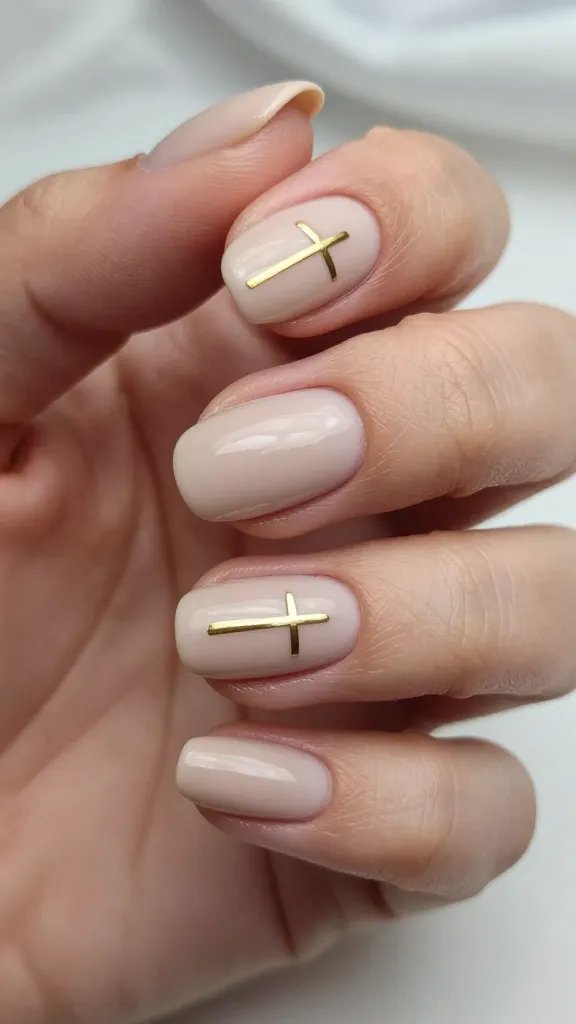
For a subtle yet meaningful nod to the true essence of Easter, consider minimalist cross designs. This is a sophisticated and reverent option, perfect for those who prefer a more understated tribute.
Choose a beautiful, muted pastel or nude base color. Using a very thin striping brush and a contrasting metallic (gold or silver) or white polish, paint small, delicate crosses on one or two accent nails. Keep them simple and clean for maximum impact.
This elegant design offers a thoughtful and beautiful way to honor the spiritual aspect of Easter, maintaining a chic aesthetic.
14. Rainbow Stripes of Joy

Why pick one pastel when you can have them all? Rainbow stripes are a bold, joyful way to celebrate Easter and the vibrant colors of spring. This design is energetic and guaranteed to lift your spirits.
Using a striping brush or nail art tape, create horizontal or vertical stripes in various pastel shades across your nails. You can go for thin, delicate lines or wider, more impactful bands. Don’t be afraid to mix and match colors like pink, blue, yellow, green, and lavender.
These rainbow stripes are a burst of pure happiness, making your nails a vibrant celebration of all things bright and beautiful this spring.
15. Jelly Bean Brights
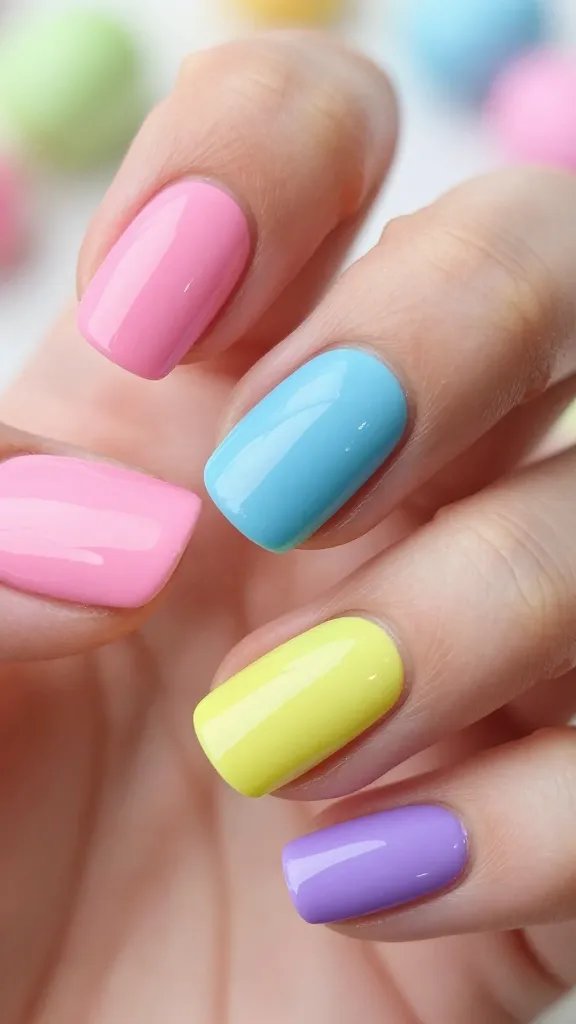
Channel the sweet, sugary fun of Easter candy with “jelly bean brights.” This design uses solid, vibrant pastel colors – one on each nail – for a playful and eye-catching look that’s super easy to achieve.
Pick five distinct, bright pastel shades (think electric pink, sky blue, lemon yellow, lime green, and vibrant purple). Paint each nail a different color. You can even add a high-gloss topcoat to make them look extra juicy, like actual jelly beans!
This simple yet impactful design is a fun, no-fuss way to bring all the joy and sweetness of Easter candy to your fingertips. Trust me, it’s a mood booster!
16. Butterfly Kisses
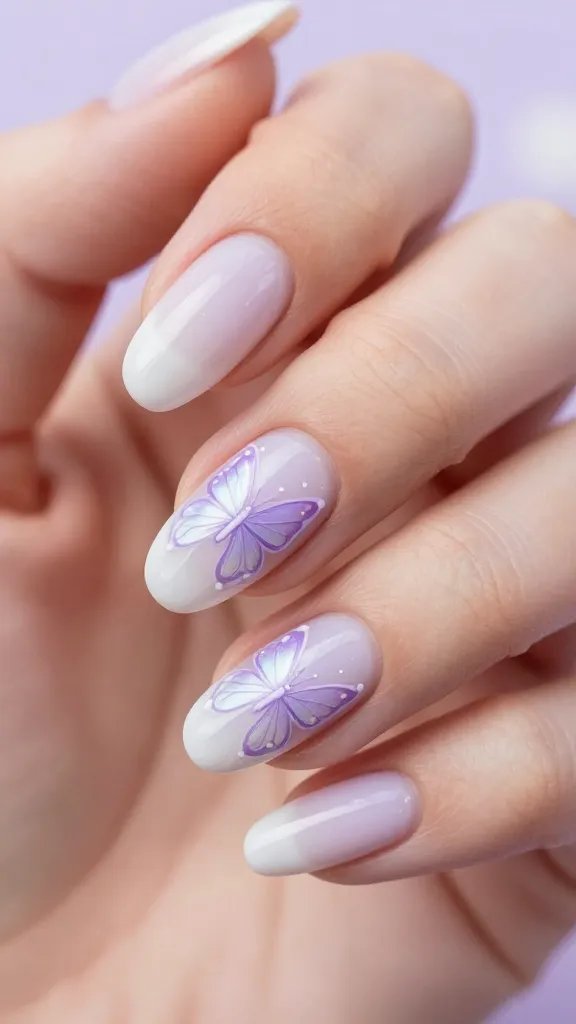
Butterflies are another beautiful symbol of spring and new beginnings. Incorporate these delicate creatures into your Easter manicure for a whimsical and enchanting look that’s utterly charming.
Paint your nails a soft, ethereal base like a sheer white or light lavender. Then, using a fine brush, carefully draw small butterfly outlines or even just a single wing on one or two accent nails. You can fill them in with iridescent polish or add tiny dots for detail. For a simpler approach, use butterfly nail decals.
These butterfly kisses add a touch of magical grace and lightness to your nails, perfectly capturing the spirit of spring transformation.
17. Tulip Mania
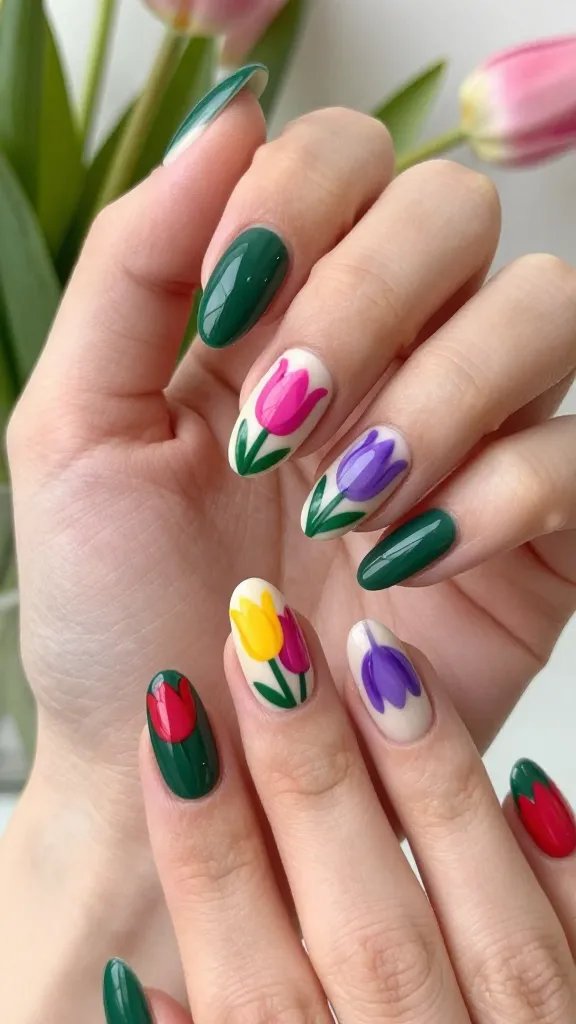
Tulips are the quintessential spring flower, bold and beautiful. Bring their elegant simplicity to your nails with a “tulip mania” design that’s both striking and sophisticated.
Choose a contrasting base color like a deep green or a creamy white. Using a fine brush, paint simple tulip shapes in vibrant colors like pink, red, yellow, or purple. You can paint a single tulip on each nail or create a small cluster on an accent nail. Keep the shapes clean and stylized.
This design celebrates the iconic beauty of tulips, giving your nails a vibrant and elegant floral statement that’s perfect for the season.
18. Gold Leaf Glam
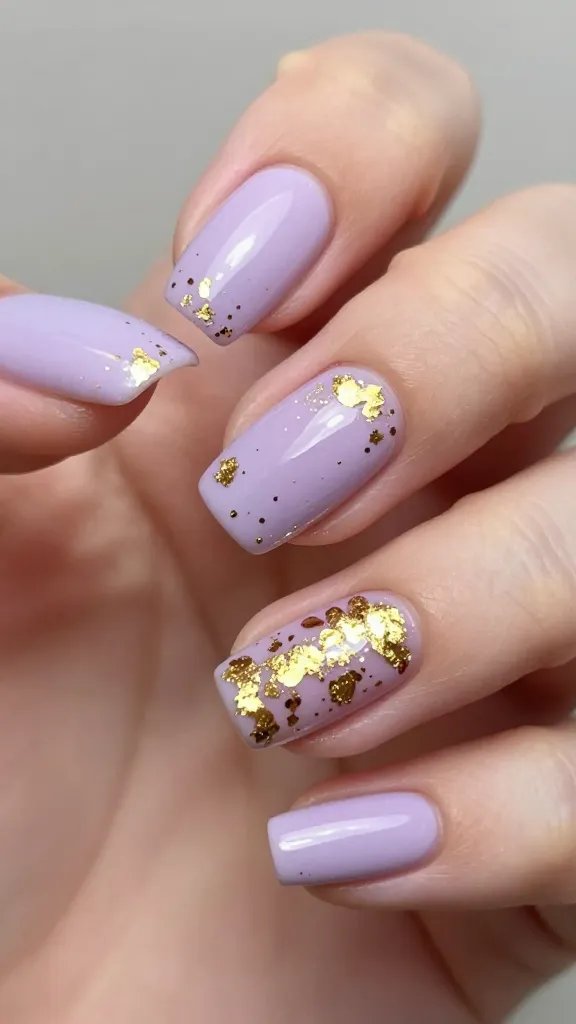
Elevate your Easter pastels with a touch of luxurious gold leaf. This design adds an unexpected element of sophistication and sparkle, making your nails look incredibly high-end and unique.
Apply your favorite pastel polish as a base. While it’s still slightly tacky, or with a thin layer of topcoat, gently press small pieces of gold leaf onto your nails. You can cover a whole nail, or just dab small flakes randomly for a more abstract look. Seal it with a good topcoat.
The addition of gold leaf transforms a simple pastel mani into something truly special and glamorous, making your nails feel utterly decadent.
19. Playful Polka Dot Eggs
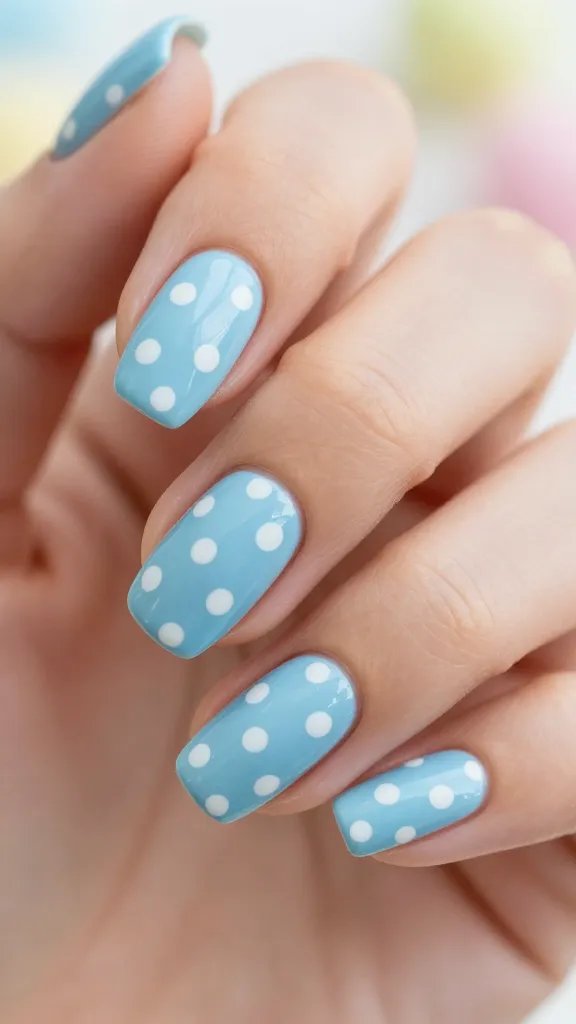
Polka dots are always a good idea, and for Easter, they can mimic the fun patterns of decorated eggs! This design is cheerful, classic, and incredibly versatile, allowing for endless color combinations.
Pick a pastel base color. Once dry, use a dotting tool (or even the end of a bobby pin) to create polka dots in a contrasting color. You can do uniform dots, varying sizes, or even a mix of colors for a truly festive “egg” effect. Try white dots on a blue base, or yellow dots on a pink base.
This playful polka dot design is a timeless choice that brings a burst of fun and whimsy to your Easter manicure, making it feel like a party on your nails!
There you have it – 19 absolutely adorable Easter nail designs to get your creative juices flowing! Whether you go for subtle elegance or full-on festive fun, your nails are about to be the cutest accessory this spring. Pick your favorite, grab your polishes, and get ready to show off your stunning Easter mani!