16 Winter Nails Ideas: Stunning Designs to Warm Up Your Style
As the weather gets colder, winter nails are heating up the beauty world. From icy blues and rich berry tones to cozy knit textures and shimmering metallic, winter nail art is all about blending seasonal vibes with chic creativity.
Winter Nails Ideas

1. Frosted French Tips
A wintry twist on the timeless French manicure, frosted French tips swap traditional white edges for silver shimmer. This style is elegant, versatile, and adds a frosty glow that works beautifully with both short and long nails.
What Makes This Design Unique:
Instead of classic white, shimmering silver is painted on the tips to mimic the sparkle of early morning frost. The subtle contrast between sheer pink and glittering silver creates a sophisticated and seasonal finish that feels effortlessly elegant.
How to Do It:
- File nails into a soft almond or square shape for a balanced look.
- Apply a sheer nude or pink base coat and let it dry completely.
- Paint the tips with a silver glitter polish using a fine brush or sticker guide.
- Seal with a high-gloss top coat to enhance the icy shimmer and add lasting shine.

2. Midnight Snowfall
This magical manicure brings the peaceful beauty of a snowy night sky to your fingertips. The deep navy base sets the tone, while delicate white snowflake details add charm and elegance.
What Makes This Design Unique:
What sets this look apart is the contrast between the moody midnight blue and tiny hand-painted snowflakes. It feels serene and festive without being overly flashy—perfect for winter evenings or holiday dinners.
How to Do It:
- Paint nails with a deep navy or midnight blue polish and let them dry fully.
- Using a fine nail art brush, draw small snowflakes and scattered dots with white polish.
- For added charm, add a touch of silver glitter at the tips or cuticles.
- Finish with a clear top coat to protect the design and add a glossy finish.

3. Cashmere Knit Texture
This manicure replicates the look and feel of your favourite winter sweater. The 3D knit pattern adds dimension and texture, making it one of the coziest designs this season.
What Makes This Design Unique:
The raised cable-knit texture mimics real fabric, offering a tactile and visual twist. This nail art technique creates an illusion of warmth and softness, perfect for chilly days and cozy outfits.
How to Do It:
- Apply a matte nude or soft gray base coat and cure under UV if using gel.
- Using a dotting tool or liner brush, draw knit-like patterns with thick gel polish.
- Cure the raised design with a UV lamp to lock in the 3D texture.
- Finish with a matte top coat to maintain the soft, fabric-like appearance.

4. Icy Blue Ombré
Cool and dreamy, this frosty gradient blends crisp white with soft baby blue. It’s perfect for a subtle, frozen-inspired look that still feels fresh and wearable.
What Makes This Design Unique:
The ombré effect mirrors the fading tones of icy landscapes, creating a seamless transition from winter white to frozen blue. It’s delicate yet visually striking—perfect for both casual and formal wear.
How to Do It:
- Apply a white or sheer base polish and let it dry completely.
- Use a makeup sponge to dab light blue polish from the tip toward the middle.
- Blend the gradient slowly in layers for a smooth ombré effect.
- Finish with a glossy top coat to enhance the fade and protect your work.

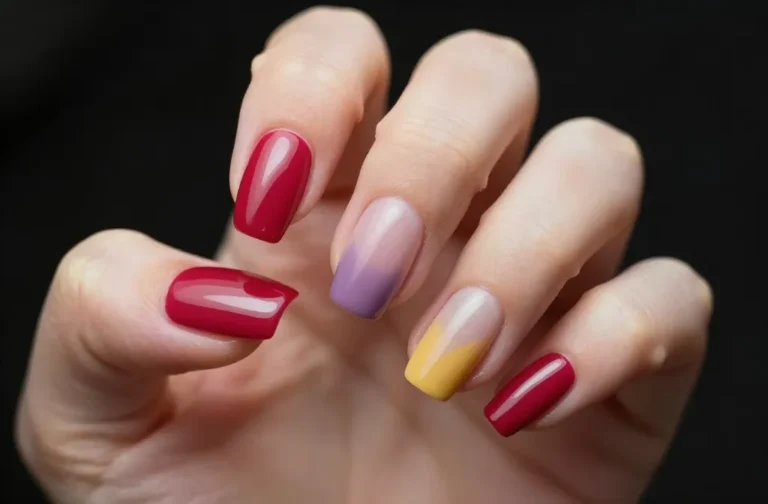
5. Cranberry Gloss
Bold and beautiful, cranberry gloss nails bring a splash of warmth to cold winter days. The deep red hue is luxurious and elegant, perfect for festive occasions.
What Makes This Design Unique:
This design relies on the richness of the cranberry tone and an ultra-glossy finish. It’s classic with a winter twist—timeless yet vibrant enough to make a seasonal statement.
How to Do It:
- Shape nails into an oval or almond style and apply a protective base coat.
- Paint two coats of deep cranberry polish, letting each layer dry in between.
- Use a high-gloss top coat to amplify shine and lock in color.
- Optionally, add a single accent nail with gold foil or shimmer.

6. Glittering Icicles
Shimmering and sharp, this design mimics glistening icicles hanging from rooftops. With silver glitter cascading from the tips, your nails will sparkle with winter magic.
What Makes This Design Unique:
The vertical glitter fade from the tips downward creates the illusion of dripping icicles. It’s a dynamic, light-catching style that turns every hand movement into a snowy sparkle.
How to Do It:
- Start with a sheer or nude polish base to keep the look translucent.
- Apply silver glitter polish at the tips and drag it lightly downward.
- Layer fine holographic glitter for dimension and reflective shine.
- Seal with two coats of clear top coat to smooth out texture and increase longevity.

7. Frozen Marble
This icy marble design swirls cool tones of white, gray, and silver, capturing the elegance of frozen stone. It’s refined, artistic, and undeniably winter-ready.
What Makes This Design Unique:
Each nail features its own unique marbled swirl, enhanced with foil or shimmer accents. It blends natural beauty with a touch of winter glam, making every set one-of-a-kind.
How to Do It:
- Apply a light gray or white base coat and let it dry.
- Use a thin brush to swirl in dark gray and silver polish in random patterns.
- Add silver foil or glitter to enhance the marbled effect.
- Apply a glossy top coat for a smooth, glass-like finish.

8. Evergreen Elegance
Inspired by winter forests, this look features deep green polish accented with metallic gold. It’s a rich and earthy manicure that’s perfect for December through February.
What Makes This Design Unique:
The forest green base evokes evergreen trees, while gold detailing adds a luxe finish. Whether you’re sipping cocoa or wrapping gifts, this design adds quiet glamour.
How to Do It:
- Apply forest green polish in two even coats and let it dry.
- Add gold striping tape or hand-drawn lines for an accent.
- Optionally, apply gold foil pieces on 1–2 nails for texture.
- Finish with a top coat to keep the look shiny and intact.
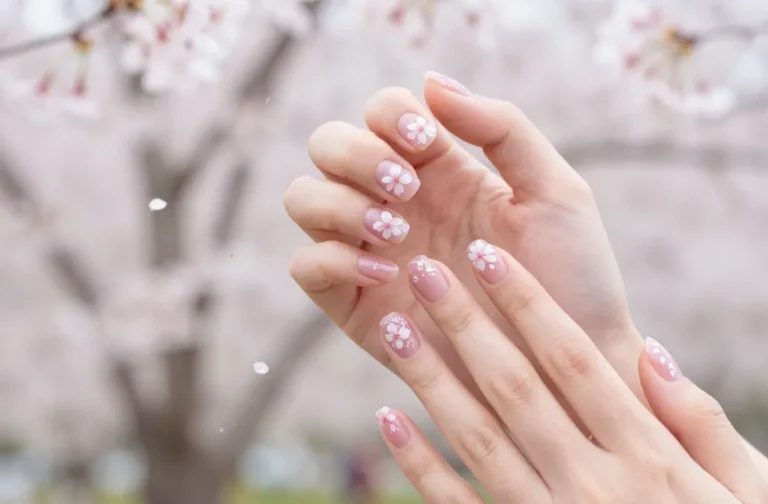
9. Snowy Nude Sparkle
This design combines nude sophistication with the whimsy of snowfall. Nude polish serves as a neutral backdrop for delicate shimmer and tiny snowflake accents, offering a minimal yet magical winter aesthetic that suits any occasion.
What Makes This Design Unique:
It’s the perfect balance of clean and festive. The nude tone elongates the nails while subtle snowflake detailing keeps the winter theme elegant rather than overwhelming. Micro-glitter and shimmer give the illusion of soft falling snow on bare skin.
How to Do It:
- Apply a nude polish that matches your skin tone and let it dry completely.
- Add a pearl or soft white shimmer coat over the base to simulate snowy light.
- Use a fine detail brush or stamping plate to add white snowflakes on 1–2 accent nails.
- Seal with a high-gloss top coat to enhance shine and protect your design.

10. Plum Winter Velvet
Rich and sultry, plum velvet nails exude luxury and depth. The velvety matte finish adds an extra layer of seasonal softness, making this design ideal for evening outings or cozy get-togethers.
What Makes This Design Unique:
The matte texture transforms the dark plum shade into something that looks and feels like soft velvet. It’s a luxurious twist on a classic dark manicure that pairs beautifully with winter fashion like wool and suede.
How to Do It:
- Apply two coats of a deep plum or wine-colored polish and allow to dry completely.
- Use a matte top coat to remove any gloss and create a velvety surface.
- For added interest, apply gold foil or glossy top coat to a single accent nail.
- Let everything dry thoroughly to prevent smudging and maintain the matte effect.

11. Snow Globe Accent
This playful nail design features a snow globe effect with floating glitter, sequins, and embedded snowflakes. It’s a statement style that brings childhood wonder and seasonal fun to your manicure.
What Makes This Design Unique:
Clear builder gel or acrylic is used to encapsulate tiny holographic snowflakes and iridescent glitter, giving a 3D snow globe look. Every movement of the hand catches the light differently, making this design interactive and mesmerizing.
How to Do It:
- Use clear builder gel or acrylic to sculpt the nails with a domed finish.
- Before curing, insert snowflake decals and chunky white or silver glitter into the gel.
- Cure under a UV lamp to lock in the layered elements.
- Apply a thick, smooth top coat to create a glassy snow globe surface.

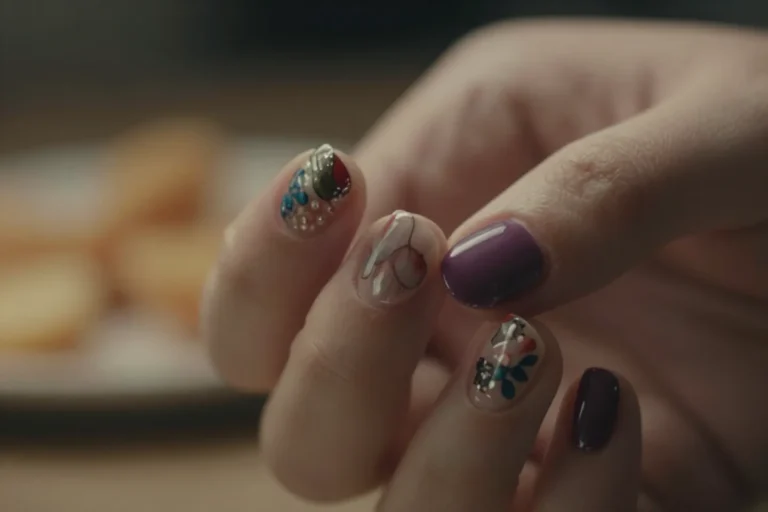
12. Muted Mauve & Gold Leaf
This soft and elegant design uses muted mauve as a base, accented with scattered pieces of gold leaf. It’s the perfect blend of modern minimalism and seasonal glamour.
What Makes This Design Unique:
The mauve shade is calm and versatile, while the irregular shapes of real gold leaf create a custom, luxe appearance. It’s like wearable jewelry for your nails—subtle yet stunning.
How to Do It:
- Paint nails with two coats of muted mauve polish and allow to dry completely.
- Gently press gold leaf flakes onto 1–2 accent nails using tweezers.
- Press the foil down lightly with a sponge or brush for even application.
- Finish with two layers of clear top coat to seal and protect the delicate foil.

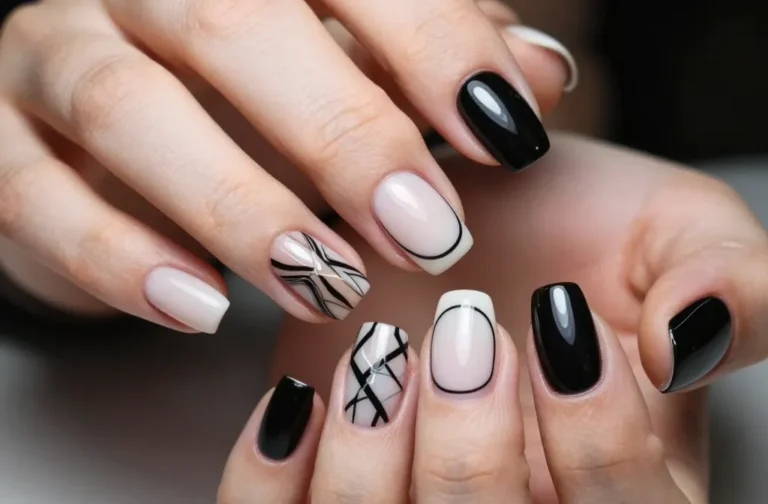
13. Arctic Matte White
Pure, striking, and crisp, matte white nails channel the untouched snow of a frozen landscape. This minimalist manicure is fresh and fashion-forward, ideal for those who prefer clean lines and a modern edge.
What Makes This Design Unique:
The matte finish adds a soft, powdered look to opaque white polish, transforming it from basic to editorial. It pairs perfectly with silver jewelry and winter coats for a high-fashion finish.
How to Do It:
- Start with clean, shaped nails and apply a strengthening base coat.
- Paint two coats of bright white polish, letting each dry thoroughly.
- Apply a matte top coat to dull the shine and create a powdery finish.
- Optional: Add a single metallic silver accent on one nail for contrast.

14. Sugar Plum Glitter Fade
This dreamy style blends sugary plum hues with shimmering glitter, fading from solid to sparkle like a fairy tale snowfall. It’s ideal for festive events or cozy nights in.
What Makes This Design Unique:
The ombré fade creates a gradient that catches light in different ways, combining sophistication with playful glam. It feels whimsical without being too bold—a great balance of beauty and fun.
How to Do It:
- Paint a deep plum base coat across all nails and let it dry.
- Using a sponge, apply glitter polish from the tips downward to create a fading effect.
- Blend the glitter halfway down the nail for a smooth gradient.
- Finish with a high-shine top coat to lock in the sparkle and extend wear.

15. Blue Frost Chrome
Sleek and futuristic, blue frost chrome nails offer a mirror-like finish in a cool icy hue. This high-impact design is ideal for winter nights and New Year celebrations.
What Makes This Design Unique:
The chrome powder gives a reflective surface that resembles metallic frost. The cool undertone keeps it winter-appropriate while the mirror finish brings runway energy to everyday style.
How to Do It:
- Apply a light blue gel polish as your base and cure under a UV lamp.
- Rub chrome powder into the cured gel using an eyeshadow applicator or finger.
- Buff until you achieve a mirrored frost look across the whole surface.
- Apply a no-wipe gel top coat and cure again to seal in the effect.

16. Cocoa Swirl Nails
Rich, warm, and sweet, this nail look swirls shades of brown, taupe, and beige to mimic a steaming mug of hot cocoa. It’s cozy and perfect for winter mornings.
What Makes This Design Unique:
The marbled effect adds warmth and visual interest. Some versions even use thermal polish that changes color with temperature, mimicking melting chocolate—an interactive and comfy touch.
How to Do It:
- Apply a base coat in beige or soft taupe and let it dry.
- While the second layer is wet, add drops of brown polish and swirl with a fine brush.
- Marble the colors by lightly dragging a needle or toothpick through the polish.
- Seal with a clear gloss top coat for a creamy, melted finish.