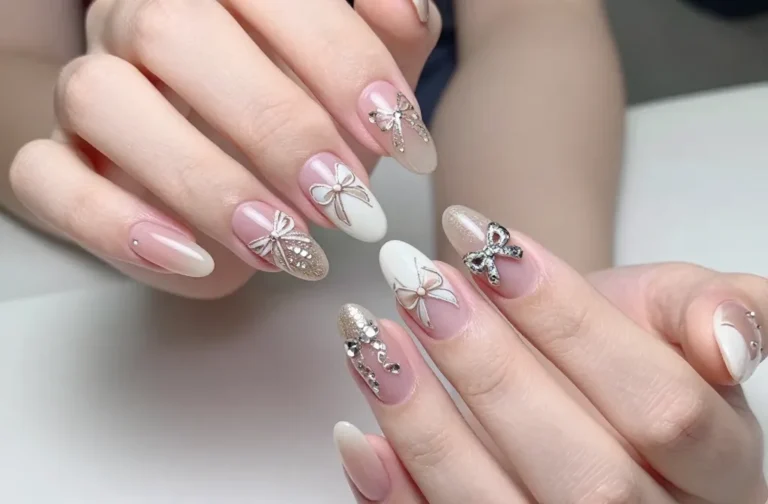
Adorably Chic 15 Red Bow Nails!
Ready to add a dash of adorable elegance to your fingertips? Red bow nails are having a major moment, and honestly, we’re totally here for it! These aren’t your grandma’s bows; we’re talking chic, playful, and utterly captivating designs that will instantly elevate your nail game. Get ready to fall head over heels for these stunning looks!
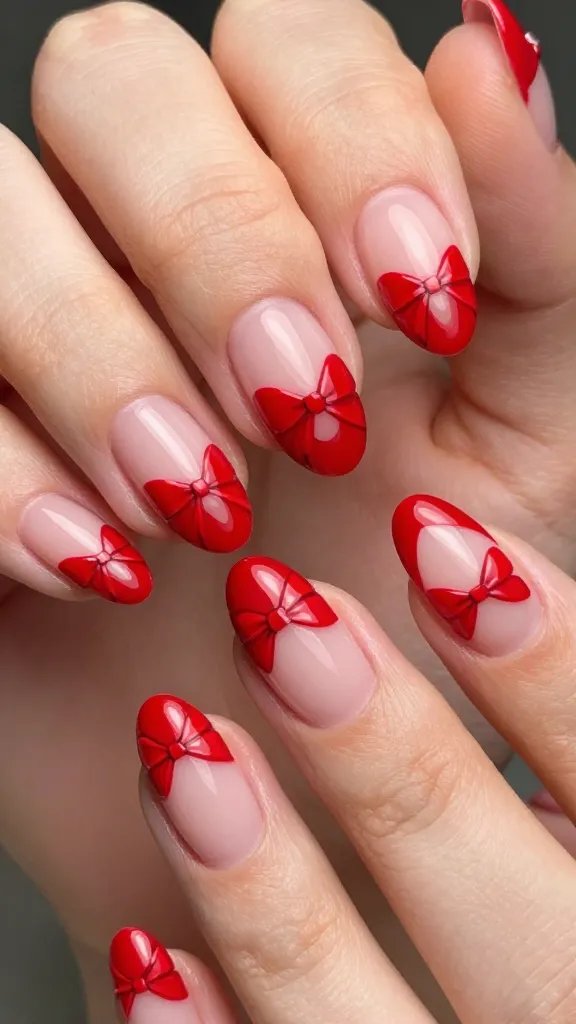
1. The O.G. Classic Red Bow
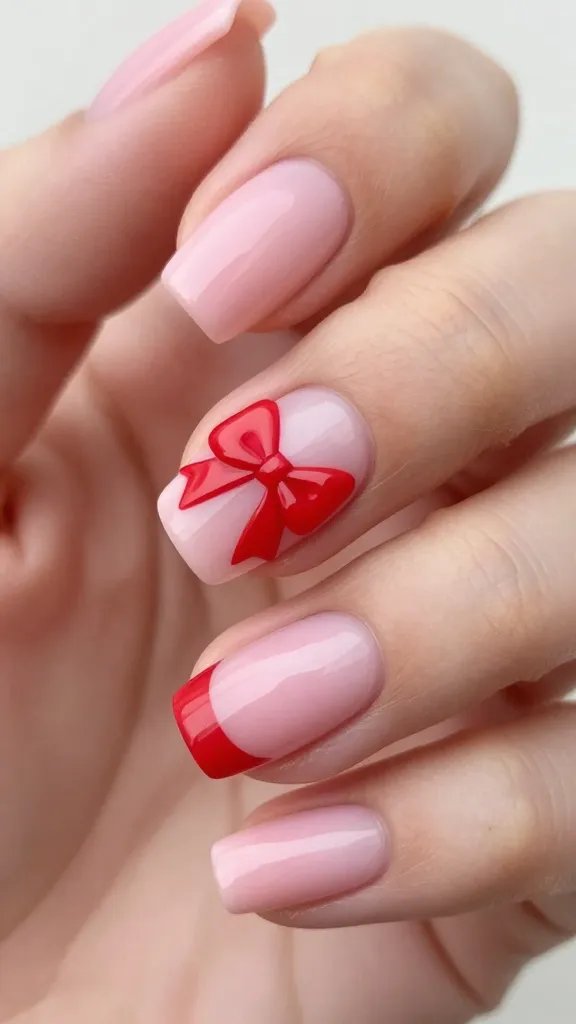
Sometimes, you just can’t beat a classic, right? This look is all about embracing the timeless elegance of a perfectly placed, vibrant red bow on a simple, chic base. It’s sophisticated, it’s playful, and it screams “I’ve got my life together, but I also love cute things.”
Getting the Look:
- Base Coat: A neutral nude, soft pink, or even a crisp white polish sets the perfect stage.
- The Bow: Hand-paint a delicate red bow on one or two accent nails, or use a tiny decal for precision. Placement is key – think near the cuticle or slightly off-center for a modern twist.
- Top Coat: A glossy finish will make that red pop and give it a luxurious shine.
This design is your go-to when you want to add a touch of feminine charm without going overboard. It’s perfect for a first date, a fancy brunch, or just elevating your everyday look. Seriously, it’s a showstopper!
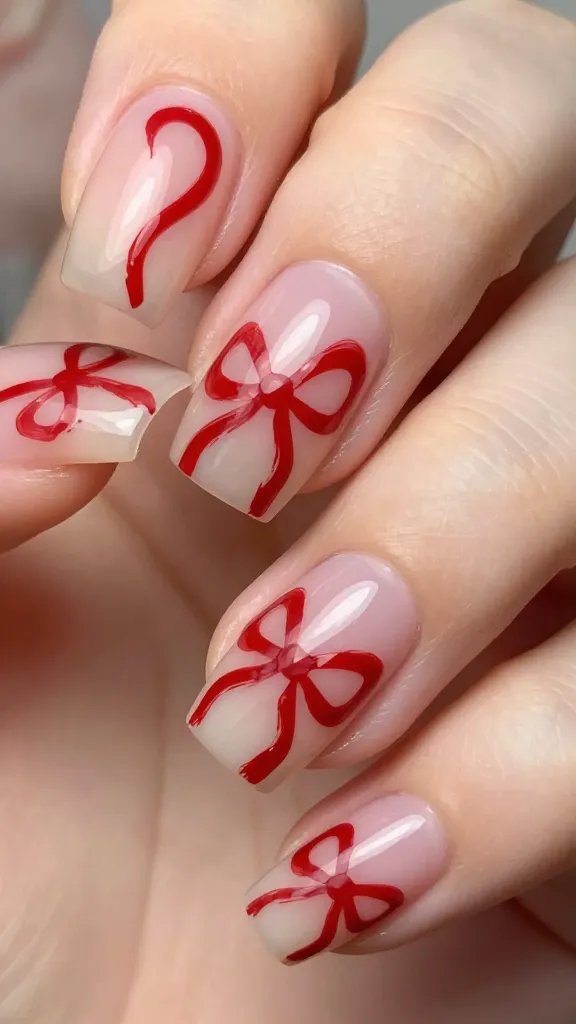
2. Minimalist Bow Accent
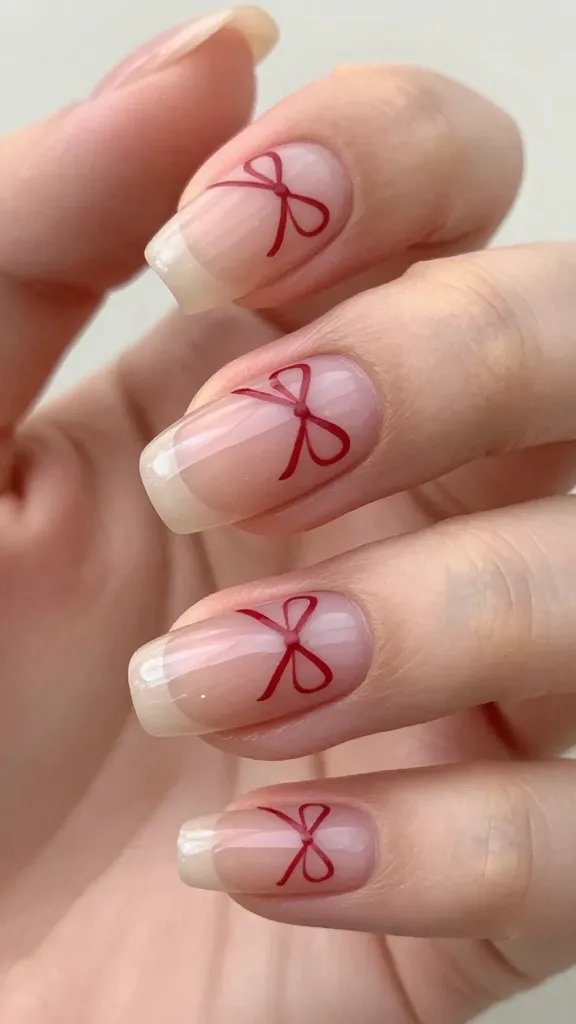
Who says bows have to be big and bold to make a statement? This minimalist approach proves that sometimes, less is definitely more. Imagine a tiny, almost whisper-thin red bow delicately placed on a bare or sheer-coated nail – pure elegance with an understated edge.
Tips for Simplicity:
- Sheer Base: A clear or very sheer nude polish lets your natural nail shine through.
- Tiny Detail: Opt for the smallest bow decal you can find, or use a fine-tip brush to paint a super delicate, almost abstract bow shape.
- Strategic Placement: Place the bow near the tip, the cuticle, or just off-center for an unexpected touch.
This subtle design is perfect for those who love a clean aesthetic but still want a hint of playful personality. It’s office-appropriate, incredibly chic, and surprisingly impactful. You’ll be surprised how many compliments you get!
3. Glitter Bow Glam
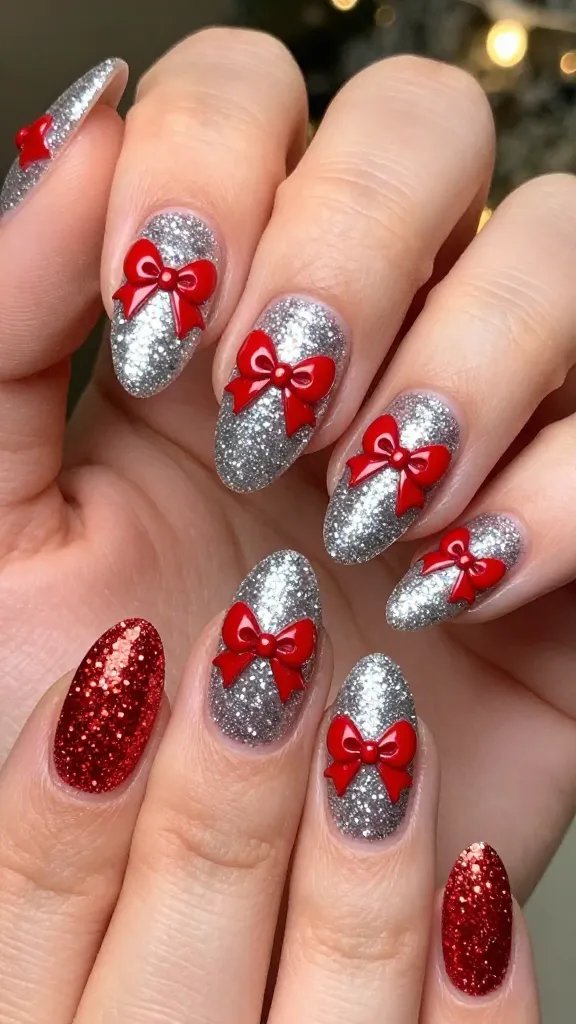
Ready to dial up the sparkle? Glitter bow nails combine the adorable charm of a red bow with the undeniable allure of shimmer and shine. This look is pure party on your fingertips, making every gesture a little more dazzling.
Sparkle Smarts:
- Glitter Base: Start with a full nail of fine glitter polish in gold, silver, or even a complementary red.
- The Bow: Paint your red bow over the glitter base, or use a red glitter polish for the bow itself to double down on the sparkle.
- Accent Nail: Consider doing a full glitter nail on one finger and a glitter bow on another for a balanced, glamorous look.
When you want to feel extra special, like you’re heading to a fabulous event or just want to brighten your day, this is your manicure! It catches the light beautifully and adds a festive vibe to any outfit.
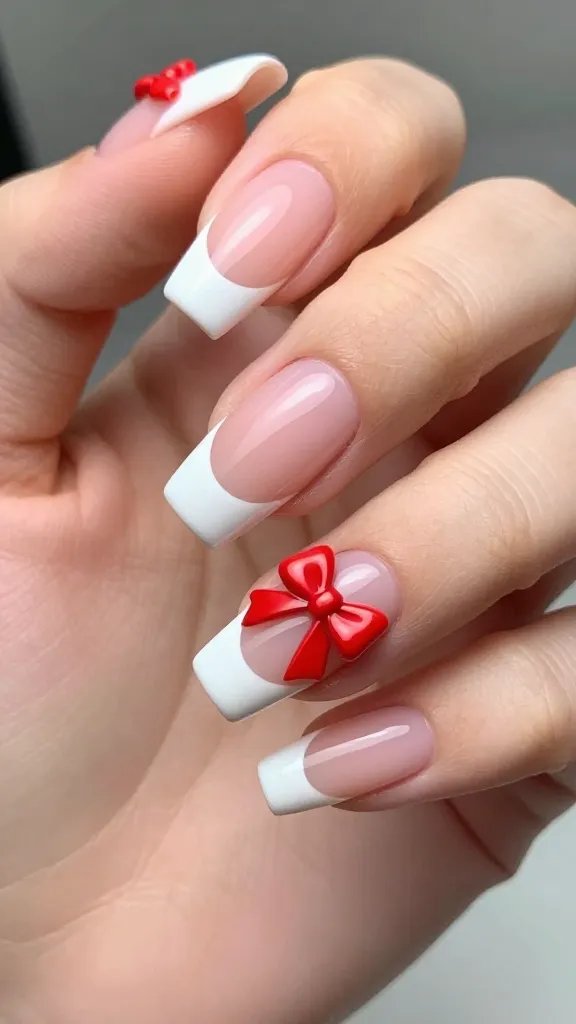
4. French Tip with a Twist
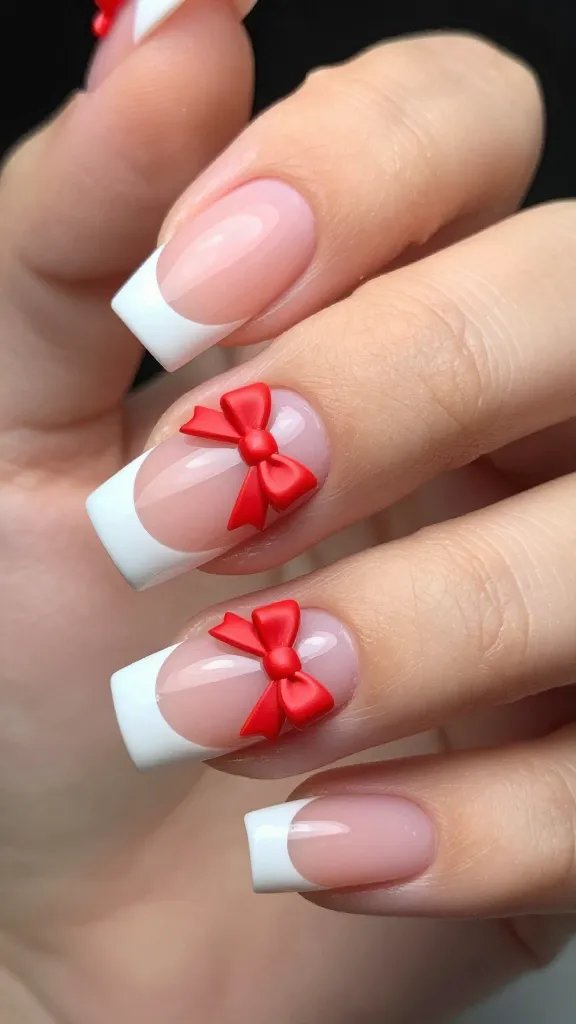
The classic French manicure gets a delightful upgrade with the addition of a sweet red bow. It’s the perfect marriage of timeless sophistication and playful charm, proving that even the most traditional looks can be given a fresh, modern twist. Who knew a tiny bow could be such a game-changer?
Making it Modern:
- Crisp French Tip: Maintain that clean, white (or colored!) tip as your base.
- Bow Placement: Place the red bow strategically either at the base of the nail, near the cuticle, or subtly on the side of the French tip itself.
- Color Play: Don’t be afraid to experiment with a red French tip and a white bow for a reverse effect!
This design is incredibly versatile, fitting in at a fancy dinner party or a casual coffee date. It’s a sophisticated way to show off your fun side without compromising on elegance. Trust me, it’s a conversation starter!
5. Matte Finish Bow Magic
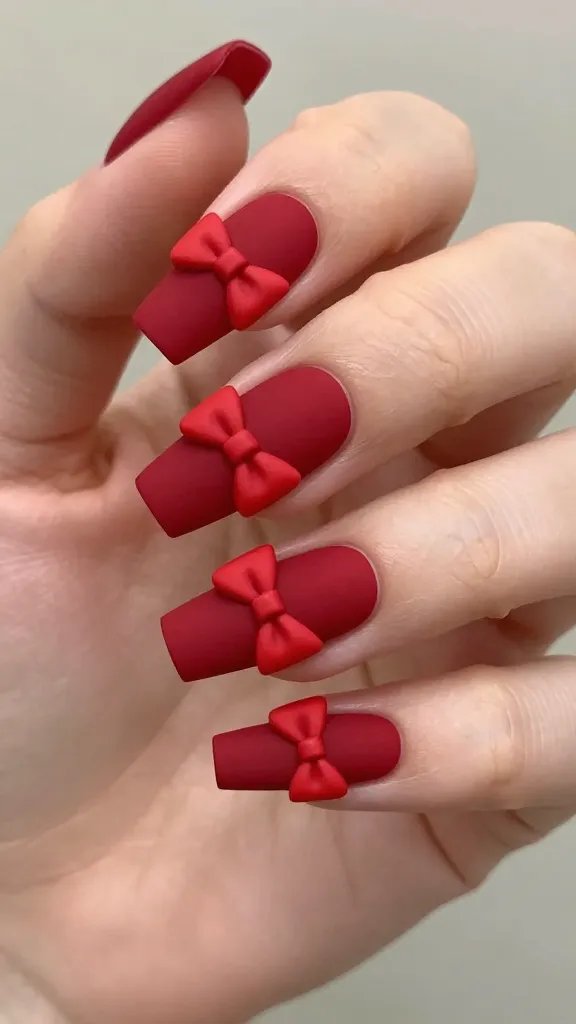
If you’re all about that velvety, non-shiny aesthetic, then matte finish red bow nails are about to become your new obsession. The matte texture gives the playful bow a surprisingly sophisticated and edgy feel, creating a high-fashion look that’s anything but basic.
Matte Must-Haves:
- Matte Top Coat: This is your secret weapon! Apply it over any color to instantly transform it.
- Glossy Bow: For a cool contrast, paint your red bow with regular glossy polish over a matte base. The difference in texture is stunning.
- Full Matte: Apply a matte top coat over your entire design, including the red bow, for a uniform, velvety finish.
This look is perfect for when you want to exude cool confidence. It’s modern, chic, and adds an unexpected layer of depth to your manicure. Prepare for compliments on your unique style!
6. 3D Bow Embellishments
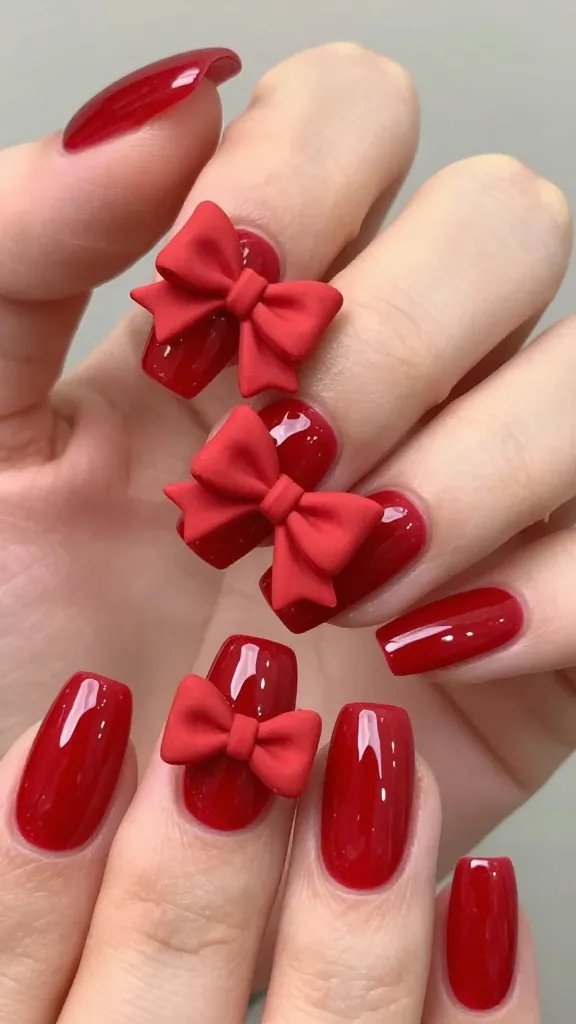
Why just paint a bow when you can literally *wear* one? 3D bow embellishments take your red bow nails to a whole new dimension, adding texture and a tangible cuteness that’s impossible to ignore. These tiny sculptures are pure nail art luxury.
Bringing it to Life:
- Tiny Charms: Find small, pre-made red bow charms at your local beauty supply store or online.
- Gel Art: Your nail tech can sculpt small 3D bows using builder gel or acrylic, then paint them red.
- Secure Application: Use a strong nail glue or builder gel to ensure your 3D bows stay put.
This design is for the bold and the beautiful, for those who aren’t afraid to make a statement with their nails. It’s perfect for special occasions, holidays, or just when you want to feel extra fancy. Just be a little careful not to snag them!
7. Ombre Bow Effect
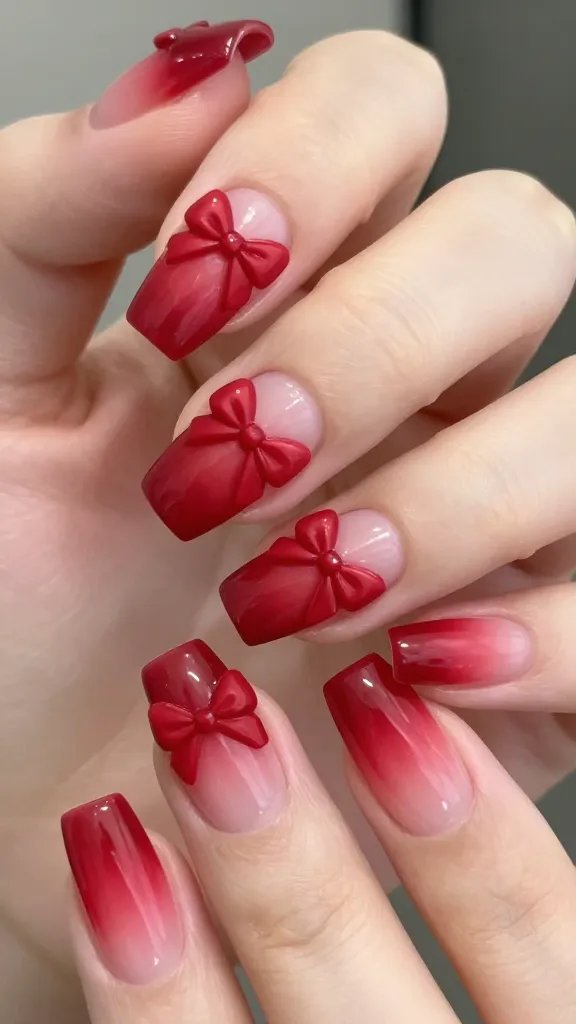
Ombre isn’t just for hair anymore! An ombre red bow creates a stunning gradient effect, transitioning from a deeper red to a lighter shade, or even from white to red. This technique adds an artistic flair and a touch of softness to the classic bow motif.
Gradient Genius:
- Two Shades: Choose two shades of red (or a white and a red) that blend well together.
- Sponge Technique: Use a small makeup sponge to dab and blend the colors onto your nail, creating the ombre effect for the bow itself.
- Subtle or Bold: You can make the ombre effect very subtle within the bow or create a full ombre nail with a solid red bow on top.
This sophisticated design is a fantastic way to showcase your creative side. It’s visually interesting and adds a unique depth to your manicure, making it perfect for when you want something a little different from the norm.
8. Tiny Bow Cluster
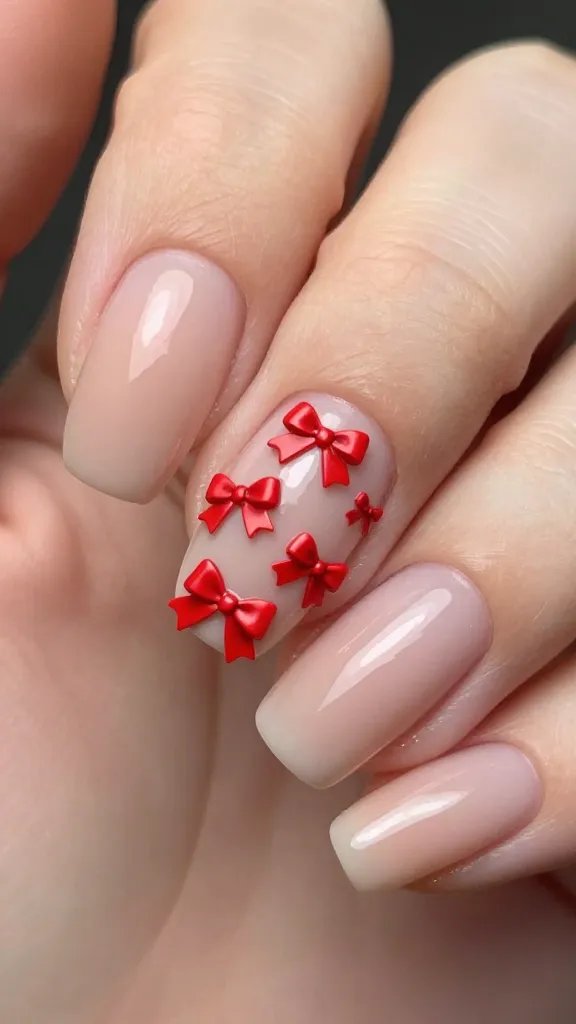
Why settle for one bow when you can have a whole adorable cluster? This design involves placing multiple tiny red bows together, either on one accent nail or scattered across a few. It’s playful, whimsical, and seriously cute, like a little party on your fingertips.
Clustering Creativity:
- Varying Sizes: Mix and match tiny bows of slightly different sizes for an organic, natural look.
- Random Placement: Don’t overthink it! Scatter them playfully, as if they just fell onto your nail.
- Accent Nail Focus: This look often works best concentrated on one or two accent nails to avoid overwhelming the hand.
This is your go-to manicure when you’re feeling extra cheerful and want your nails to reflect that joy. It’s super charming and adds an instant dose of happiness to your day. Plus, it’s a great conversation starter!
9. Bow on Negative Space
Negative space nails are incredibly chic and modern, and adding a red bow into the mix creates a truly striking design. By leaving parts of your natural nail exposed, you create an artful, airy feel that makes the red bow pop even more dramatically. It’s minimalist meets maximalist in the best way!
Negative Space Know-How:
- Clear Base: Start with a clear base coat or no polish at all for the “negative” areas.
- Outline the Bow: Paint the red bow, but leave the center or parts of the loops uncolored, letting your natural nail show through.
- Geometric Shapes: Combine the bow with other negative space elements like lines or dots for an even more abstract look.
This design is for the fashion-forward and the trendsetters. It’s sophisticated, edgy, and shows off your artistic side. Perfect for when you want a manicure that truly stands out from the crowd.
10. Reverse French with Bow
Flip the script on the traditional French manicure with a reverse French, where the color is applied at the cuticle line, and then add a red bow for an unexpected twist. This look is modern, stylish, and offers a fresh perspective on a classic design, making your nails look incredibly polished and unique.
Reversing the Rules:
- Curved Cuticle Line: Paint a clean, curved line of color (white, nude, or even red) along your cuticle.
- Bow Placement: Place the red bow either directly over the colored cuticle line or subtly above it on the main nail body.
- Color Contrast: A white or nude reverse French with a bold red bow creates a beautiful contrast.
This sophisticated take on the bow trend is perfect for those who appreciate subtle details and a touch of avant-garde style. It’s elegant enough for formal events but quirky enough for everyday chic. You’ll love the double-take effect!
11. Holiday Festive Bows
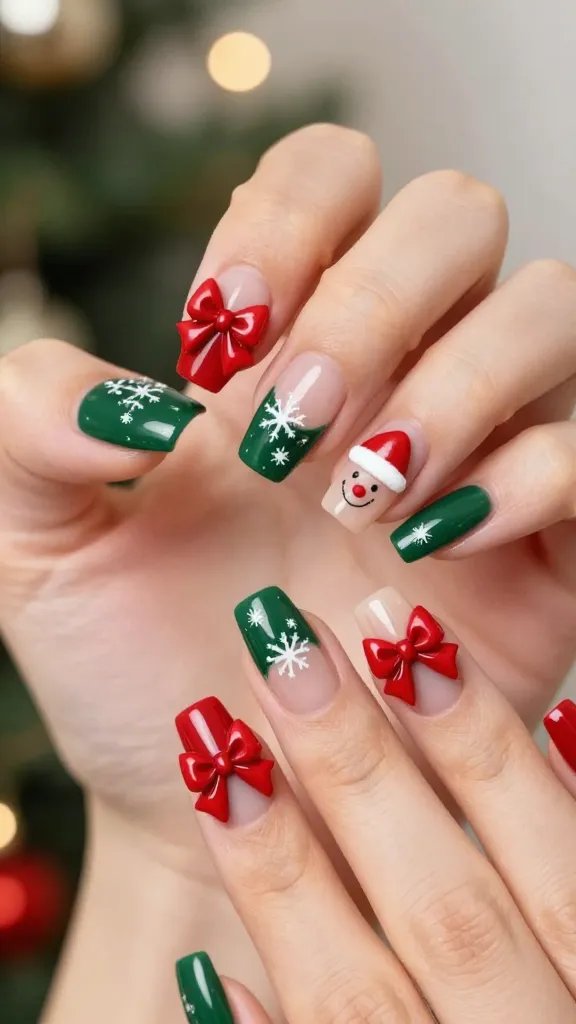
When the holidays roll around, red bows become an absolute must-have! Transform your nails into festive masterpieces by incorporating red bows with other seasonal elements. Think Christmas cheer, Valentine’s romance, or even a Fourth of July pop – these bows are ready to celebrate!
Festive Flair:
- Christmas: Combine red bows with green accents, snowflakes, or tiny Santa hats.
- Valentine’s Day: Pair red bows with hearts, glitter, or a romantic pink base.
- Beyond: Red bows can also work for other celebrations; just adjust your base color or accompanying designs.
This is your ultimate party manicure! It instantly puts you in a celebratory mood and adds a playful touch to any festive outfit. Get ready to spread some serious holiday cheer, one adorable bow at a time.
12. Gingham Bow Chic
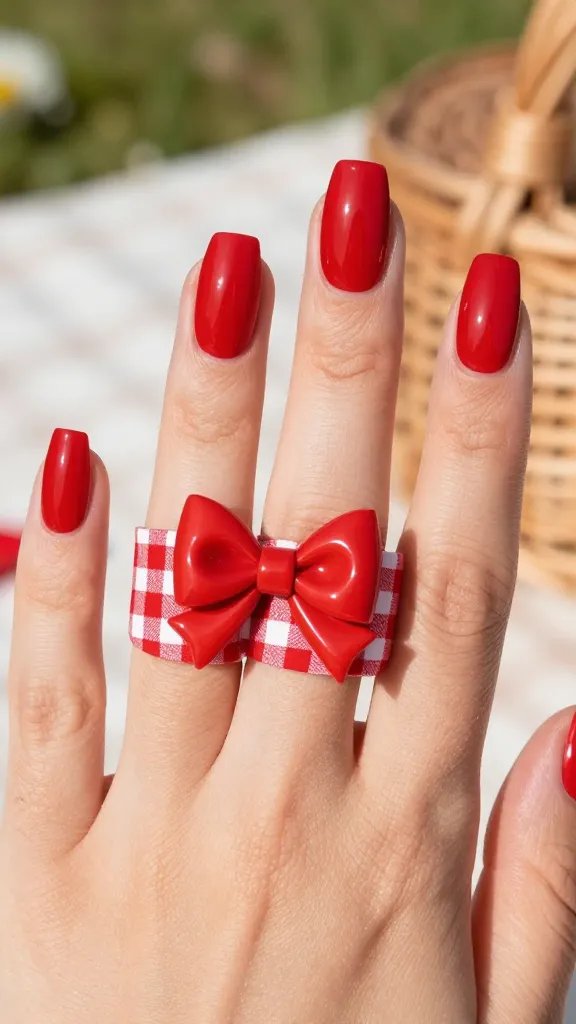
Embrace a touch of country charm with a sophisticated twist by pairing your red bows with a classic gingham pattern. This look is incredibly cute, a little bit retro, and oh-so-fashionable, bringing a picnic-ready vibe to your fingertips in the most stylish way possible.
Gingham Glam:
- Gingham Base: Paint a classic red and white (or red and nude) gingham pattern on one or two accent nails.
- The Bow: Place a solid red bow decal or hand-painted bow over the gingham pattern.
- Complementary Nails: Keep the rest of your nails a solid red or a neutral color to let the gingham and bow shine.
This design is perfect for spring and summer, adding a fresh, playful, and slightly vintage feel to your look. It’s unique, eye-catching, and shows off your impeccable taste for charming details. Seriously, it’s adorable!
13. Pearl and Bow Combo
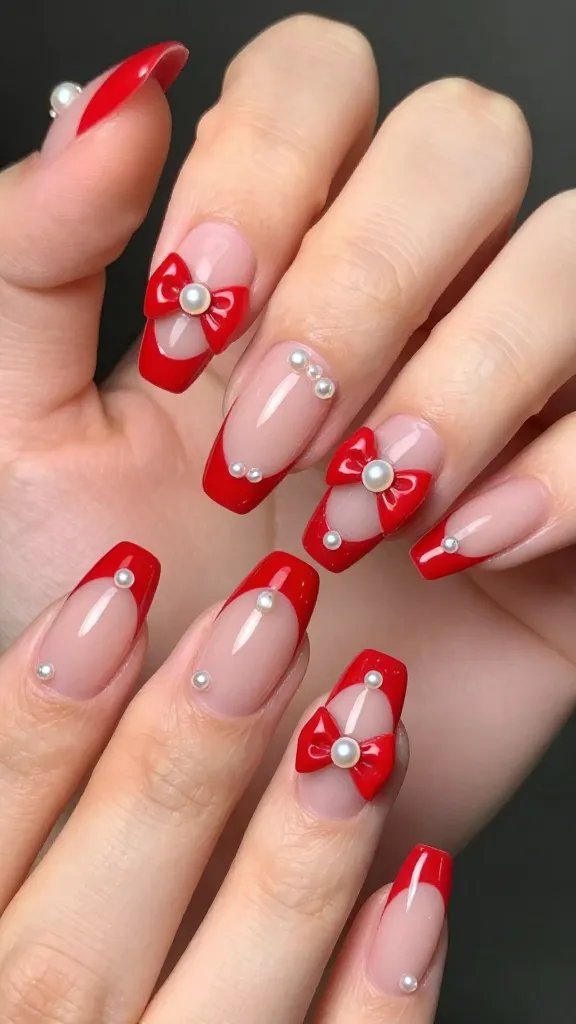
For an ultra-luxurious and elegant feel, combine the delicate charm of red bows with the timeless beauty of pearls. This pairing creates a sophisticated, almost regal manicure that’s perfect for when you want to feel like royalty. It’s classic glamour with a sweet twist.
Pearls of Wisdom:
- Tiny Pearls: Use small, flat-backed pearl embellishments, either real or faux.
- Placement: Place a pearl at the center of your red bow, or scatter a few around the bow for an opulent halo effect.
- Base Color: A soft pink, nude, or even a deep burgundy base will enhance the luxurious feel.
This manicure is ideal for weddings, anniversaries, or any occasion where you want to exude refined elegance. It’s incredibly feminine, chic, and adds a touch of old-world charm to your modern style. Prepare to feel utterly pampered!
14. Abstract Bow Art
Who needs perfect symmetry when you can have art? Abstract red bow nails take the essence of a bow – its loops, its knot, its color – and reinterprets it in a more fluid, artistic manner. Think brushstrokes, deconstructed shapes, and a modern, painterly feel. It’s cool, it’s contemporary, and it’s totally unique.
Artistic Angles:
- Deconstructed Bow: Instead of a full bow, paint just one loop, or a series of curved lines that suggest a bow.
- Brushstroke Effect: Use a slightly thicker brush to create a more painterly, less precise bow shape.
- Color Blending: Incorporate other colors that subtly blend into the red for an even more abstract look.
This design is for the free spirits and the art lovers. It’s a fantastic way to express your individuality and showcase a more modern, less traditional approach to nail art. You’ll definitely turn heads with this one!
15. Velvet Bow Texture
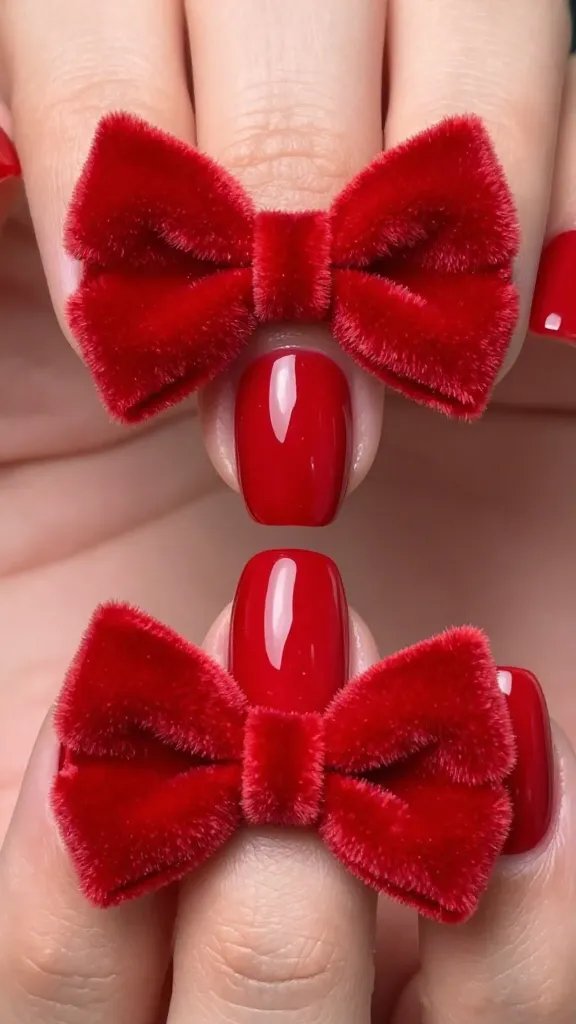
Imagine your nails feeling as soft and luxurious as velvet – that’s the magic of velvet bow nails! Using flocking powder or a specialized velvet top coat, you can create a tactile, fuzzy red bow that not only looks incredible but feels amazing too. It’s a sensory delight!
Velvet Vibe:
- Flocking Powder: After painting your red bow, sprinkle red flocking powder over the wet polish, then tap off the excess.
- Velvet Top Coat: Some brands offer a specific velvet or suede-effect top coat that can be applied over your red bow.
- Contrast: Pair a velvet bow with a glossy base for a striking textural contrast.
This unique design is perfect for cooler months, special events, or whenever you want to add an unexpected, luxurious touch to your manicure. It’s incredibly chic, wonderfully tactile, and will make your nails the star of the show. Seriously, you have to try it!
There you have it – 15 ways to rock red bow nails like the style icon you are! From classic elegance to edgy modern art, there’s a red bow look for every mood and occasion. So go ahead, pick your favorite (or two, or three!), grab your polish, and get ready to flaunt those fabulous fingers!